UDN
Search public documentation:
PhysXDestructibleReference
日本語訳
中国翻译
한국어
Interested in the Unreal Engine?
Visit the Unreal Technology site.
Looking for jobs and company info?
Check out the Epic games site.
Questions about support via UDN?
Contact the UDN Staff
中国翻译
한국어
Interested in the Unreal Engine?
Visit the Unreal Technology site.
Looking for jobs and company info?
Check out the Epic games site.
Questions about support via UDN?
Contact the UDN Staff
UE3 Home > PhysX? > PhysX Destructible Reference
PhysX Destructible Reference
Document Summary: Description of the PhysXDestructible class. Document Changelog: Created by Bryan Galdrikian.
Overview
The PhysXDestructible is a feature built on top of UE3's FracturedStaticMesh (FSM). As a starting point, it will be assumed that the reader is familiar with the FSM. See the Fracture Tool page to familiarize yourself with that feature.
When to use a PhysXDestructible instead of a FracturedStaticMesh
The FracturedStaticMeshActor is an efficient way to generate small levels of destruction within a UE3 level. However, if you wish to scale up the amount destruction, the FracturedStaticMeshActor will soon reach some limitations. For one thing, every piece (or conglomorate) that gets ejected is represented by an AActor. If hundreds of pieces are ejected, the AActor overhead can be quite large. The PhysXDestructibleActor is designed to operate within the regime of hundreds, or even thousands, of rigid body pieces. It handles this in two ways. First, it represents its pieces as bones in SkeletalMeshes. This greatly reduces the AActor overhead. Secondly, it fractures hierarchically. So large pieces that are unfractured remain represented as one rigid body, and one SkeletalMesh bone. In addition, PhysXDestructibles have some extra features that enhance the effect of destruction. You may assign a "crumble particle system," which is intended to be a PhysXParticleSystem (see PhysXParticleSystemReference). This will represent the finest level of fracturing. That is, when the smallest pieces are destroyed, their volume will be replaced by a set of PhysX fluid particles. If you use a mesh data type, this can give a convincing crumbling effect. You may also assign a crumble sound, as well as a more traditional particle effect (for smoke or dust, e.g.). PhysXDestructibleActors can be static or dynamic. If they are static, there are two ways to assign some parts of the Actor to be "support." When a contiguous path (via chunk pieces) is lost between a chunk and a support chunk, then the chunk will come loose. This feature is available through the FracturedStaticMeshActor, but the PhysXDestructibleActor has an additional feature that allows them to create a support structure between touching actors. That is, islands of touching PhysXDestructibleActors will form one support structure. You may use this, for example, to create a tall column out of several PhysXDestructibleActors. If you shoot through the middle of the column, the actors on top will automatically come loose. Finally, the PhysXDestructibleActor supports impact damage. By supplying an impact-to-damage scale, fracturing will occur when the PhysXDestructibleActor is hit (or hits) hard enough. Note: Impact damage currently contains a bug which prevents it from working in all cases. This will be addressed as soon as possible. By starting out life as a FracturedStaticMesh (in its unbroken state), a PhysXDestructible gets the benefit of more efficient static rendering until it is broken.
Guidelines for creating a suitable FracturedStaticMesh
Summary: choose a small number of pieces (roughly 5 to 20) to fragment your static mesh with the FractureTool. In more detail... the FractureTool can fracture a StaticMesh into a moderately large number of pieces. Currently the tool allows up to 150 pieces. However, we recommend keeping this count small (perhaps a dozen, maybe even fewer for a small object). The reason is that each fragment of the FracturedStaticMesh will become one AActor. After that, however, no more AActors are created. Each of these AActors (PhysXDestructibleParts) is represented by one or more SkeletalMeshes. It is possible to "fragment" your StaticMesh into one piece! If you do this, the FracturedStaticMesh, and will be replaced entirely by SkeletalMesh(es) when any damage is taken. But the idea behind starting with the FracturedStaticMesh is to keep as much of the undamaged mesh static for as long as possible, to take advantage of the more efficient rendering that offers. So, we do not recommend fragmenting into too small a number of pieces (like 1). Note: Currently this optimization is not in place. As soon as a PhysXDestructible is fractured, all fragments become separate SkeletalMeshes. We plan to implement the static optimization soon. But we recommend you follow the above guidelines, and a later code drop implementing this optimization should give your levels better fracturing performance.
How to Create a PhysXDestructible
Materials
Even though we start off with a StaticMesh, we will end up with SkeletalMeshes. It is therefore very important that you select bUsedWithSkeletalMesh in the material editor for any material used with a PhysXDestructible.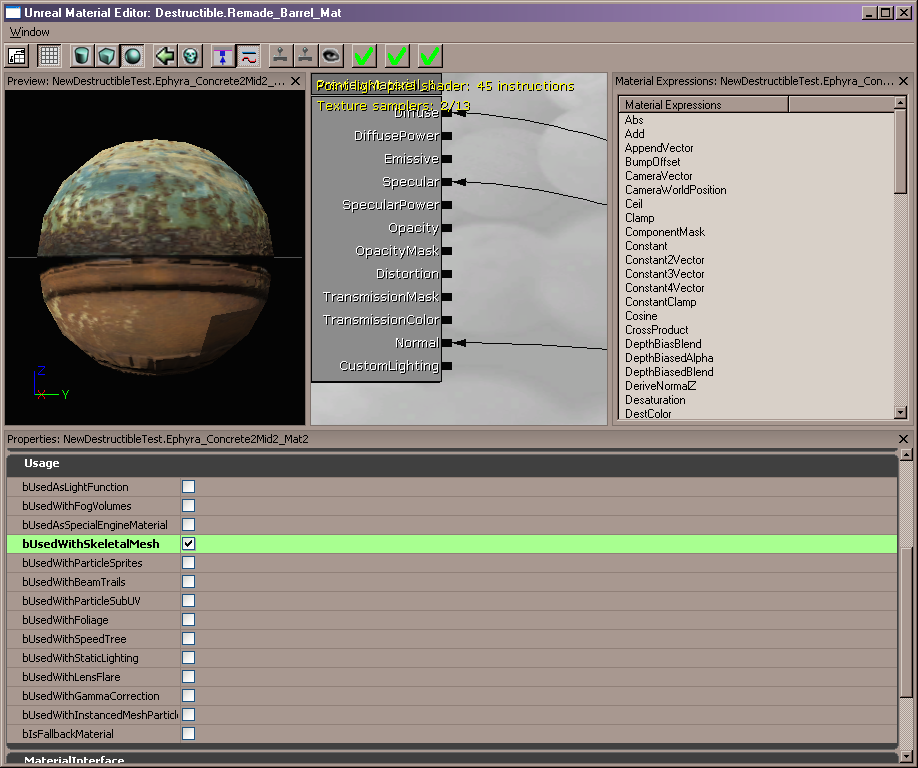 This will not make a difference when you run the level in Play-In-Editor, but in-game the material will not be applied if this checkbox is not selected.
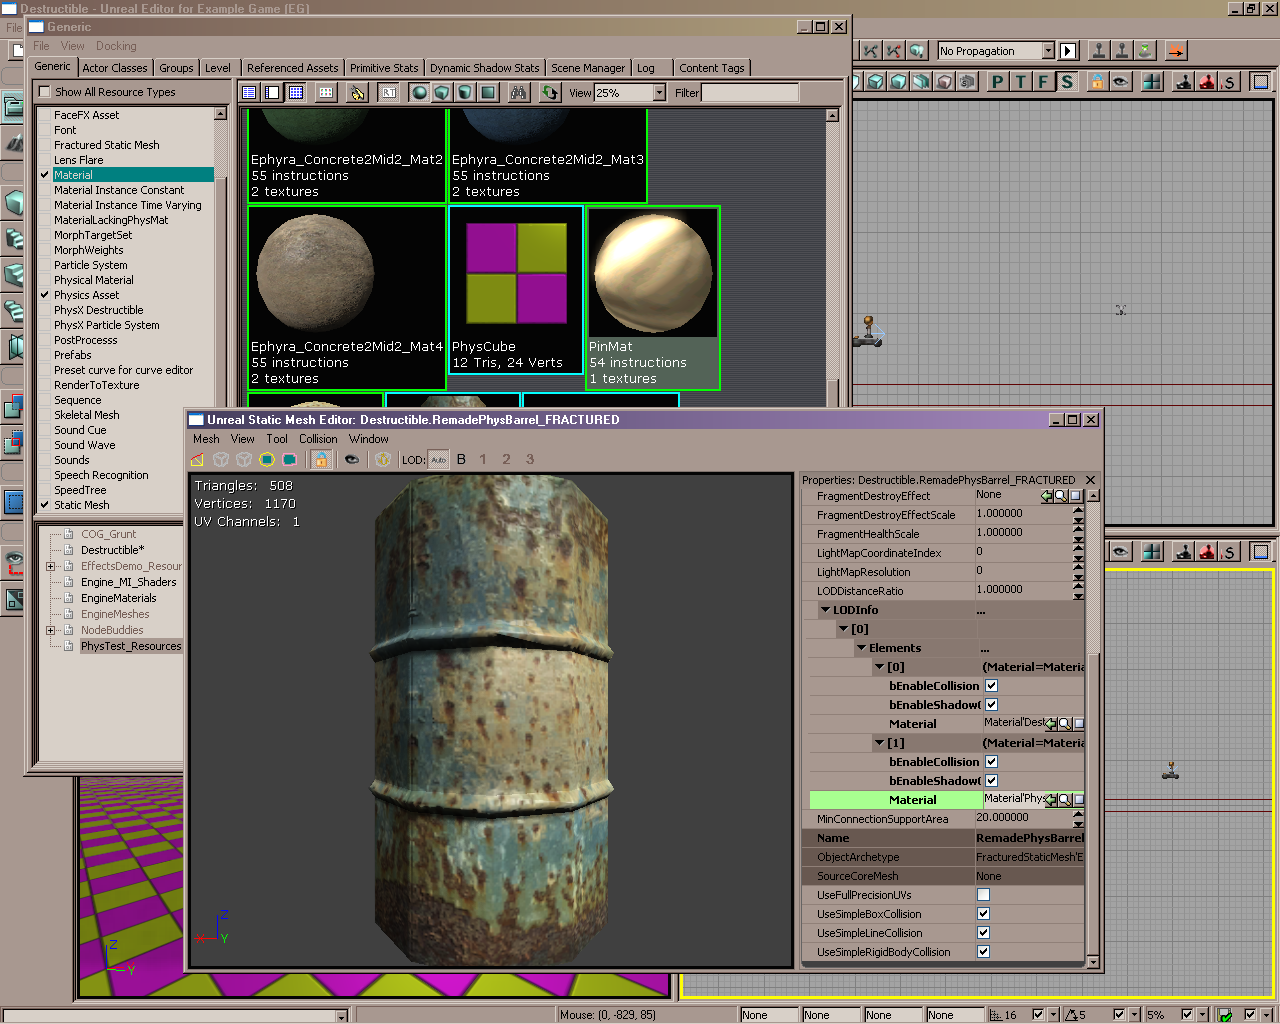
When fragmenting a static mesh, you must select the material that will be applied to the newly-created interior faces. This same material will be applied to all of the interior faces created by the hierarchical splitting used to generate the PhysXDestructible. Here we have chosen a fractured barrel mesh (below). The interior material is always in the last element of the FracturedStaticMesh.
Open up the FracturedStaticMesh by double-clicking on it in the generic browser. Then select the interior material in the generic browser (we have selected 'PinMat'). Back in the StaticMesh editor, open up LODInfo[0]->Elements[last index] and click on the green arrow by the 'Material' field to fill that field with the selected material.
This will not make a difference when you run the level in Play-In-Editor, but in-game the material will not be applied if this checkbox is not selected.
When fragmenting a static mesh, you must select the material that will be applied to the newly-created interior faces. This same material will be applied to all of the interior faces created by the hierarchical splitting used to generate the PhysXDestructible. Here we have chosen a fractured barrel mesh (below). The interior material is always in the last element of the FracturedStaticMesh.
Open up the FracturedStaticMesh by double-clicking on it in the generic browser. Then select the interior material in the generic browser (we have selected 'PinMat'). Back in the StaticMesh editor, open up LODInfo[0]->Elements[last index] and click on the green arrow by the 'Material' field to fill that field with the selected material.
Slicing the Mesh
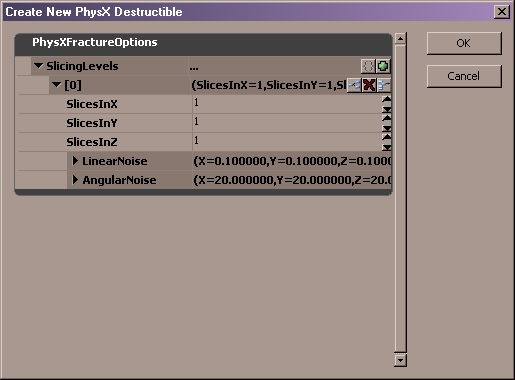
Right-click on the FracturedStaticMesh in the generic browser, and select 'Create New PhysX Destructible'.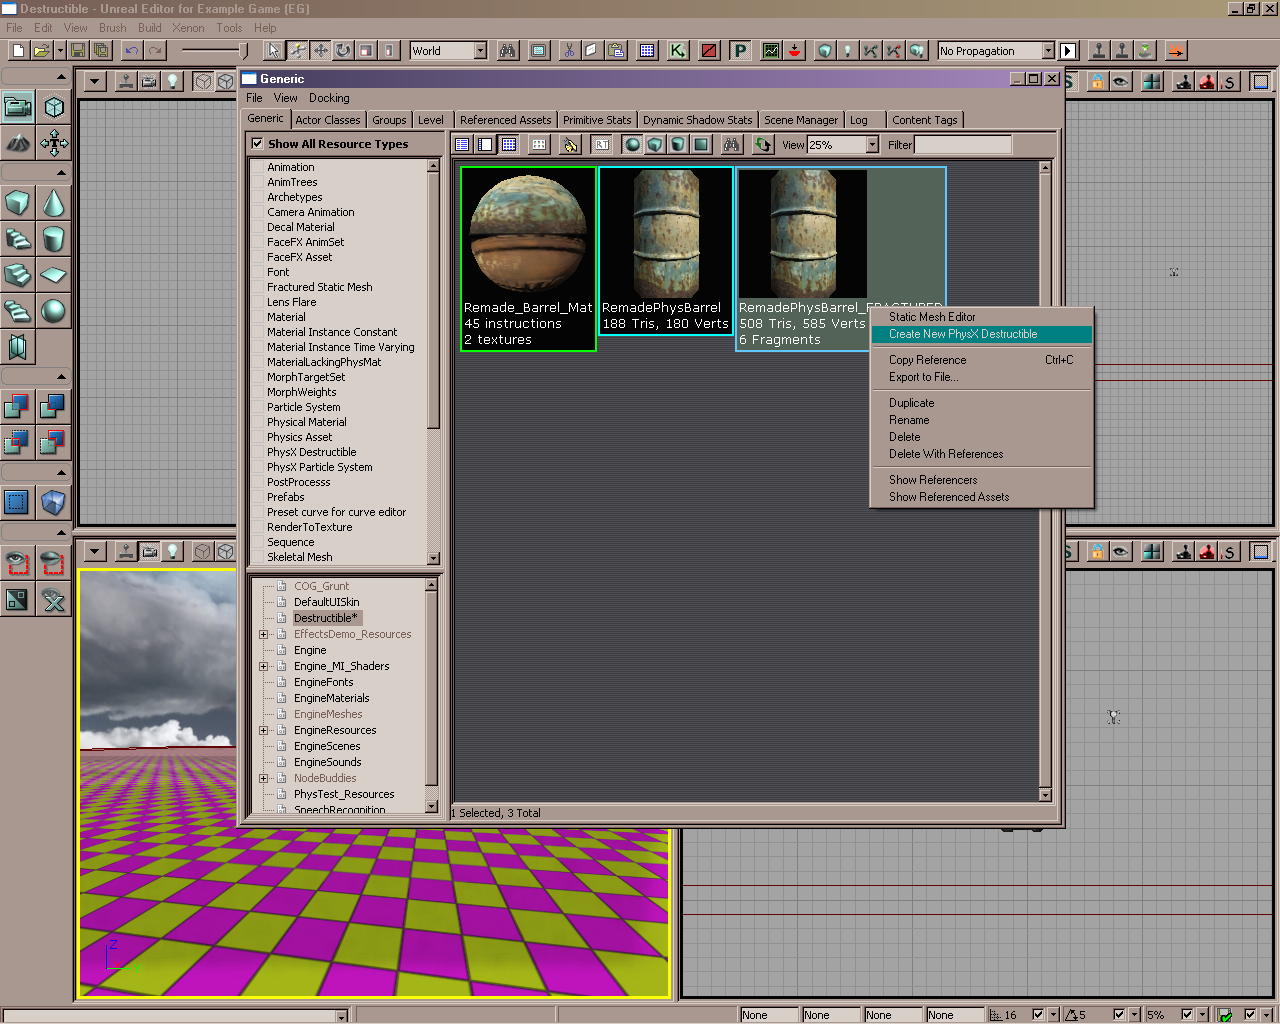 After selecting the destination package and name for the new asset, a dialog will appear with PhysXFractureOptions. This is an array of "SlicingLevels." By default there is one level, but you may add more by clicking on the green '+' button next to the SlicingLevels array name. The number of generated pieces will increase geometrically with each new level, so beware You may erase the array with the '{}' button and start again if you wish.
For each level, you may select the number of slices in X, Y and Z, and linear and angular noise. The number of slicing planes along each axis may be any non-negative number. If 0 is selected, no slicing will occur along that axis for that level of the hierarchy. With no noise, the slicing planes would have their normals facing exactly along their axes, and they would evenly divide the mesh's bounding box. AngularNoise describes how far the plane normal may deviate from the slicing axis. (A random normal is chosen within that range.) LinearNoise describes how far the plane may be randomly shifted on the slicing axis. The scale is set so that each slicing plane gets 1/N of the bounding box as its "domain" (where N = the number of slices along the axis). A linear shift of 1 would push the plane right up to the next plane's domain.
The default is 1 slice along each axis. This will generate up to 2x2x2 = 8 new pieces from each original piece. It is "up to" since a piece may not be generated if the resulting slice does not intersect mesh geometry. Also, if a slice will produce a volume that is relatively very small, it will not be made.
Starting with the number of FracturedStaticMesh fragments, the default slicing will therefore generate up to 8 times as many pieces (chunks) in the next level of the splitting hierarchy. If you add another slicing level, you will multiply that number again. It is easy to generate chunk counts in the hundreds, thousands, or even more. If the number exceeds 1,000 you will recieve a warning with an estimate of the number of pieces that will be generated.
A note about slice counts (Slices in X, Y and Z) vs. number of slicing levels. It is usually best to use another slicing level to generate more pieces, rather than increase the number of slices along each axis. This is so the fracturing remains as hierarchical as possible, possibly reducing the number of generated rigid bodies. A good use of the slice counts is to divide an oddly-shaped mesh up in such a way that the pieces are more regularly sized (closer to cubic). This might be done on the first level of splitting, and then you can just use 1x1x1 splitting on the next level(s). An extreme case would be a long, thin object like a broom handle. You might use 0 slicing planes along X and Y, and a large number (perhaps even dozens) along Z (assuming the handle is aligned locally with the Z-axis).
After selecting the destination package and name for the new asset, a dialog will appear with PhysXFractureOptions. This is an array of "SlicingLevels." By default there is one level, but you may add more by clicking on the green '+' button next to the SlicingLevels array name. The number of generated pieces will increase geometrically with each new level, so beware You may erase the array with the '{}' button and start again if you wish.
For each level, you may select the number of slices in X, Y and Z, and linear and angular noise. The number of slicing planes along each axis may be any non-negative number. If 0 is selected, no slicing will occur along that axis for that level of the hierarchy. With no noise, the slicing planes would have their normals facing exactly along their axes, and they would evenly divide the mesh's bounding box. AngularNoise describes how far the plane normal may deviate from the slicing axis. (A random normal is chosen within that range.) LinearNoise describes how far the plane may be randomly shifted on the slicing axis. The scale is set so that each slicing plane gets 1/N of the bounding box as its "domain" (where N = the number of slices along the axis). A linear shift of 1 would push the plane right up to the next plane's domain.
The default is 1 slice along each axis. This will generate up to 2x2x2 = 8 new pieces from each original piece. It is "up to" since a piece may not be generated if the resulting slice does not intersect mesh geometry. Also, if a slice will produce a volume that is relatively very small, it will not be made.
Starting with the number of FracturedStaticMesh fragments, the default slicing will therefore generate up to 8 times as many pieces (chunks) in the next level of the splitting hierarchy. If you add another slicing level, you will multiply that number again. It is easy to generate chunk counts in the hundreds, thousands, or even more. If the number exceeds 1,000 you will recieve a warning with an estimate of the number of pieces that will be generated.
A note about slice counts (Slices in X, Y and Z) vs. number of slicing levels. It is usually best to use another slicing level to generate more pieces, rather than increase the number of slices along each axis. This is so the fracturing remains as hierarchical as possible, possibly reducing the number of generated rigid bodies. A good use of the slice counts is to divide an oddly-shaped mesh up in such a way that the pieces are more regularly sized (closer to cubic). This might be done on the first level of splitting, and then you can just use 1x1x1 splitting on the next level(s). An extreme case would be a long, thin object like a broom handle. You might use 0 slicing planes along X and Y, and a large number (perhaps even dozens) along Z (assuming the handle is aligned locally with the Z-axis).
 After selecting your slicing planes, hit "OK" and the slicing will start. This may take a while At least one SkeletalMesh will be generated for each FracturedStaticMesh fragment. (Each SkeletalMesh will be used to hold up to 250 chunks. If the slicing produces more chunks than that, then more SkeletalMeshes will be used.)
When done, you will see a lot of new PhysicsAssets and SkeletalMeshes in the generic browser. You may ignore those. It is the newly created PhysXDestructible that you use to create an actor in the level.
After selecting your slicing planes, hit "OK" and the slicing will start. This may take a while At least one SkeletalMesh will be generated for each FracturedStaticMesh fragment. (Each SkeletalMesh will be used to hold up to 250 chunks. If the slicing produces more chunks than that, then more SkeletalMeshes will be used.)
When done, you will see a lot of new PhysicsAssets and SkeletalMeshes in the generic browser. You may ignore those. It is the newly created PhysXDestructible that you use to create an actor in the level.
Destructible Parameters
There are a number of "destructible parameters" that may be stored with the PhysXDestructible. When you instantiate an actor from a PhysXDestructible, these parameters will be copied into the actor (PhysXDestructibleActor), and they may be modified per-instance within the actor. To modify them in the PhysXDestructible "template," double-click on the PhysXDestructible in the generic browser. A window will pop up with two items at the top level: CookingScales, and DestructibleParameters. We will discuss CookingScales later. For now, let's concentrate on the destructible parameters. Select the PhysXDestructible in the generic browser, and right-click in a level editing window in the place you wish to create a new PhysXDestructibleActor.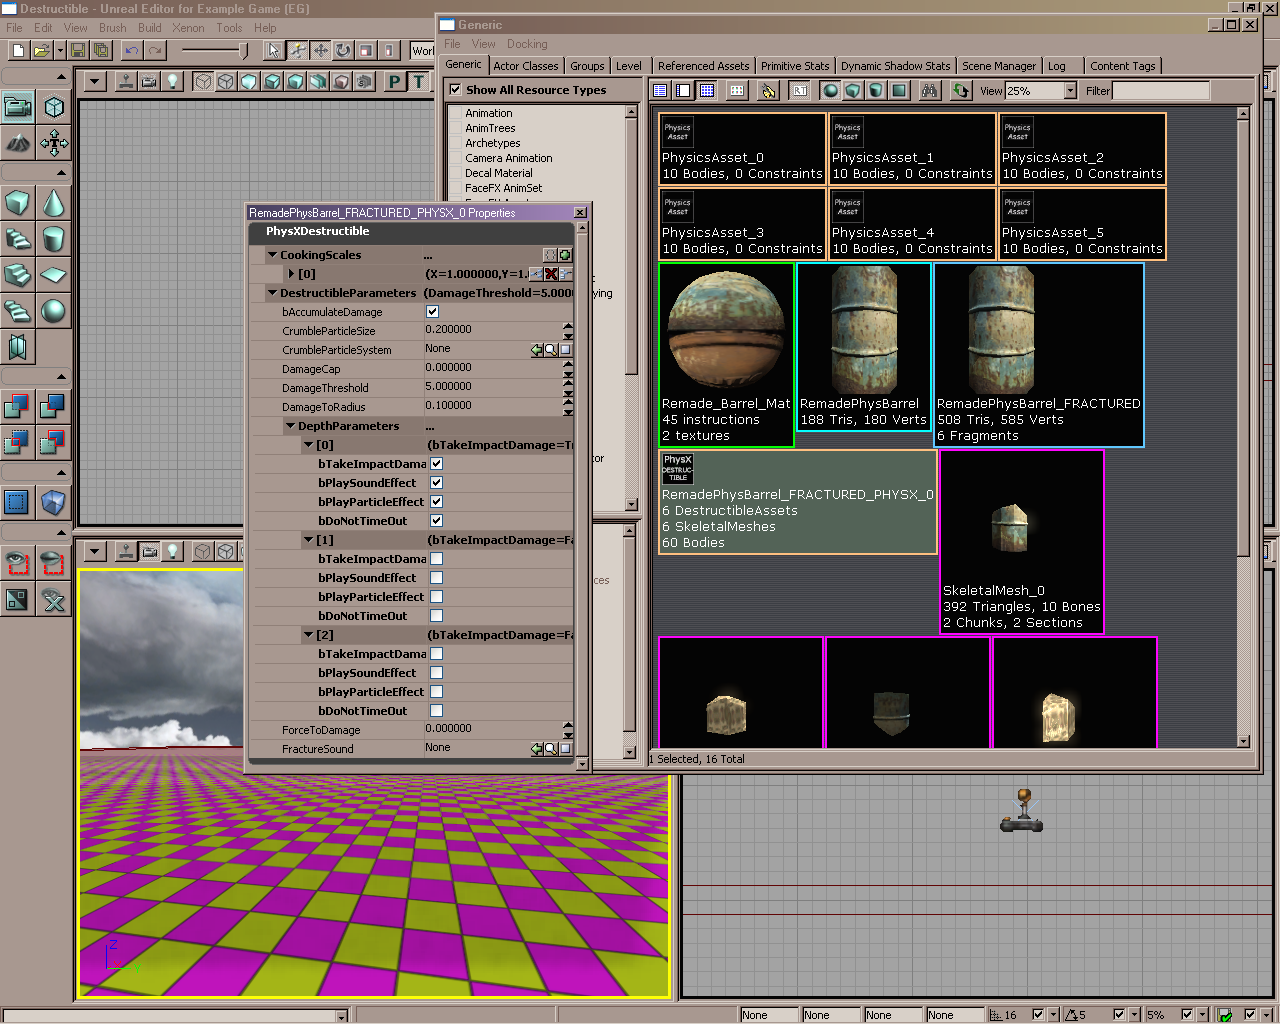 DamageThreshold - this is the amount of damage a chunk needs to take in order to break free.
bAccumulateDamage - when checked, damage applied to chunks will accumulate. When the damage exceeds a damage threshold, the chunk will break free. When unchecked, damage is not accumulated, and a single application of damage must exceed the threshold in order to break the chunk free.
DamageCap - applied damage will be limited to this amount. If set to 0 (default) there is no limit to the applied damage.
DamageToRadius - this translates damage to a distance within the destructible. If the damage type applies 'bFullDamage' then all chunks within this radius will have this amount applied. Otherwise, damage falls off linearly from the full damage (at the damage origin) to 0 (at the damage radius). Some notes about damage:
- After a chunk takes damage, the DamageThreshold is subtracted from the damage and the remainder is applied to all of the chunk's "children" in the fracture hierarchy. At each level of the hierarchy, DamageThreshold is the amount needed to break a chunk loose. When linear falloff is used in the damage type, the effect is that the mesh breaks into finer pieces near the damage origin, and tends to break into large pieces farther away.
- The actual translation from damage to radius goes as follows: damage is divided by DamageThreshold, then the result is multiplied by DamageToRadius, and finally multiplied by the size of the object (the mean width of the object's bounding box). This scales both damage and size, so that both DamageThreshold and mesh scale may be varied, but the damage propagation remains unchanged.
ForceToDamage - Impact force is translated into damage by this factor. In order for this to work, bNotifyRigidBodyCollision must be checked in the Actor's CollisionComponent.
CrumbleParticleSystem - This is intended to be a particle system containing PhysX emitters. (See PhysXParticleSystemReference.) You may use a PhysX Mesh Emitter to emulate crumbling. When a chunk at the lowest (smallest) level of the hierachy takes DamageThreshold in damage, it is destroyed. If you have selected a CrumbleParticleSystem then the volume of that chunk will be replaced by a group of mesh "fluid" particles. These can collide with geometry and emulate many small bodies.
CrumbleParticleSize - When using a CrumbleParticleSystem (see above), the chunk destroyed is filled with particles spaced at this distance.
FractureSound - A SoundCue that may be played when a chunk is broken free (or crumbles).
DepthParameters - This is an array of parameter sets, one set for each level of the chunk hierarchy. This array cannot be resized; it is set in size by the number of levels in the chunk hierarchy. Set [0] gives parameters for the PhysXDestructibleActor. Set [1] gives parameters for the top-level chunks (each single chunk representing a FracturedStaticMesh fragment). If you used one level of slicing, there will be a set [2], which applies to the next-finer level of chunks. If you used two levels of slicing, there will be a set [3], etc. At each level, the paramaters are:
- bTakeImpactDamage - if ForceToDamage > 0, impact force will apply damage at this level.
- bPlaySoundEffect - if FractureSound is set, then it will be played when chunks at this level break free (or crumble).
- bPlayParticleEffect - chunks broken at this level will play the FragmentDestroyEffect set in the FracturedStaticMesh. (This is set in the FSM in the StaticMesh editor, see the Fracture Tool page.)
- bDoNotTimeOut - if set, chunks at this level will remain indefinitely, as long as the config. variable MaxDynamicChunkCount is not exceeded (see LOD Scaling, below). If this is not set, then after the time given by the config. variable DebrisLifetime (again, see LOD Scaling), this chunk will be destroyed.
LOD Scaling
There are two global LOD parameters for the PhysXDestructible. These are both in [Engine.PhysXLODVerticalDestructible] in BaseEngine.ini, and all derived .ini files. They are: MaxDynamicChunkCount - This sets the maximum number of loose chunks, and therefore rigid bodies, for PhysXDestructibles. This count is the total for all PhysXDestructibles in the level. The chunks are kept in a FIFO, so the oldest ones are destroyed in order to maintain the MaxDynamicChunkCount limit.DebrisLifetime - This sets how long "debris" chunks are kept around. In this case "debris" simply means the bDoNotTimeOut field (see Destructible Parameters, above) is not checked. If a chunk is removed due to the max. chunk count limit being exceeded, or the timeout is exceeded, then it will crumble completely using the CrumbleParticleSystem. If no CrumbleParticleSystem is set, the chunk will simply disappear.
Creating a PhysXDestructibleActor
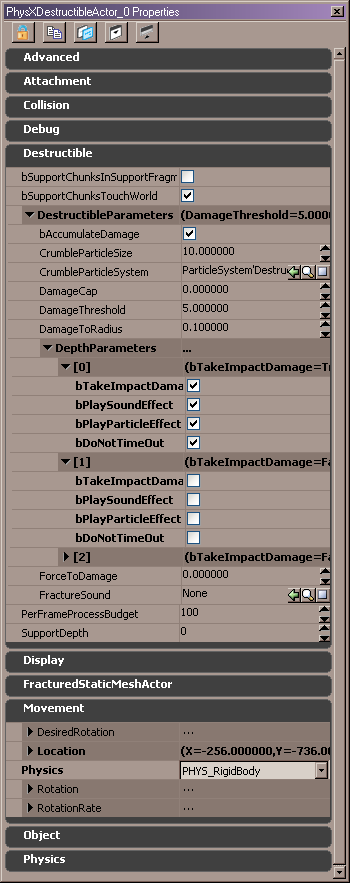
To create a PhysXDestructibleActor, simply select a PhysXDestructible in the generic browser, and right-click in the level editor in the location where you wish to place the actor. Then select 'Add PhysXDestructibleActor...' (see below).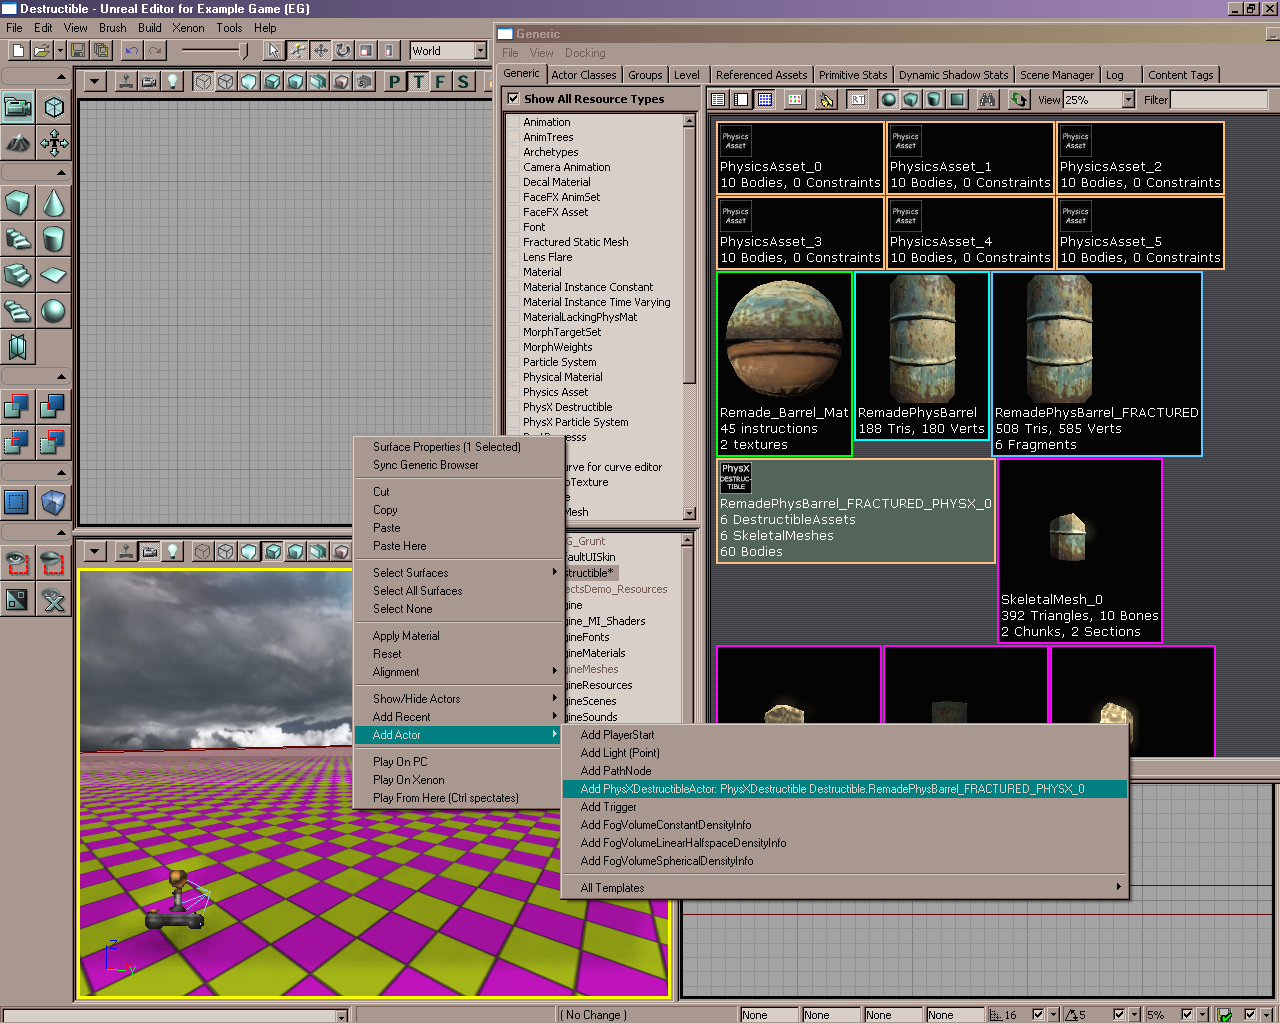 Once placed in the level, you may modify the instance's DestructibleParameters, scale the actor, or make it dynamic. There are also some parameters that affect destructible "support." See the section on Support below.
Opening the PhysXDestructibleActor properties,
Once placed in the level, you may modify the instance's DestructibleParameters, scale the actor, or make it dynamic. There are also some parameters that affect destructible "support." See the section on Support below.
Opening the PhysXDestructibleActor properties,
 there are a few things to point out.
- The DestructibleParameters are copied from the PhysXDestructible, and may be modified for this actor instance.
- You may make the PhysXDestructibleActor dynamic by changin its Physics to PHYS_RigidBody.
- If the PhysXDestructibleActor is not dynamic, then it may be part of a support island. This will be described in detail in the Support section below. Here we will describe the four support fields:
- SupportDepth - support calculations are done at this depth in the hierarchy. Depth = 0 (default) means that support calculations are done at the FracturedStaticMesh fragment depth, i.e. the largest pieces.
- PerFrameProcessBudget - how many iterations (steps through the support graph) will be allowed to perform support calculations, per frame. This is usually not an issue, unless a support island is very large. If the process budget is exceeded, unprocessed chunks will break loose automatically.
- bSupportChunksInSupportFragment - if this is checked, then a chunk at SupportDepth is considered a "support chunk" only if it a child of a FracturedStaticMesh support chunk. (Set in the FractureTool.)
- bSupportChunksTouchWorld - if this is checked, then a chunk at SupportDepth is considered a "support chunk" only if it touches world geometry.
Creating a Crumble Particle System
Crumble particle systems use PhysX Emitters, and usually mesh emitters to emulate crumbling. Since the crumbling is done via "volume filling," many hundreds, sometimes thousands, of fluid particles may be generated. It is advised in this case to use instanced mesh rendering for the particles. To enable this, open up the material that will be applied to the particle and check bUsedWithInstancedMeshParticles: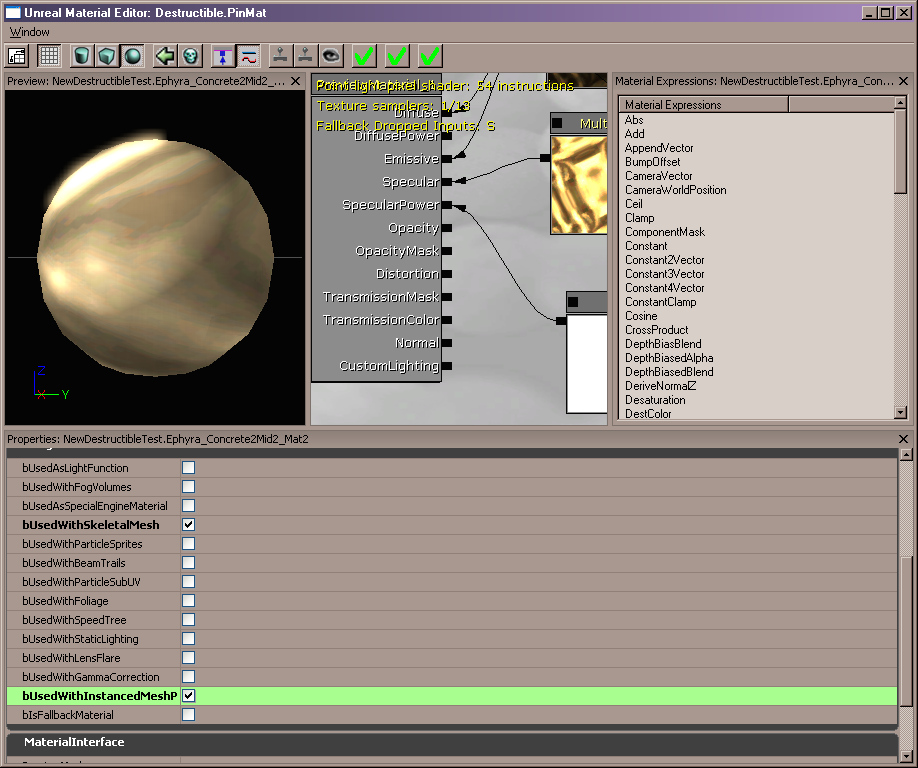 Create a PhysX mesh emitter using this material applied to the mesh particles. See PhysXParticleSystemReference.
Then, open up the DestructibleParameters for either a PhysXDestructible "template" or a PhysXDestructibleActor instance. Select the particle system in the generic browser, and click on the green arrow next to the CrumbleParticleSystem field to fill it in.
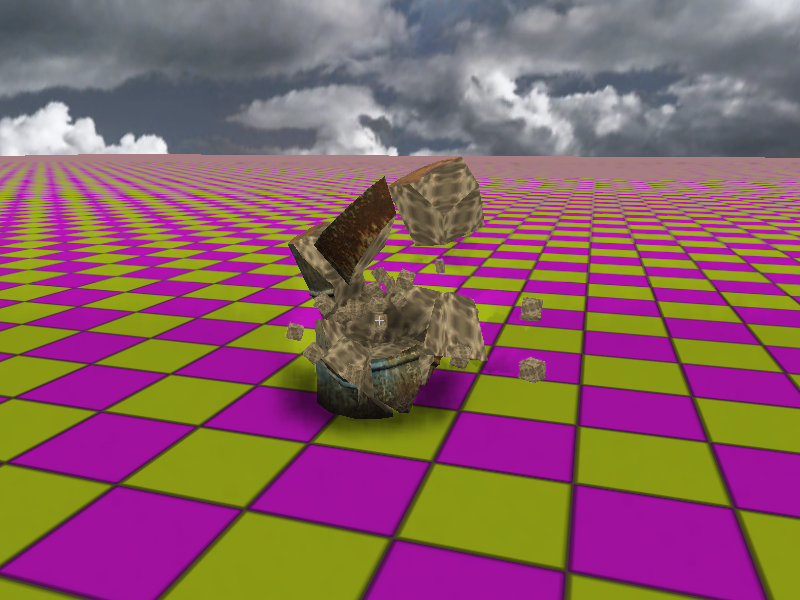
As an exmaple of what we've done so far, if we run the level with the destructible barrel we've created, and left-click on it to apply damage, something like this will occur:
Create a PhysX mesh emitter using this material applied to the mesh particles. See PhysXParticleSystemReference.
Then, open up the DestructibleParameters for either a PhysXDestructible "template" or a PhysXDestructibleActor instance. Select the particle system in the generic browser, and click on the green arrow next to the CrumbleParticleSystem field to fill it in.
As an exmaple of what we've done so far, if we run the level with the destructible barrel we've created, and left-click on it to apply damage, something like this will occur:
Support
A static PhysXDestructibleActor may have "support chunks," as described above. The support is calculated as follows: if a chunk touches a support chunk, it is supported. If a chunk touches a supported chunk, it is supported. In this way a whole actor may start out supported, but if it is sufficiently broken (so that a chunk no longer is in contact with a supported chunk) then parts of it may become unsupported. When chunks become unsupported they become dynamic. In addition, the support structure may extend between two or more PhysXDestructibleActors that touch in a level. Every island of touching PhysXDestructibleActors forms a support structure. In this way you may connect or "tile" static destructibles so that they behave like one large destructible actor. Dynamic destructibles do not take part in support calculations. They are not part of support islands. As an example, we will create a destructible wall piece. EffectsDemo_Resources.Ephyra_lpwallow3 makes a good wall piece, but it is too small. This will therefore serve as an example of scaling.Scaling and Cooking
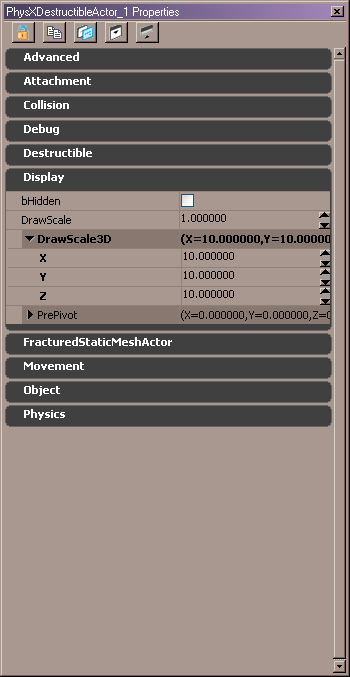
Continuing with our wall example, we go through the steps above to create a PhysXDestructible out of EffectsDemo_Resources.Ephyra_lpwallow3. We'll use the FractureTool to break it into 12 fragments, then slice using a second level of slicing to get lots of pieces. We will need to scale it in order for it to be useful. Therefore, the collision models for the chunks will also need to be scaled. We will want those (convex) collision models to be precooked in the level, so we need to specify the scale at which we'd like them to be cooked. Double-clicking on the PhysXDestructible, add to the CookingScales array by clicking on the green '+' button next to CookingScales. Then add the scale you wish to cook, in this case we'll choose (10,10,10), or a 10x uniform scale. Note, if we're not going to use unscaled instances, we should remove the (1,1,1) scale to save room in the level file.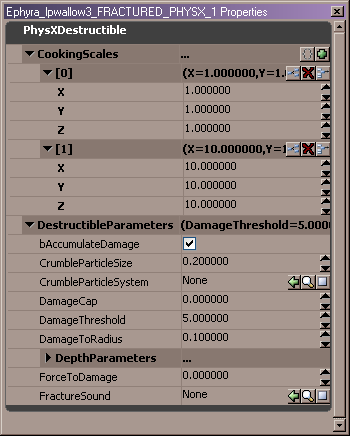 We may now select the PhysXDestructible in the generic browser and create a PhysXDestructibleActor in the level, as described above. Once in the level, open the actor property sheet and change the DrawScale3D to (10,10,10):
 ... and your scaled destructible is ready to use.
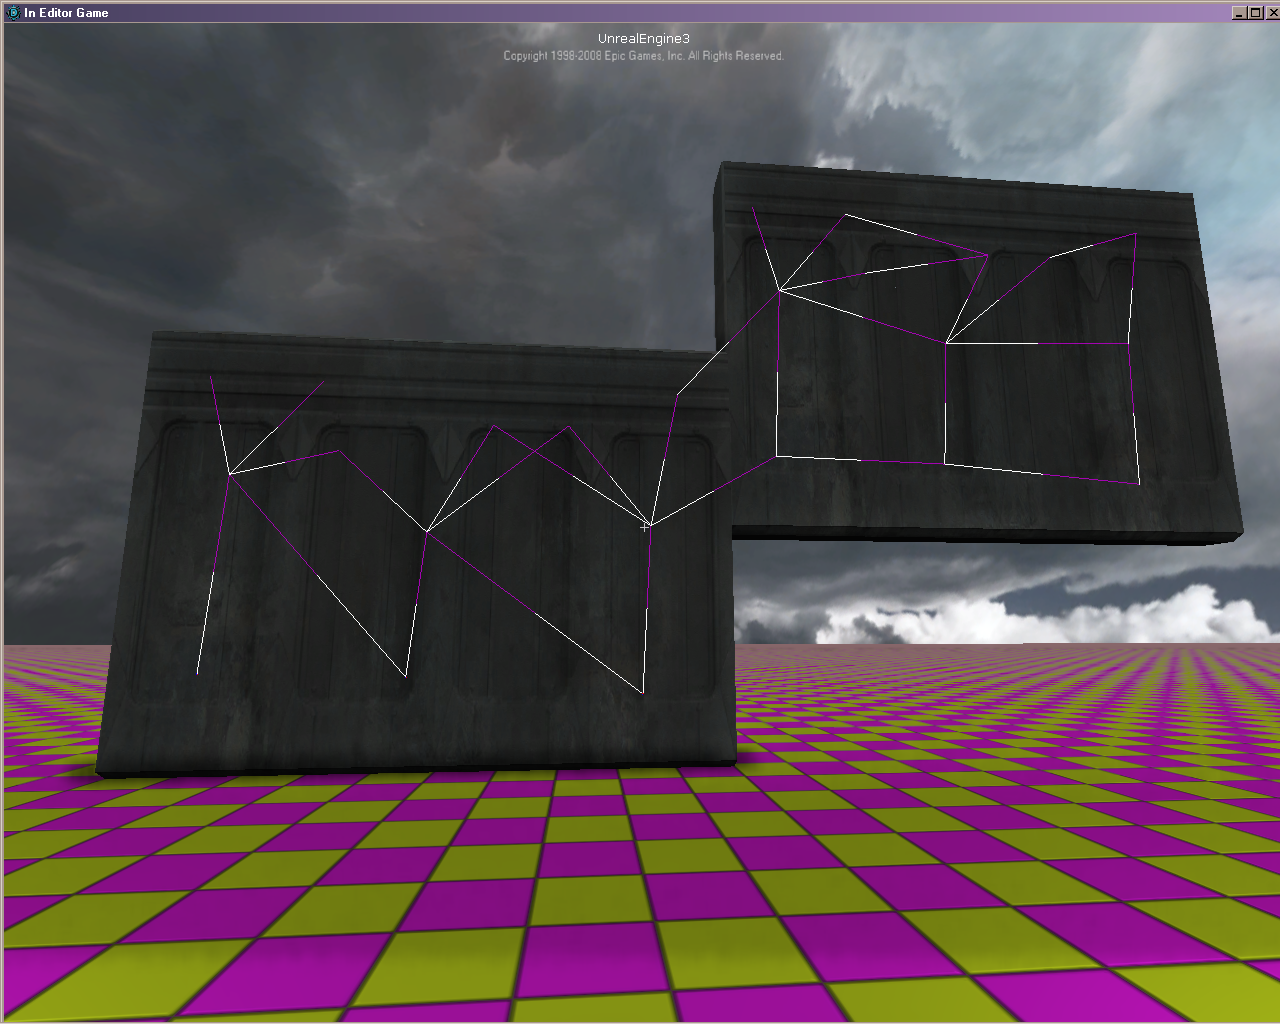
Support Example
To complete this support example using the wall piece, run the level and type APEXVIS SUPPORT in the console. If your destructible actor is supported, a support graph will be drawn: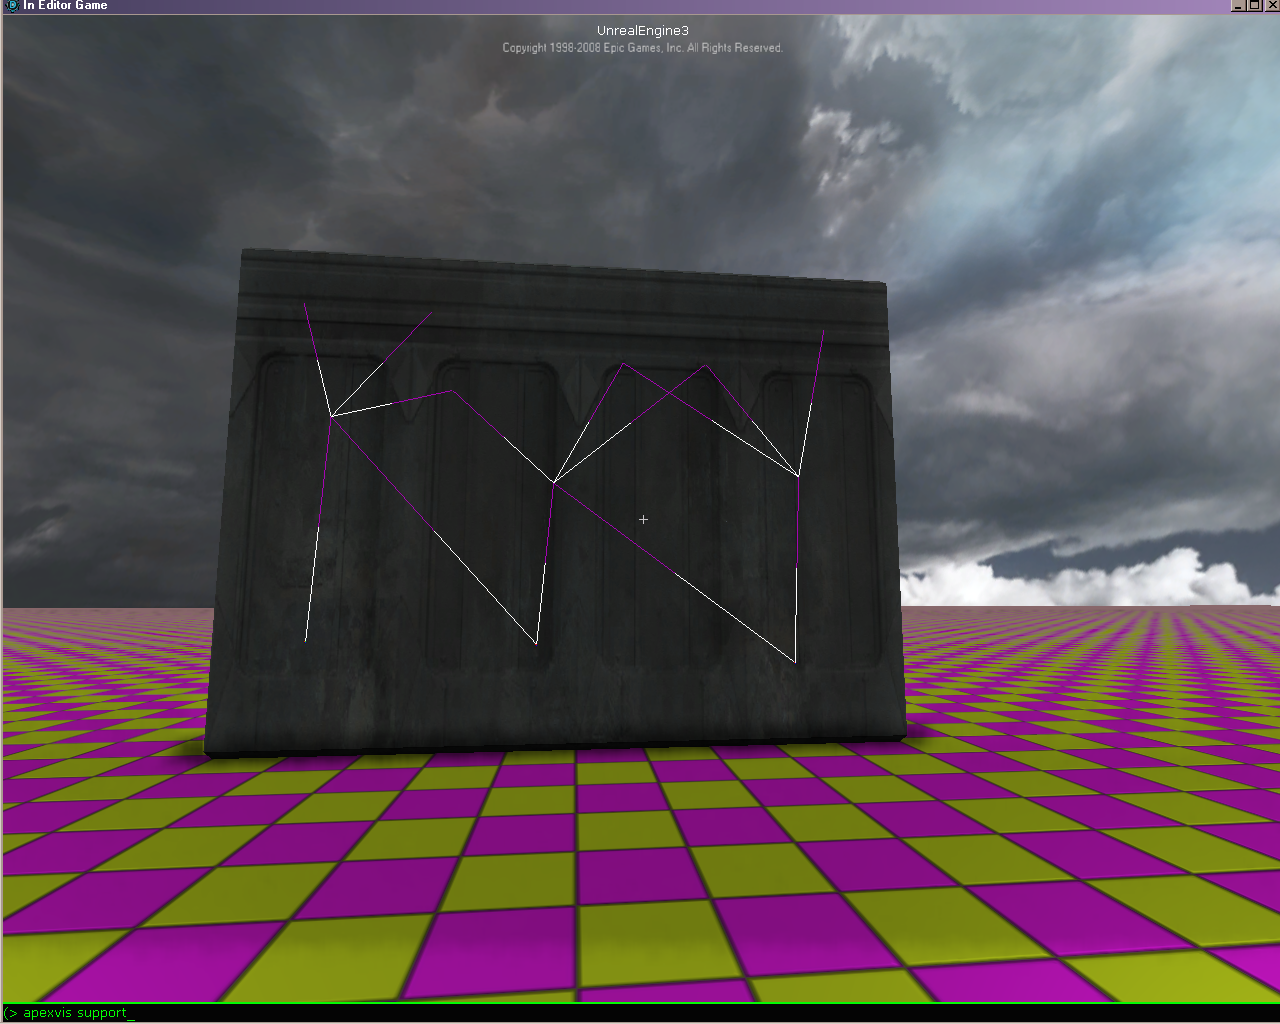 Here the wall is touching the ground, so the bottommost chunks are support chunks. (Since bSupportChunksTouchWorld was set by default.) If we copy the wall in the editor, and move it over so it butts up against the original, then the support graph extends to the second wall:
 Notice that the second wall would not be supported by itself, since it does not touch world geometry. (And in this case it is by default set so that bSupportChunksInSupportFragment is false.) But, since it touches a supported PhysXDestructibleActor, it gains its support. The two form a support island.
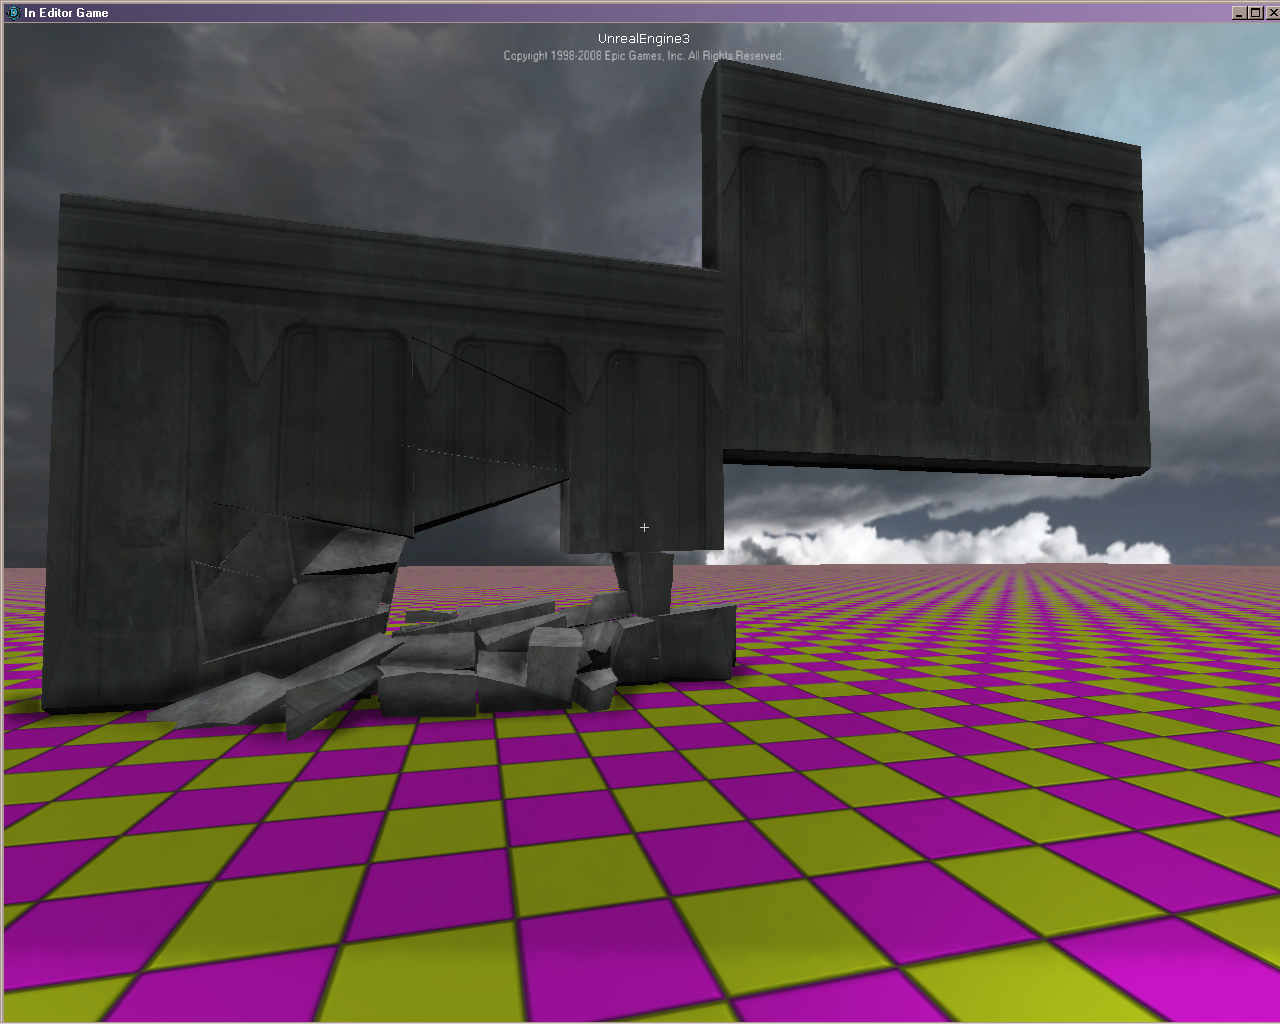
We can shoot away at the lower wall,
Notice that the second wall would not be supported by itself, since it does not touch world geometry. (And in this case it is by default set so that bSupportChunksInSupportFragment is false.) But, since it touches a supported PhysXDestructibleActor, it gains its support. The two form a support island.
We can shoot away at the lower wall,
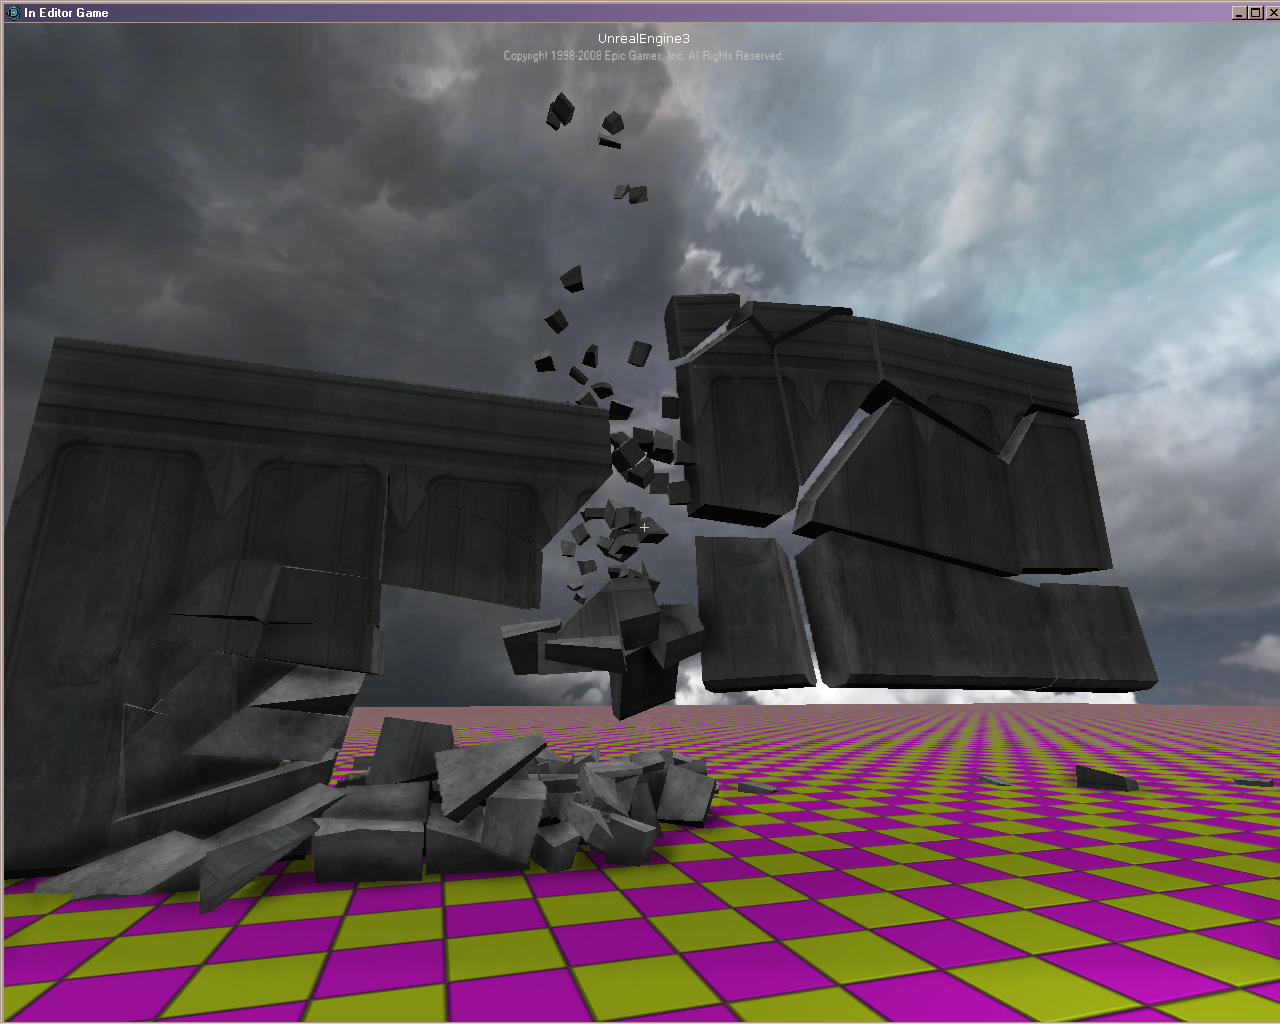
 ... until support is broken between it and the upper wall:
Known Issues
- Impact damage does not always work. This is either due to an integration bug or a bug in the PhysX SDK.
- The FracturedStaticMesh is remvoved upon first damage, and replaced by SkeletalMeshes. A more efficient approach is planned where the framgents will be made invisible and replaced by SkeletalMeshes only as needed, thereby keeping as much represented by a static mesh as possible.
- If a mesh is sliced down too finely, some strange errors can occur that cause small shards to appear "floating" in mid-air.
- Changes to FracturedStaticMeshes and PhysXDestructibles are not propagated to the PhysXDestructibleActor instances in the level.
- Destructible1.wmv: Destructible1.wmv
