Choose your operating system:
Windows
macOS
Linux
Choose your implementation method:
C++
In this tutorial you will be adding a Camera Component to a CharacterBlueprint class.
Cameras provide a perspective through which to view a level and can be attached to any Actor in the level including playable characters and non-playable Actors.
This tutorial will be covering how to add a Camera Component to a Character Blueprint class and set up a toggle between two different camera perspectives for the character.
Creating a Character Blueprint
-
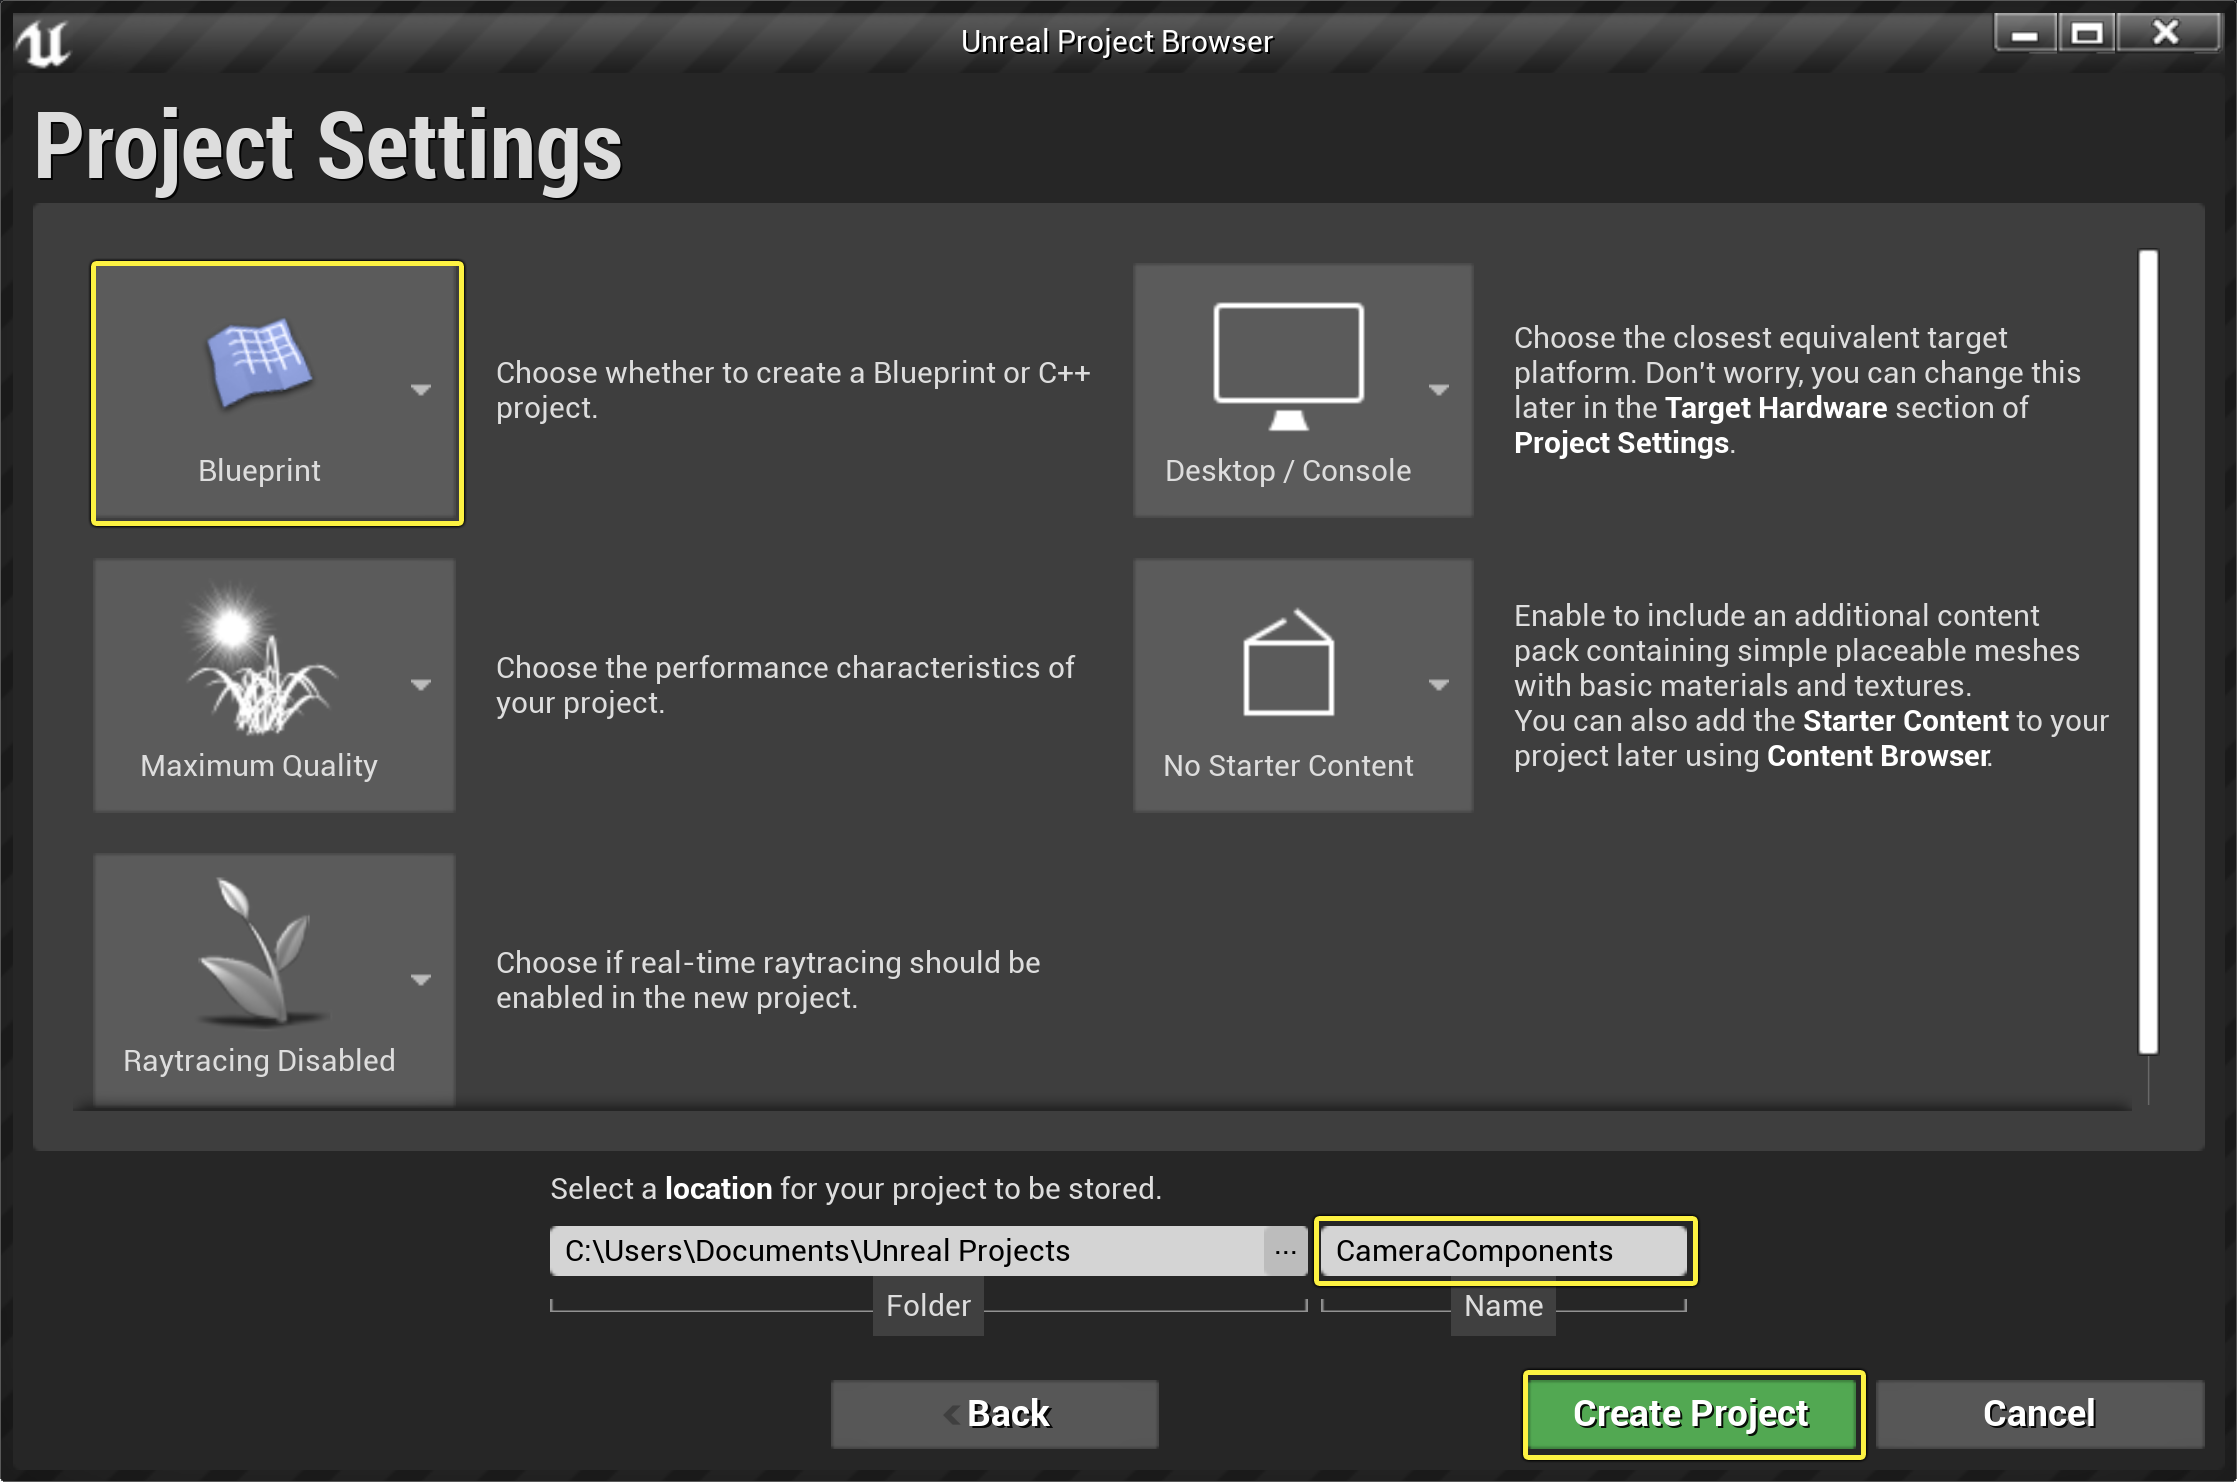
Begin by creating a New > Games > Blank > Blueprint project named CameraComponents .
![image alt text]()
-
From the Content Browser click the Add/Import button to create a new Blueprint Character class named BP_CameraCharacter.
![image alt text]()
-
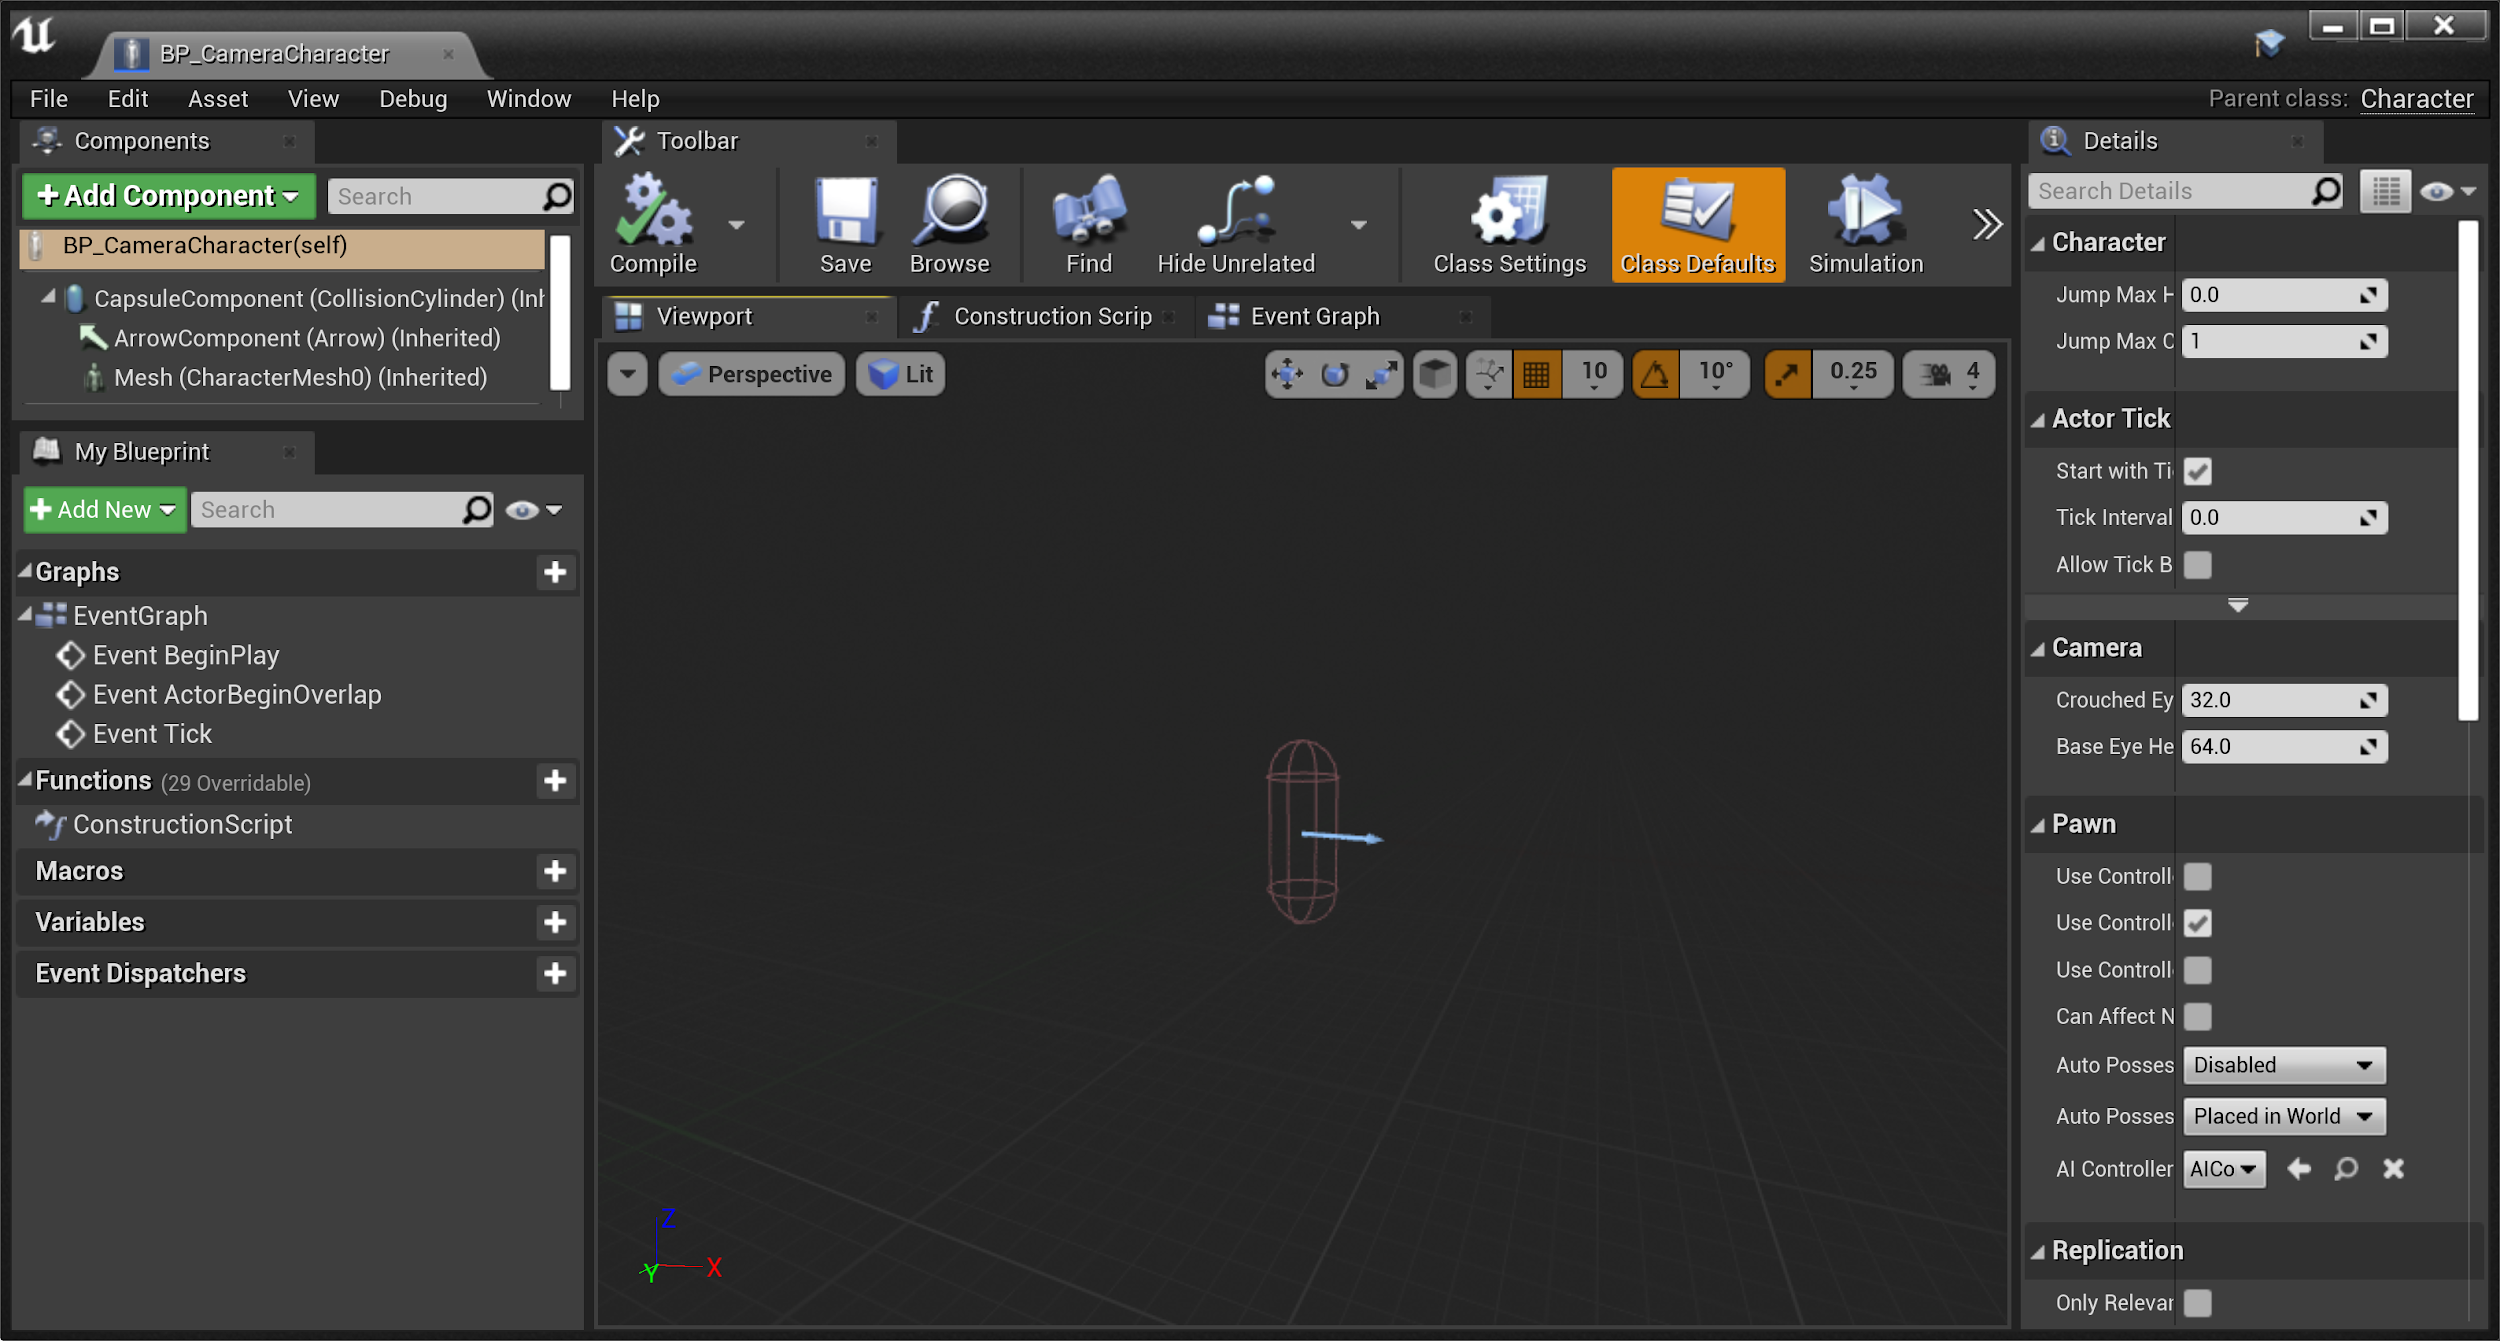
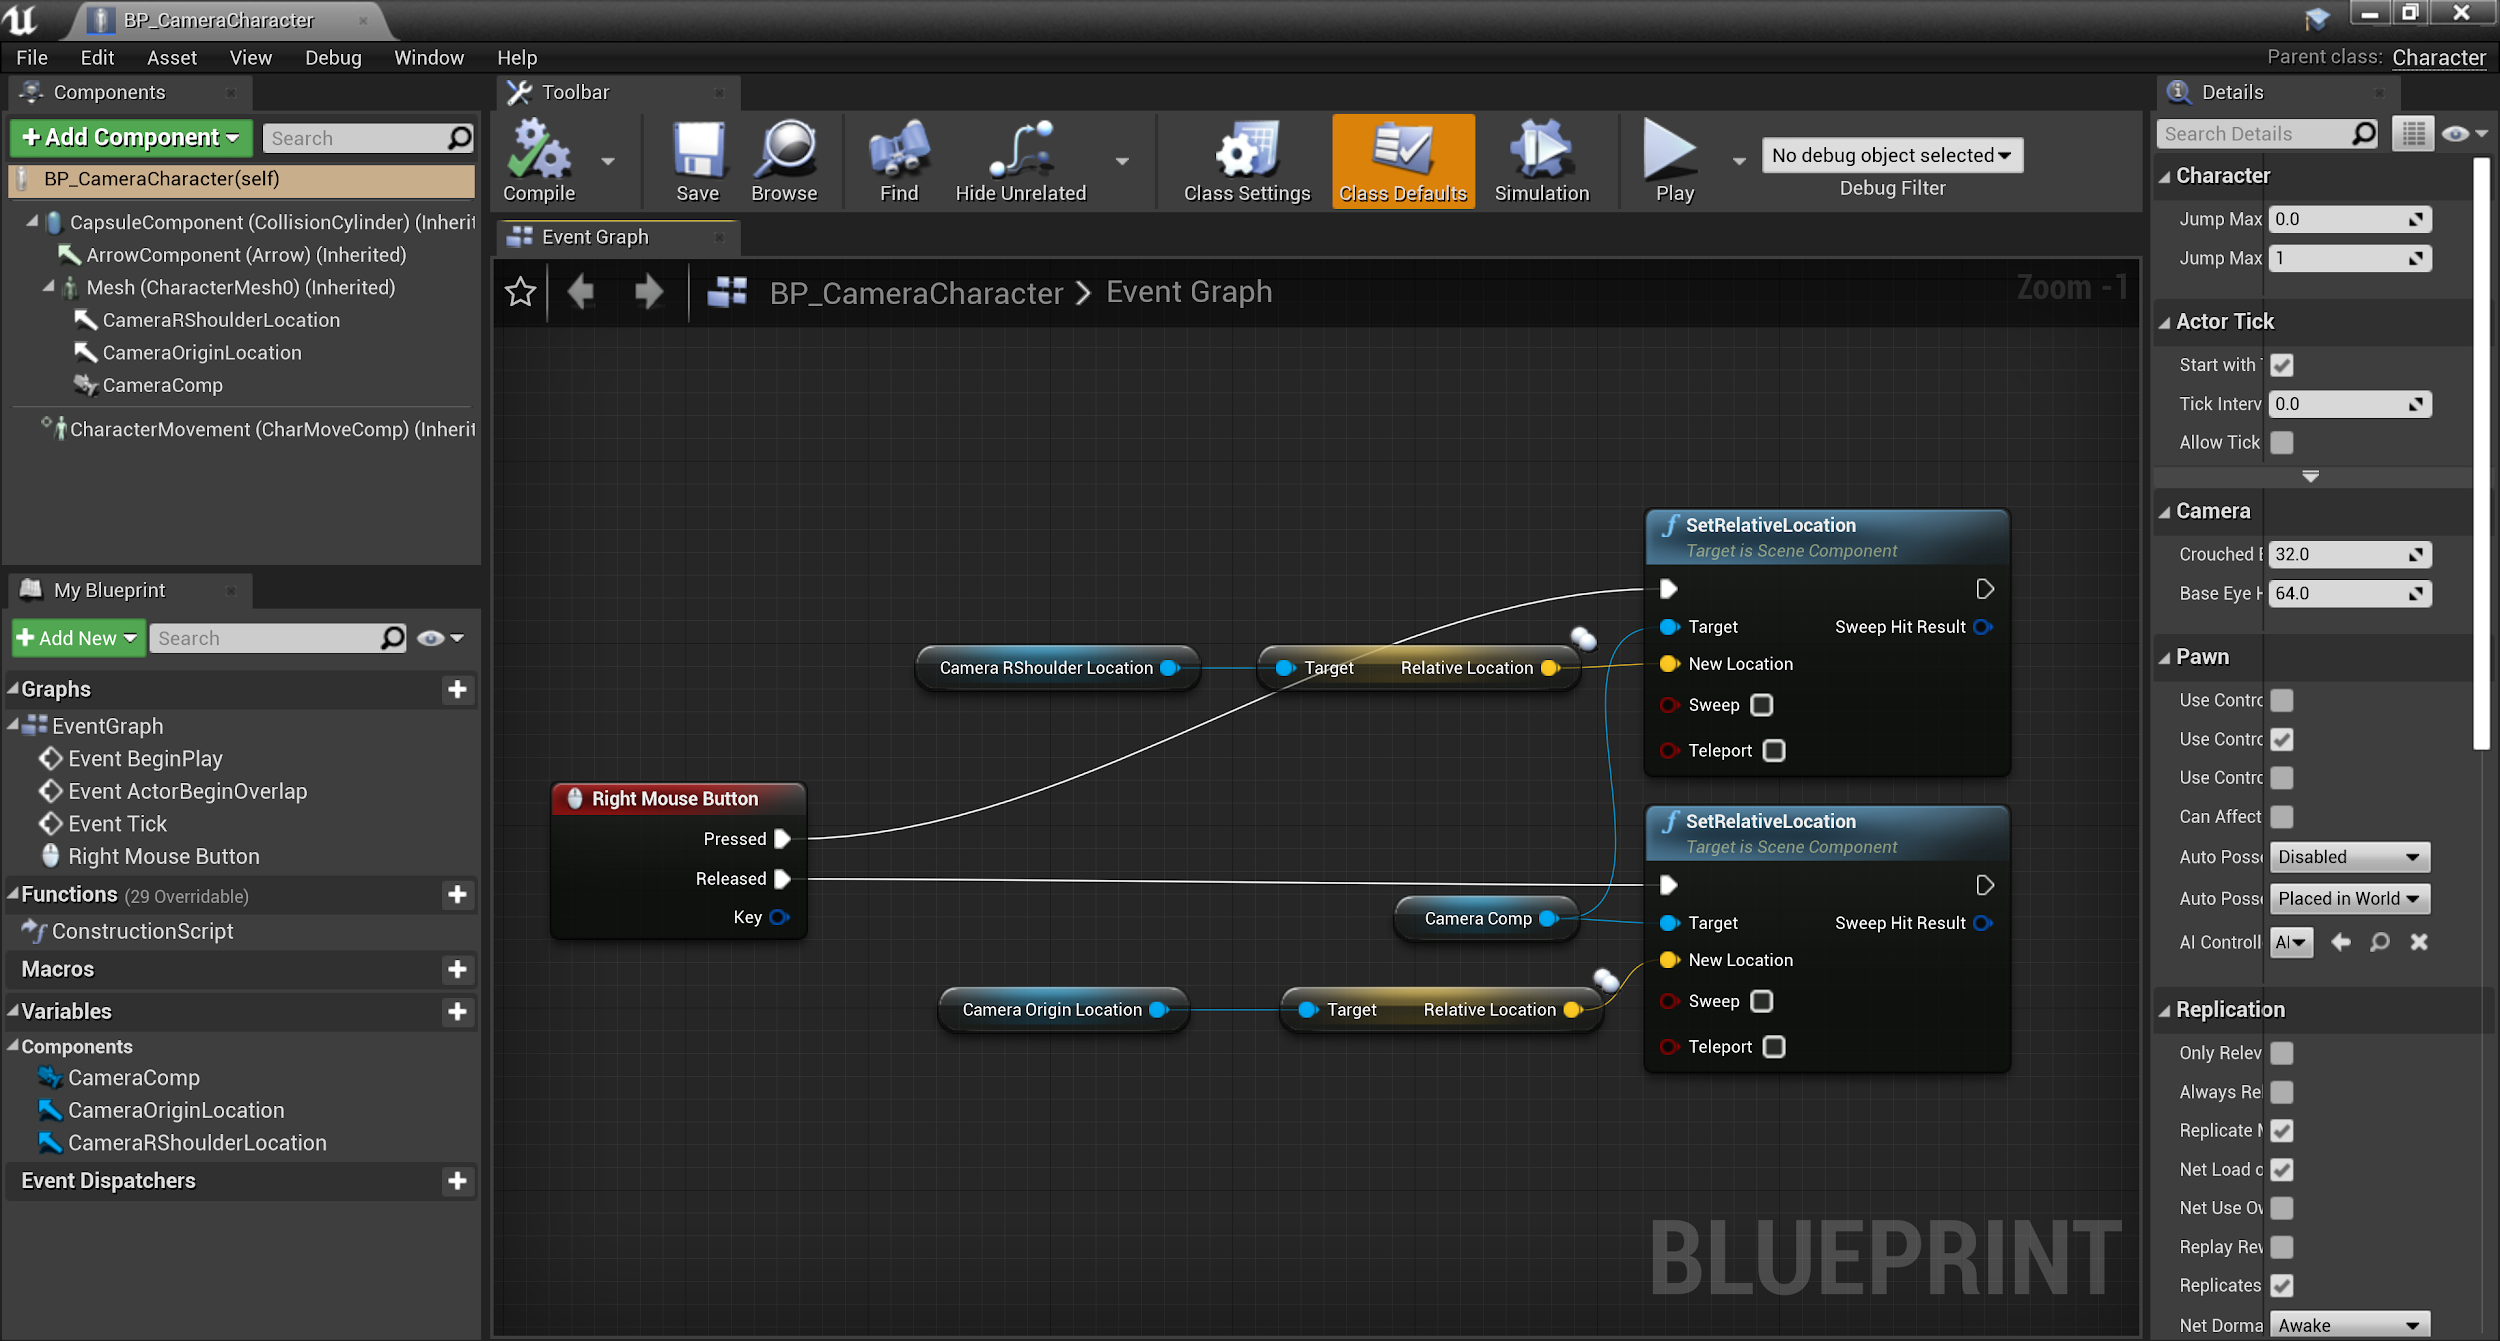
Double-click the BP_CameraCharacter from the Content Browser to open its Class Defaults .
![image alt text]()
-
Select the Mesh Skeletal Mesh Component, then from the Components tab , click Add Component , select Arrow from the dropdown menu, and rename it to CameraRShoulderLocation .
![image alt text]()
An Arrow Component is a Scene Component that renders a simple arrow with lines to indicate the direction it is facing. For more information, refer to the documentation on Utility Components .
-
Select the CameraRShoulderLocation Arrow Component, from the Details panel and navigate to the Transform category to set its Location to ( -30,0,150 ) and Rotation to ( 0,0,90 ).
![image alt text]()
-
Select the Mesh Skeletal Mesh Component, then from the Components tab click Add Component . Select Arrow from the dropdown menu and rename it to CameraOriginLocation .
![image alt text]()
-
Select the CameraOriginLocation Arrow Component from the Components tab, then navigate to the Transform category in the Details panel and set its Location to ( 0, -120 , 150 ) and Rotation to ( 0,0,90 ).
![image alt text]()
CameraOriginLocation and CameraRShoulderLocation are attached to the Skeletal Mesh Component to provide a visual representation of where the Camera Component will switch its viewpoint locations.
-
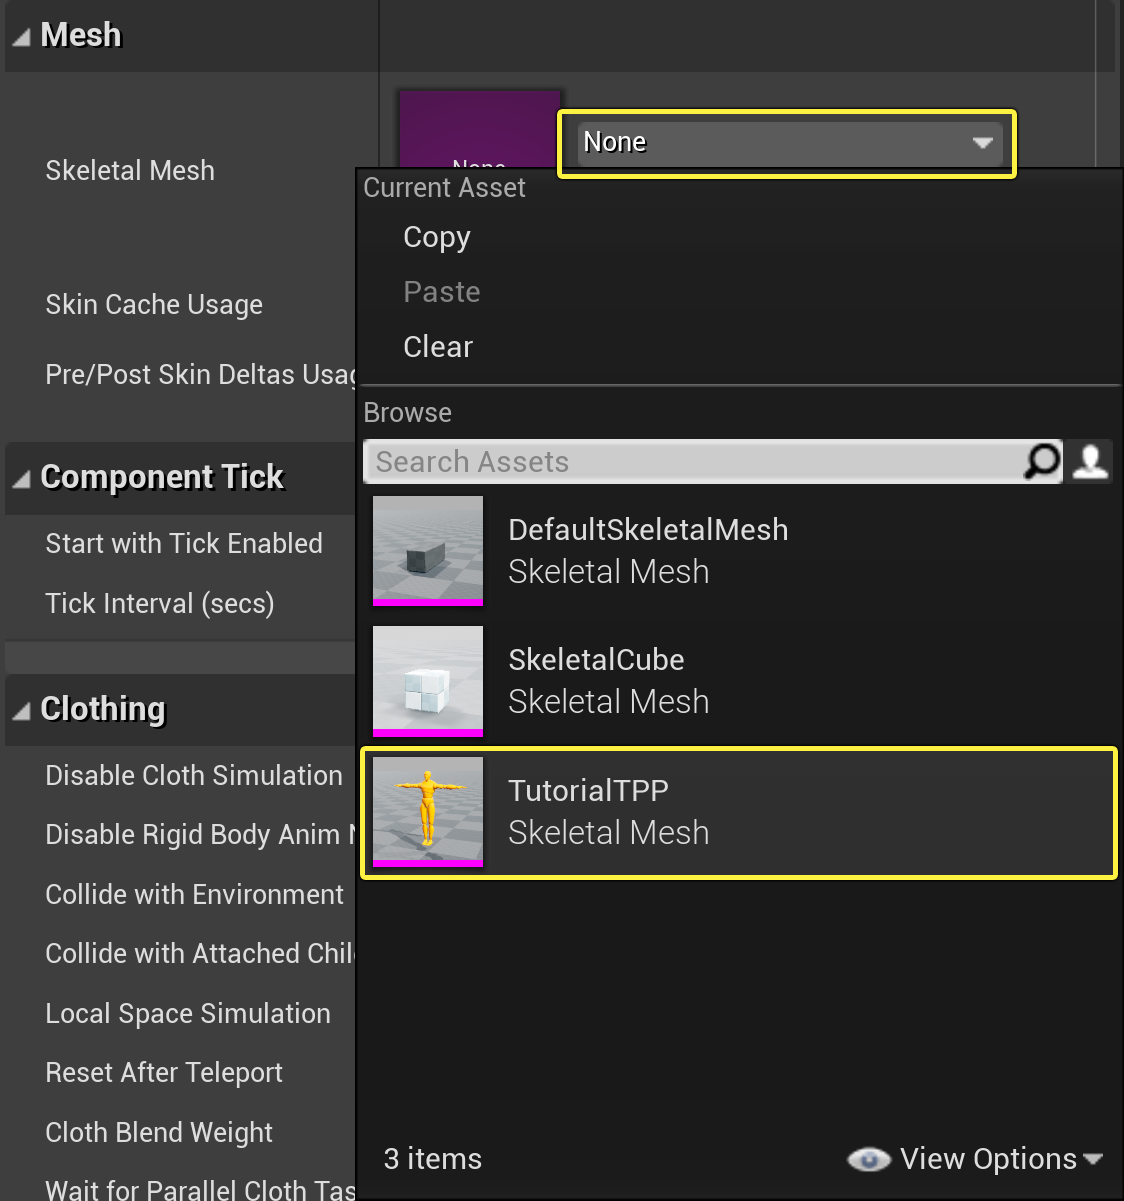
In the Components tab, select the Mesh Component and navigate to the Details panel. From the Mesh category, select Skeletal Mesh and from the dropdown menu search and select TutorialTPP .
![image alt text]()
If you do not see any options listed in the dropdown menu, click View Options , and check the box for Show Engine Content .
![image alt text]()
-
From the Details panel, navigate to the Transform category and set the Mesh's Location to ( 0,0,-90 ) and the Rotation to ( 0,0,-90 ).
![image alt text]()
-
Next, in the Components tab, click the Add Component button , select Camera to add a Camera Component, and rename the Component to CameraComp .
![image alt text]()
-
Navigate to the Details panel and set the camera's Location values to ( 0, -120 , 150) .
![image alt text]()
-
Compile and save .


Work-In-Progress Blueprint
In this example, the camera is attached to the character's Skeletal Mesh Component to provide a third person perspective, however a Camera Component can be added to any Blueprint Actor class for any chosen camera perspective.
Creating and Binding Input Key Events
With the Character Blueprint class created, you need to set up some scripted logic in order to transition the Camera Component's relative location between the two different Arrow Component locations.
-
From the BP_CameraCharacter's Class Defaults, click the Event Graph tab and right-click in the graph. From the dropdown menu select Right Mouse Button to add an input mouse event.
![image alt text]()
The Event Graph is where the scripted logic to move the camera will occur.
-
Navigate to the My Blueprint panel, then from the variables category, Ctrl-click and hold to drag a copy of the CameraComp variable onto the Event Graph.
![image alt text]()
Creating a copy of the CameraComp variable provides the ability to set properties or affect the Camera Component through its class methods.
-
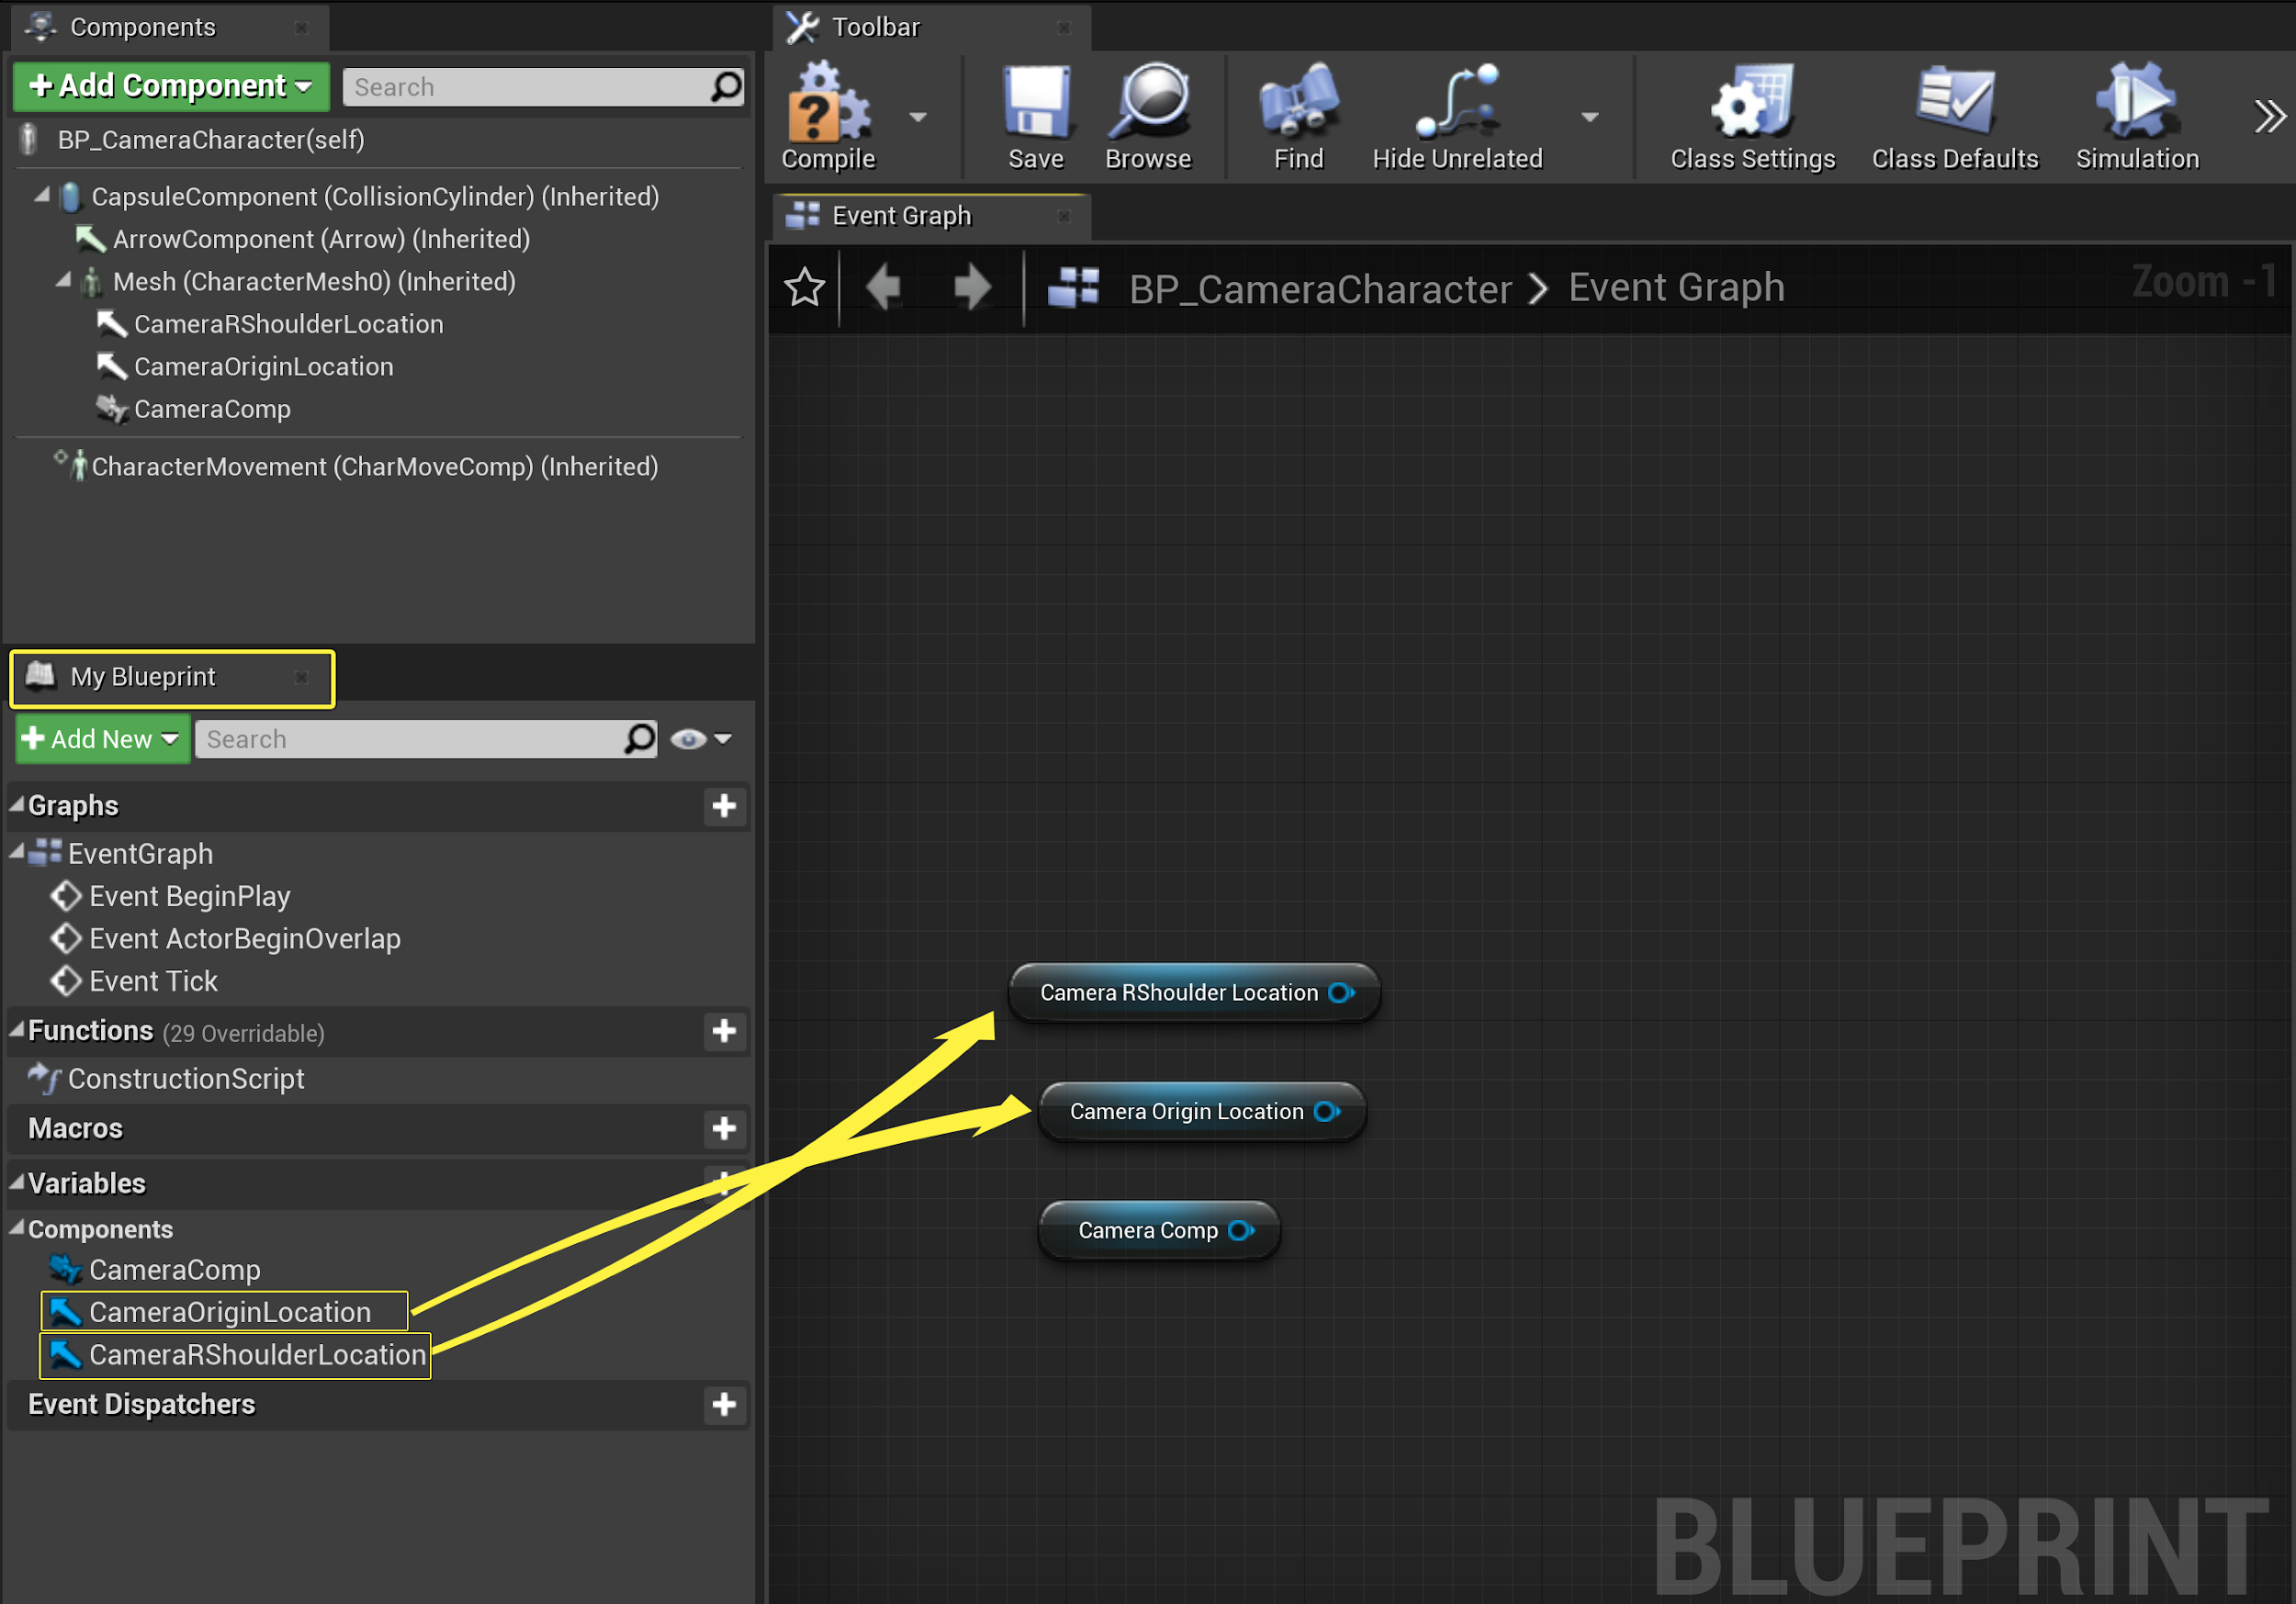
Navigate back to the My Blueprint tab, then from the Variables category Ctrl-click and drag the CameraOriginLocation and CameraRShoulderLocation Arrow Components into the Event Graph.
![image alt text]()
-
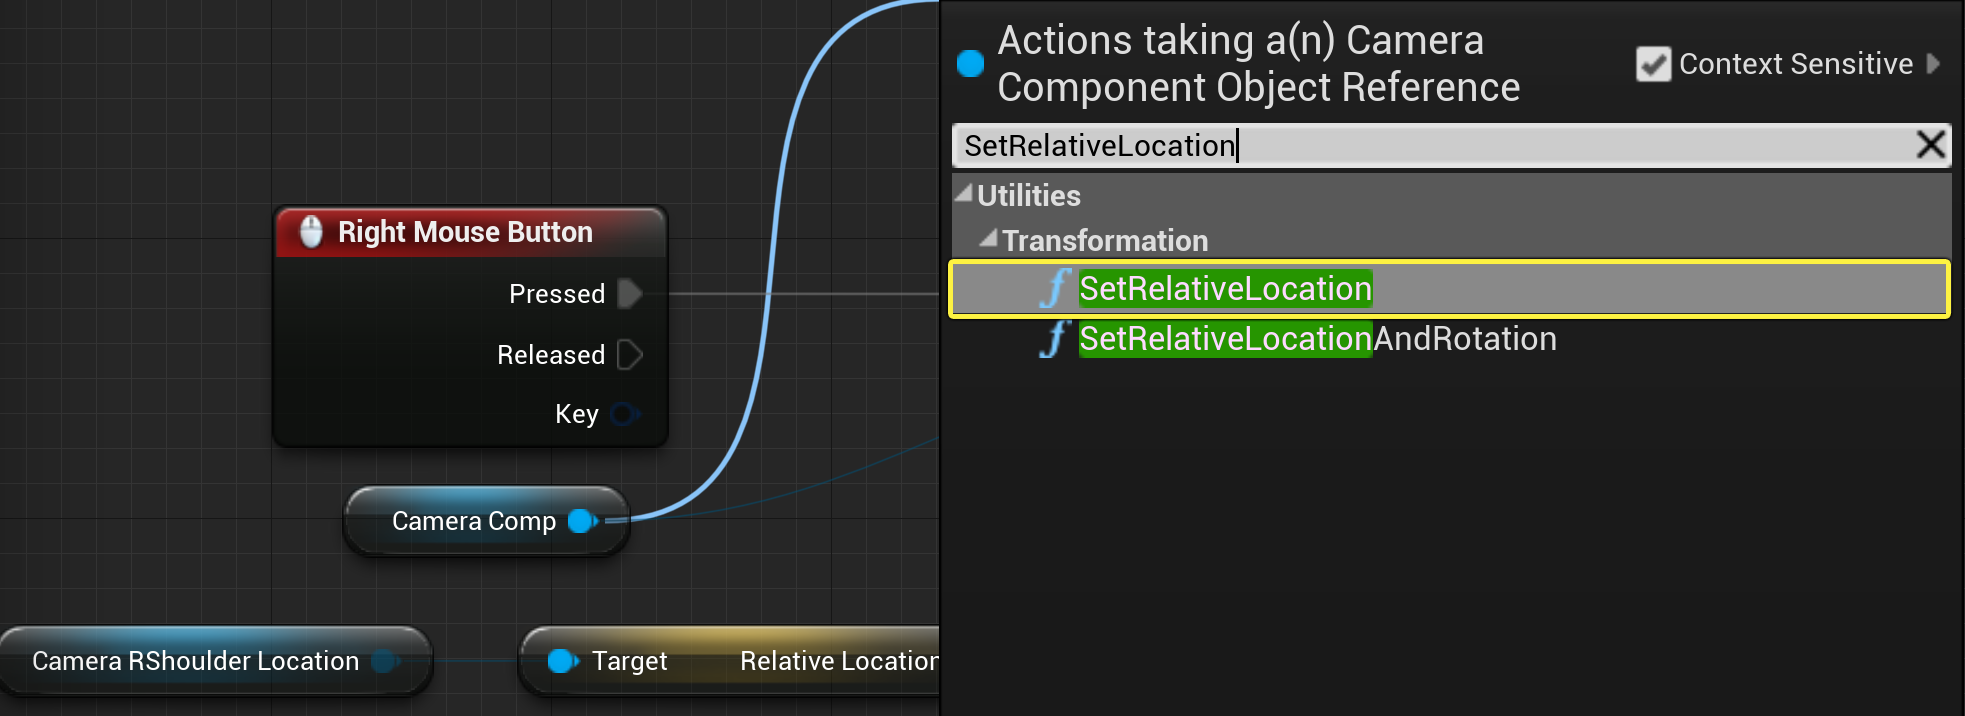
In the Event Graph, click and drag off the CameraComp output pin, then from the dropdown menu search and select SetRelativeLocation .
![image alt text]()
The SetRelativeLocation method provides the ability to move the Camera Component to a chosen location.
-
Click and drag off the CameraRShoulderLocation node output pin, then search and select GetRelativeLocation .
![image alt text]()
-
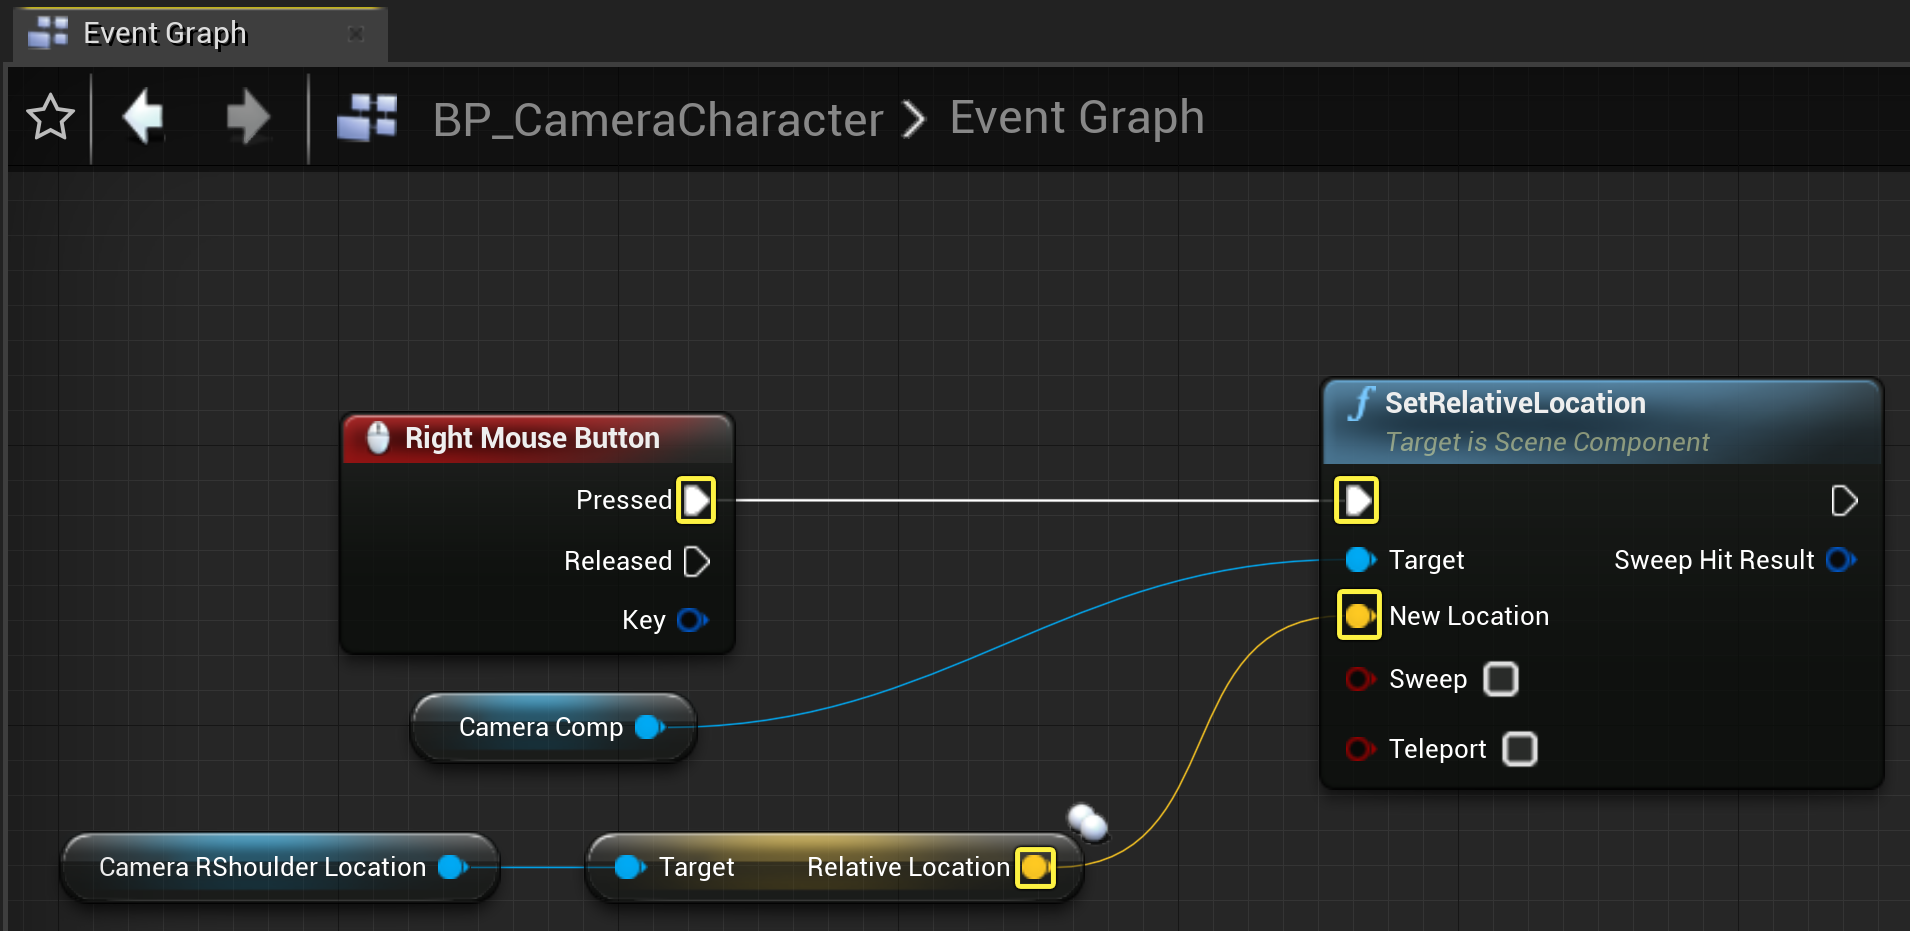
Connect the output pin from the Relative Location node into the New Location node, then connect the Pressed execution pin from the Right Mouse Button event node into the input execution pin of the Set Relative Location node.
![image alt text]()
When the Right Mouse Button is pressed, the relative location of the camera is set to the location of the Arrow Component CameraRShoulderLocation .
-
Click and drag off the Camera Comp pin and from the dropdown menu select SetRelativeLocation .
![image alt text]()
-
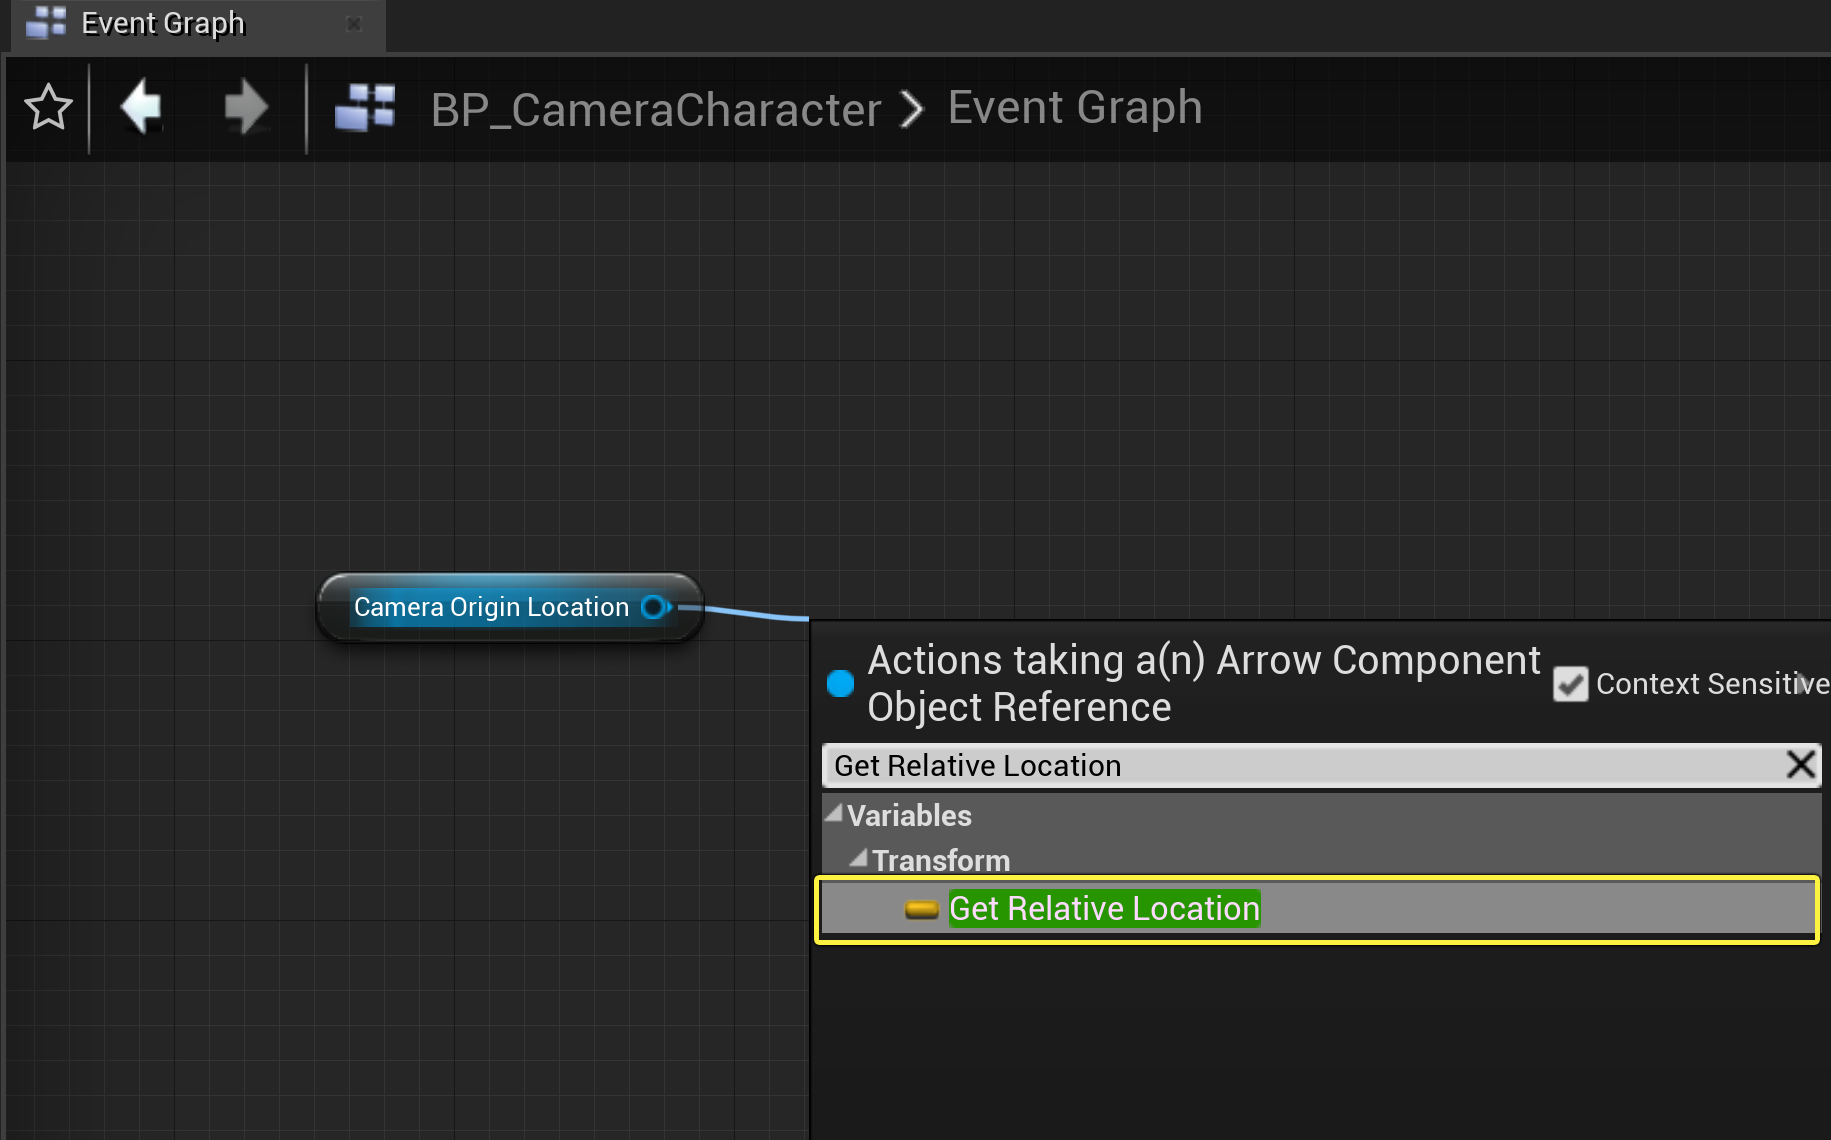
Click and drag off the CameraOriginLocation node output pin and from the dropdown menu select Get Relative Location .
![image alt text]()
-
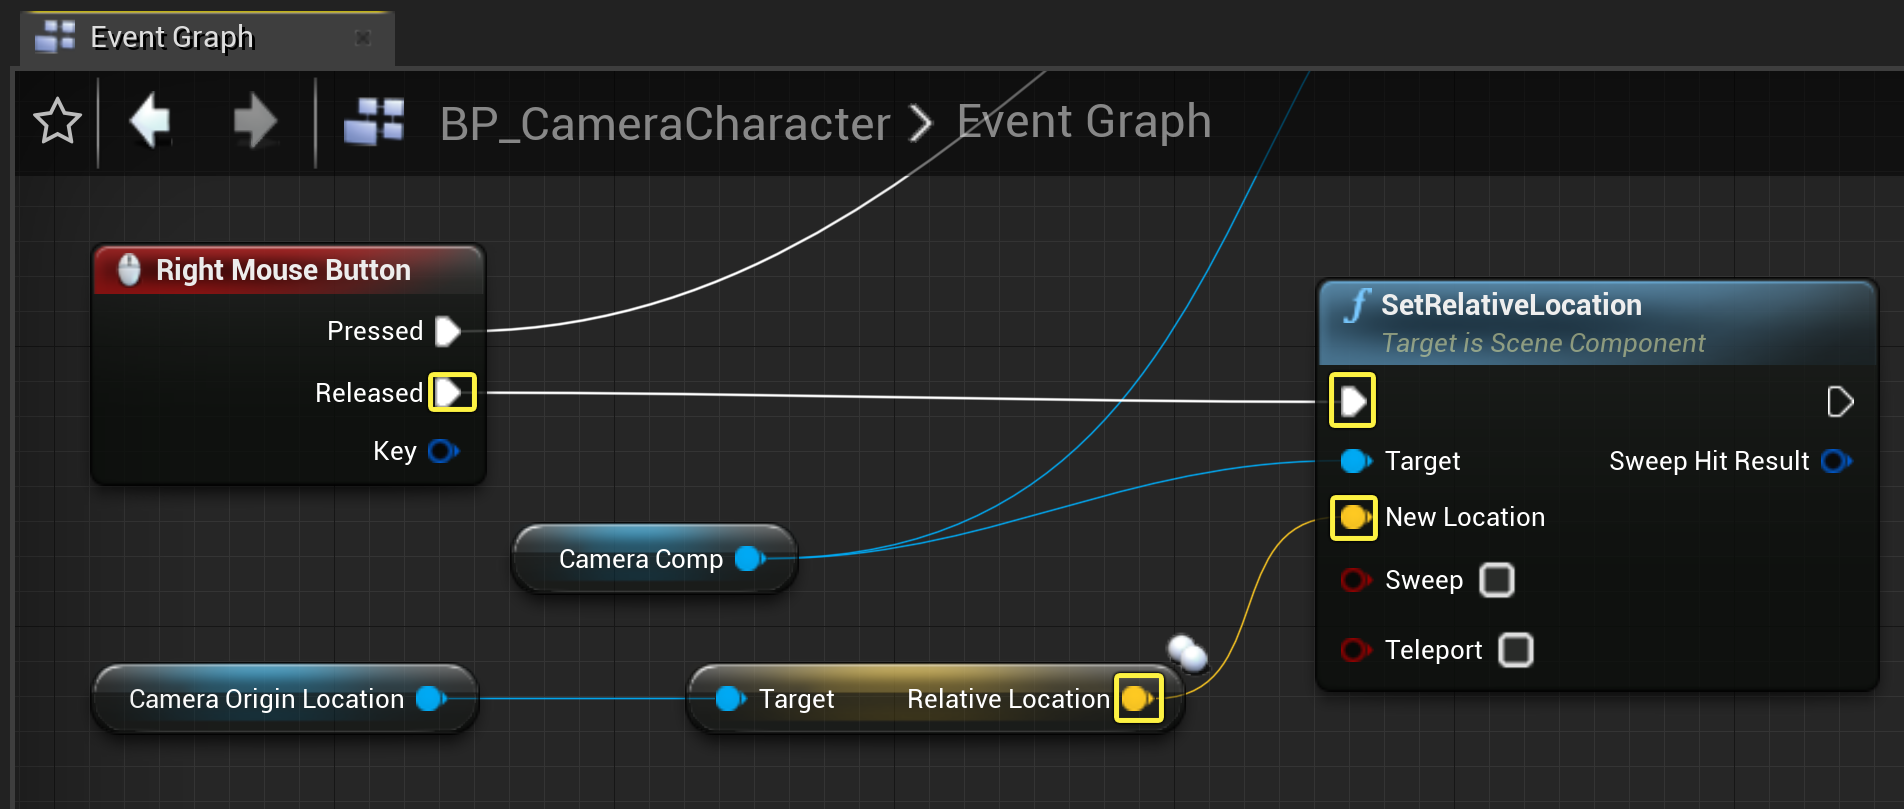
Connect the CameraOriginLocation's Relative Location node output pin into the New Location pin, then from the Right Mouse Button event node connect the Released execution pin to the input execution pin of the SetRelativeLocation node.
![image alt text]()
-
Compile and Save .
The Event Graph should now look similar to the image below:
![image alt text]()


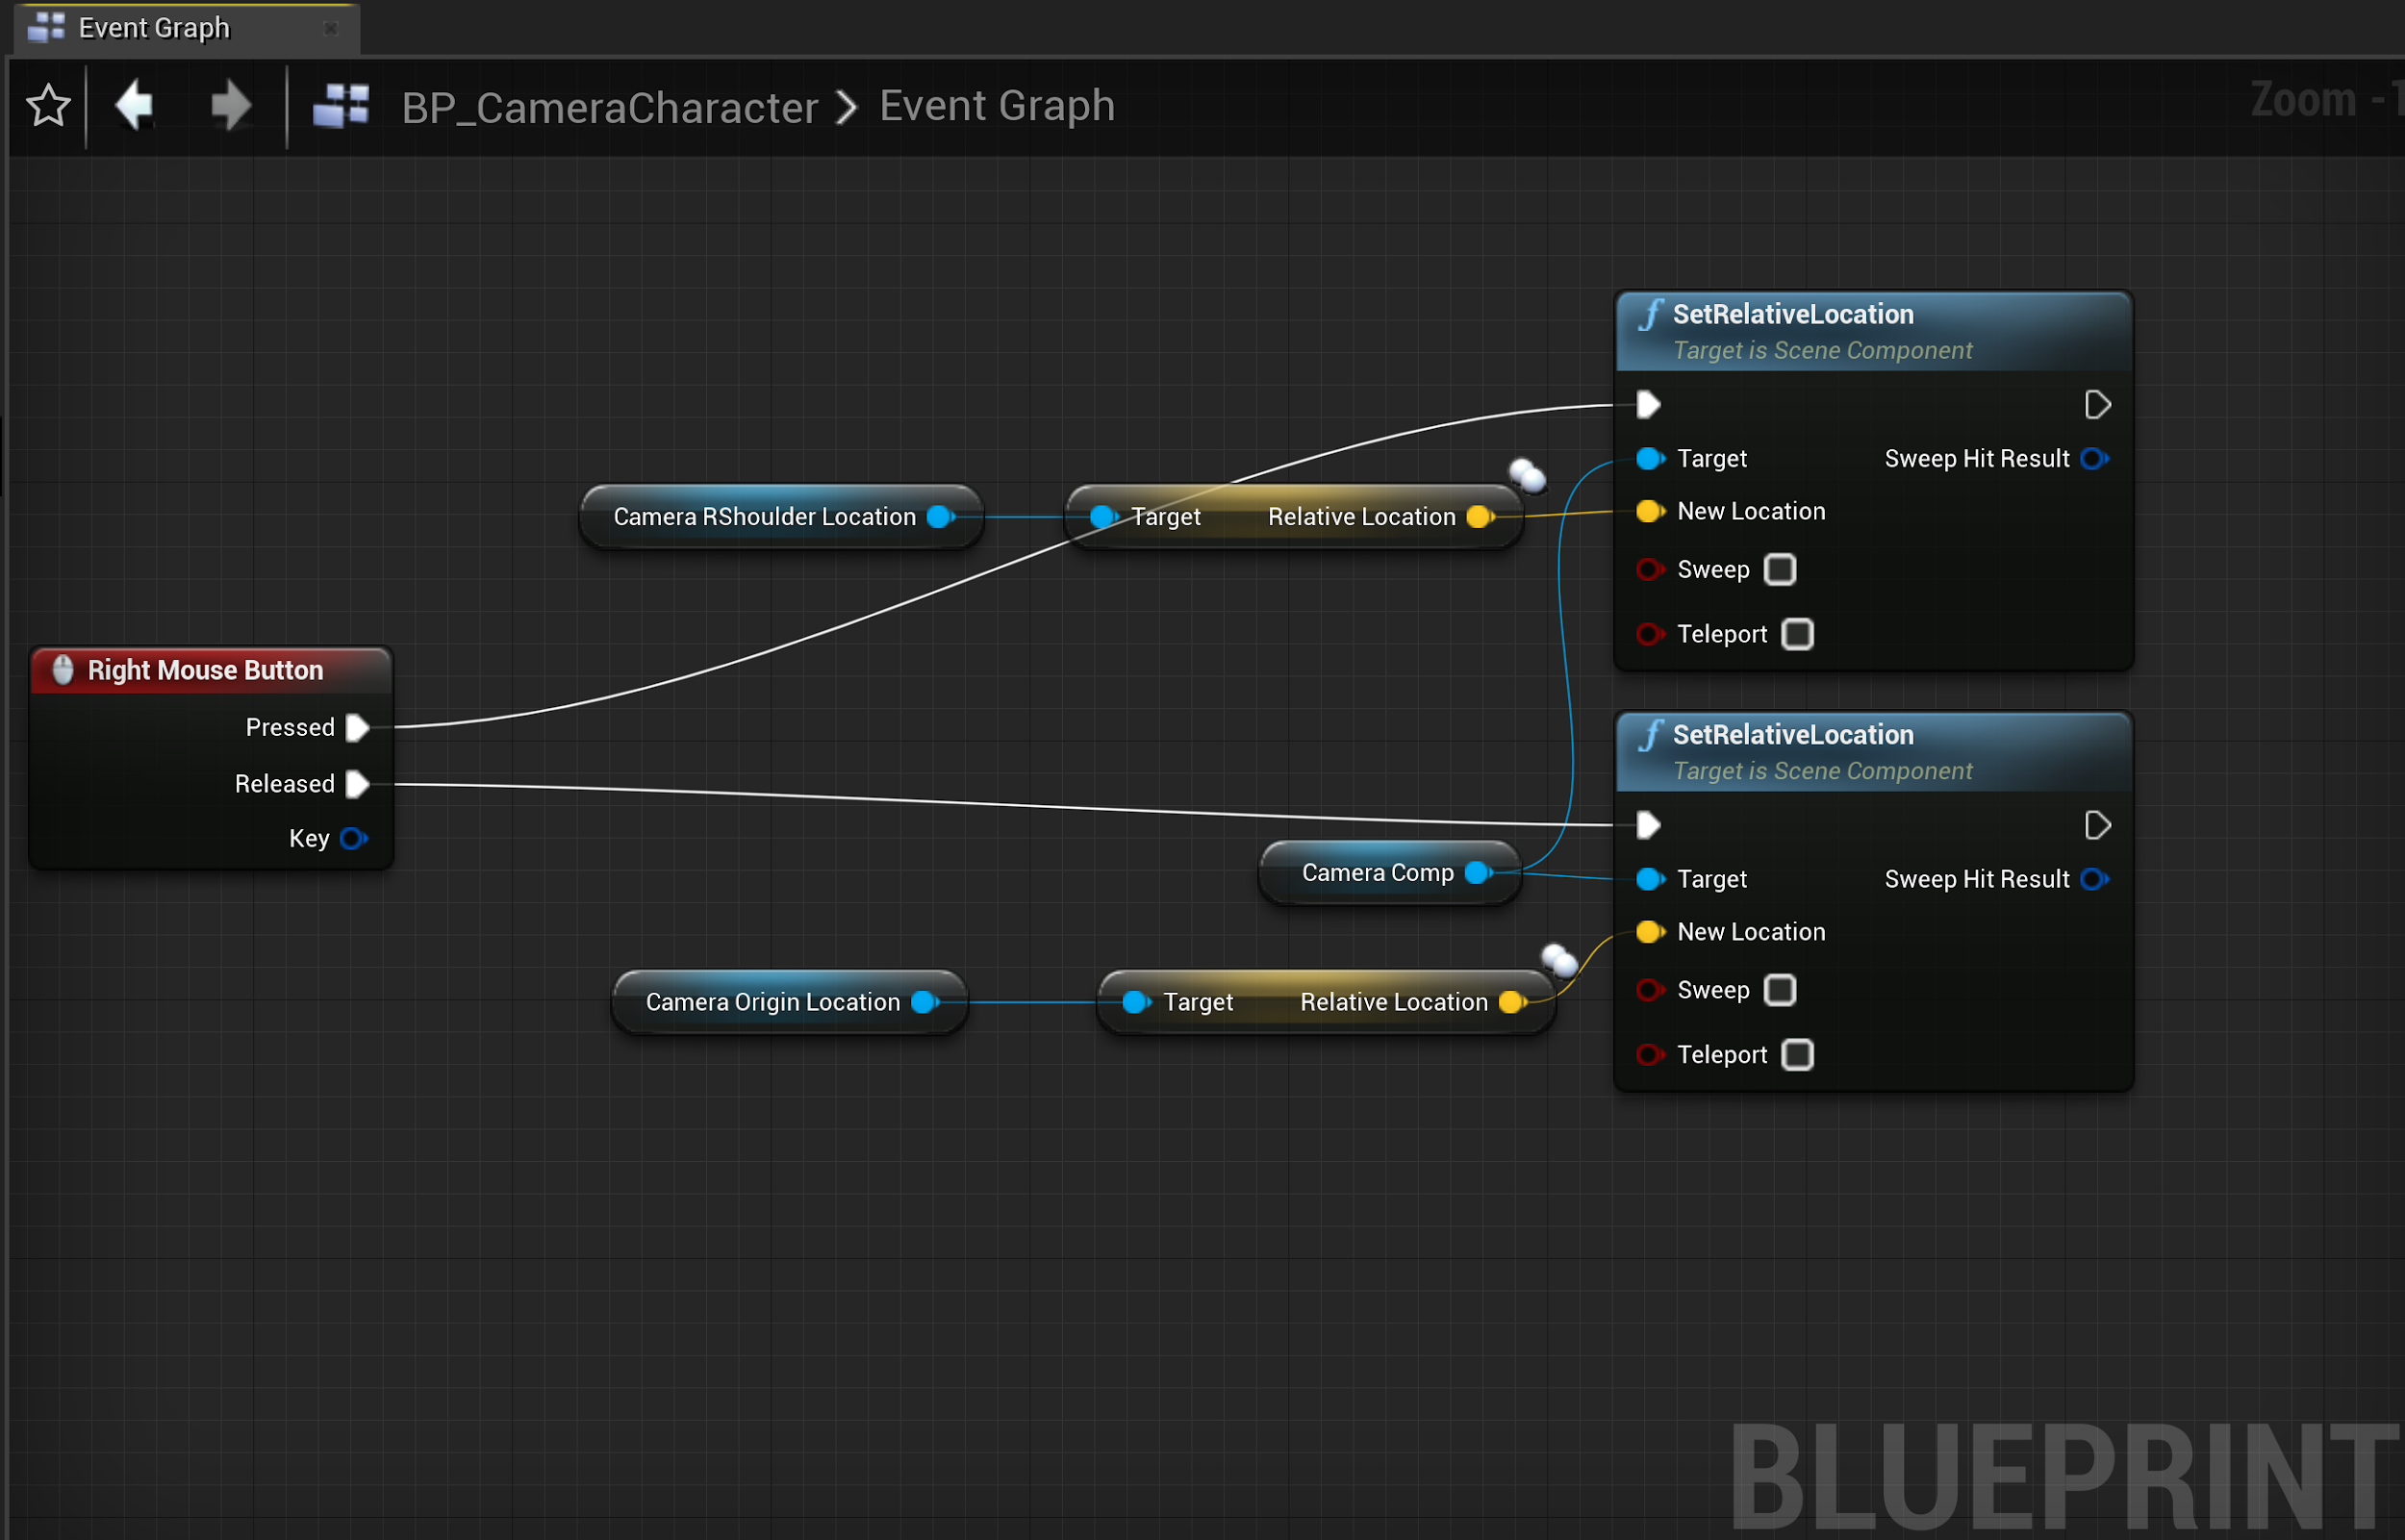
Finished Blueprint
Setting Up the Game Mode
With the character created and set up, you will need to modify the Game Mode in order to spawn the character when Play (PIE) is clicked.
-
From the Content Browser , click the Add/Import button to create a new Game Mode Base Blueprint class named BP_CameraCompGameMode .
![image alt text]()
-
Double-click the BP_CameraCompGameMode to open the Class Defaults . From the Details panel , navigate to the Classes category , and select Bp_CameraCharacter from the Default Pawn Class dropdown menu.
![image alt text]()
For additional documentation on Player Controllers and possessing Pawn Actors refer to Possessing Pawns .
-
Compile and save .
-
From the Unreal Engine toolbar, select Edit > Project Settings and navigate to the Maps & Modes settings. From the Default Modes category select the newly-created BP_CameraCompGameMode class.
![image alt text]()
-
From the Level Editor click the Play (PIE) button to start previewing these changes.
![image alt text]()


End Result

When you select Play (PIE) , you can now transition between the two camera perspectives by clicking and releasing the right mouse button.
Next Steps
Now that you have worked with Camera Components you may want to move on to the Spring Arm Component tutorial.
This tutorial will demonstrate how to prevent a camera from being obstructed when moving into tight spaces or when an object blocks the camera's view of the player.
In this tutorial you will be adding a Camera Component to a Character Blueprint class.
Cameras provide a perspective through which to view a level and can be attached to any Actor in the level including playable characters and non-playable Actors.
This tutorial will be covering how to add a Camera Component to a Character Blueprint class and set up a toggle between two different camera perspectives for the character.
Creating the Character Class
-
Begin by creating a New > Games > Blank > C++ project named CameraComponents .
![image alt text]()
-
From the C++ Class Wizard , create a new Character class named CameraCharacter , then navigate to the
CameraCharactor.hfile and declare the following class definitions:protected: // Arrow Component for the Camera shoulder viewpoint location UPROPERTY(EditDefaultsOnly, BlueprintReadWrite) class UArrowComponent* CameraRShoulderLocation; // Arrow Component for the Camera Origin viewpoint location UPROPERTY(EditDefaultsOnly, BlueprintReadWrite) class UArrowComponent* CameraOriginLocation; UPROPERTY(EditDefaultsOnly, BlueprintReadWrite) class UCameraComponent* CameraComp; -
Navigate to the
CameraCharactor.cppfile and add the following class libraries:#include "Camera/CameraComponent.h" #include "Components/ArrowComponent.h" -
In the ACameraCharactor::ACameraCharacter constructor method declare the following in order to to instantiate and attach the Arrow and Camera Components to the character's skeletal mesh.
// Instantiating your class Components CameraRShoulderLocation = CreateDefaultSubobject<UArrowComponent>(TEXT("CameraRShoulderLocation")); CameraOriginLocation = CreateDefaultSubobject<UArrowComponent>(TEXT("CameraOriginLocation")); CameraComp = CreateDefaultSubobject<UCameraComponent>(TEXT("CameraComp")); // Attaching your class Components to the default character's Skeletal Mesh Component. CameraRShoulderLocation->SetupAttachment(GetMesh()); CameraOriginLocation->SetupAttachment(GetMesh()); CameraComp->SetupAttachment(GetMesh());[ UProperty specifiers provide the capability of editing your class components and properties in Blueprint.
-
Compile the code.
-
From the Content Browser , navigate to the C++ Classes folder. Right-click the CameraCharacter class, select Create Blueprint class based on CameraCharacter from the dropdown menu, and name the Blueprint BP_CameraCharacter .
![image alt text]()
-
Double click the BP_CameraCharacter to open its Class Defaults.
![image alt text]()
-
In the Components tab, select the Mesh Component and navigate to the Details panel. From the Mesh category, select Skeletal Mesh and from the dropdown menu search and select TutorialTPP .
![image alt text]()
If you do not see any options listed in the dropdown menu, click View Options , and check the box for Show Engine Content .
![image alt text]()
-
From the Details panel, navigate to the Transform category and set the Mesh's Location to ( 0,0,-90 ) and the Rotation to ( 0,0,-90 ).
![image alt text]()
-
Select the CameraRShoulderLocation Arrow Component, from the Details panel and navigate to the Transform category to set its Location to ( -30,0,150 ) and Rotation to ( 0,0,90 ).
![image alt text]()
-
Select the CameraOriginLocation Arrow Component from the Components tab, then navigate to the Transform category in the Details panel and set its Location to ( 0, -120 , 150 ) and Rotation to ( 0,0,90 ).
![image alt text]()
CameraOriginLocation and CameraRShoulderLocation are attached to the Skeletal Mesh Component to provide a visual representation of where the Camera Component will switch its viewpoint locations.
-
Select CameraComp from the Components tab, then navigate to the Transform category in the Details panel and set its Location to ( 0, -120 , 150 ) and Rotation to ( 0,0,90 )
![image alt text]()
-
Compile and Save .
-
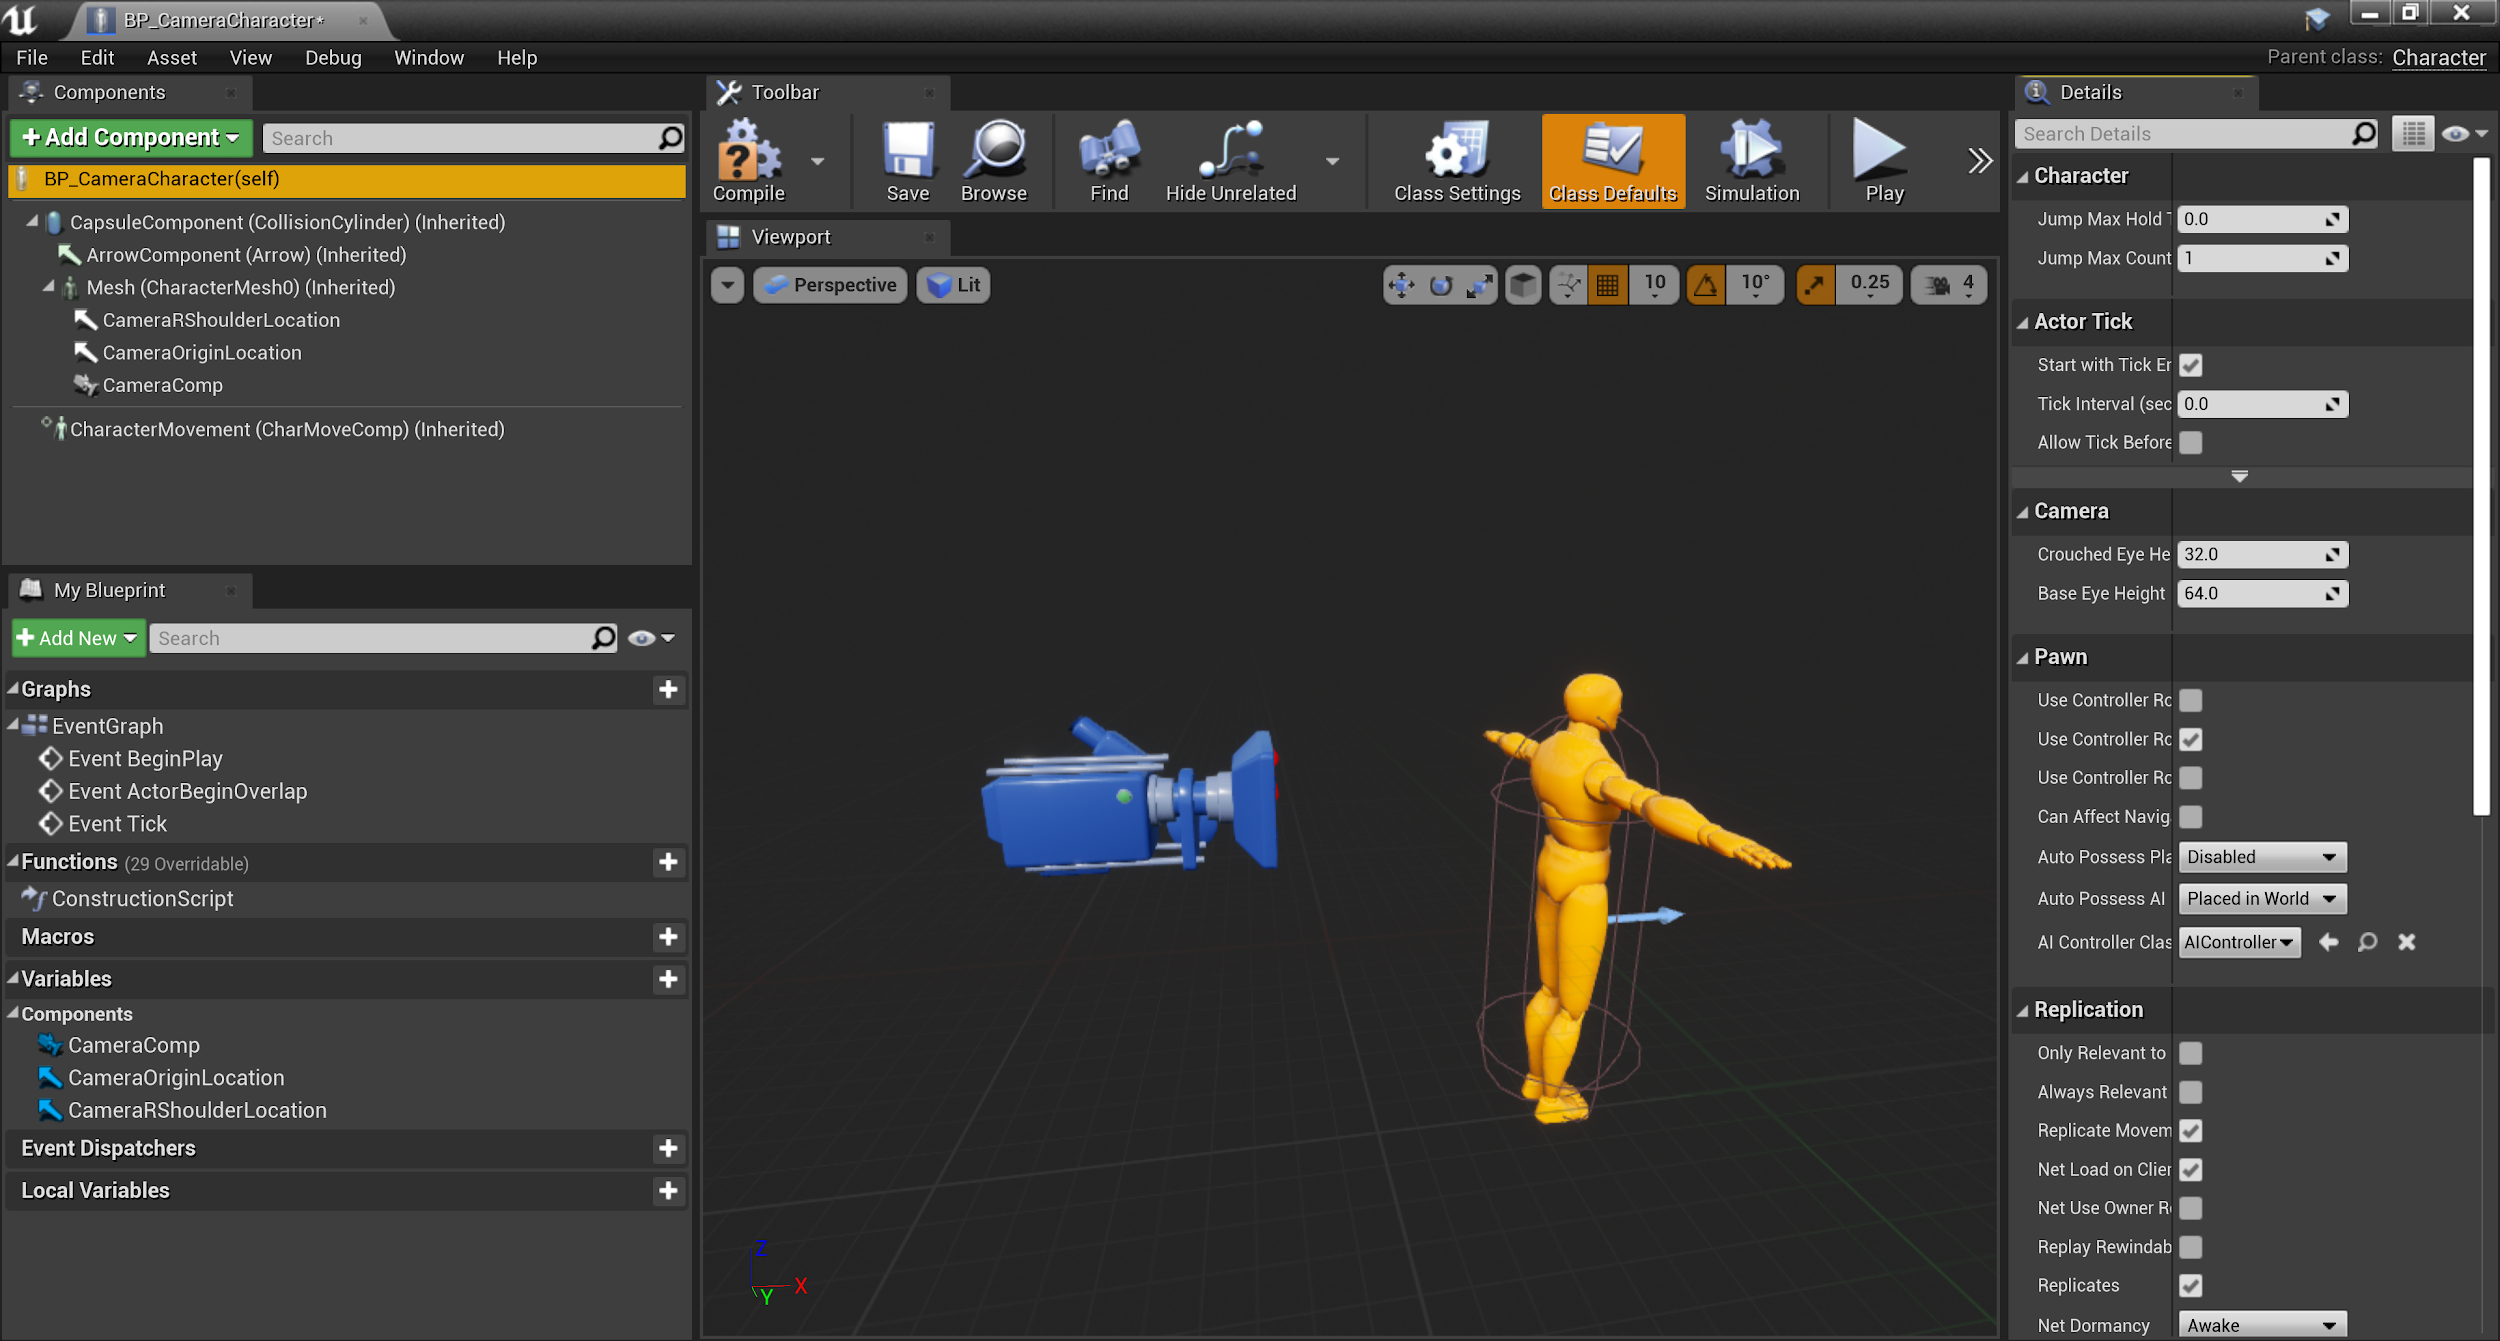
The Components should appear as they in the viewport below.
![image alt text]()


Work In-Progress Code
CameraCharacter.h
// Fill out your copyright notice in the Description page of Project Settings.
#pragma once
#include "CoreMinimal.h"
#include "GameFramework/Character.h"
#include "CameraCharacter.generated.h"
UCLASS()
class CAMERACOMPONENTS_API ACameraCharacter : public ACharacter
{
GENERATED_BODY()
public:
// Sets default values for this character's properties
ACameraCharacter();
protected:
// Called when the game starts or when spawned
virtual void BeginPlay() override;
public:
// Called every frame
virtual void Tick(float DeltaTime) override;
// Called to bind functionality to input
virtual void SetupPlayerInputComponent(class UInputComponent* PlayerInputComponent) override;
protected:
        // Arrow Component for the Camera shoulder viewpoint location
        UPROPERTY(EditDefaultsOnly, BlueprintReadWrite)
        class UArrowComponent* CameraRShoulderLocation;

        // Arrow Component for the Camera Origin viewpoint location
        UPROPERTY(EditDefaultsOnly, BlueprintReadWrite)
        class UArrowComponent* CameraOriginLocation;

        UPROPERTY(EditDefaultsOnly, BlueprintReadWrite)
        class UCameraComponent* CameraComp;
};CameraCharacter.cpp
// Fill out your copyright notice in the Description page of Project Settings.
#include "CameraCharacter.h"
#include "Camera/CameraComponent.h"
#include "Components/ArrowComponent.h"
// Sets default values
ACameraCharacter::ACameraCharacter()
{
// Set this character to call Tick() every frame. You can turn this off to improve performance if you don't need it.
PrimaryActorTick.bCanEverTick = true;
// Instantiating your class Components
CameraRShoulderLocation = CreateDefaultSubobject<UArrowComponent>(TEXT("CameraRShoulderLocation"));
CameraOriginLocation = CreateDefaultSubobject<UArrowComponent>(TEXT("CameraOriginLocation"));
CameraComp = CreateDefaultSubobject<UCameraComponent>(TEXT("CameraComp"));
// Attaching your class Components to the dDefault Character's Skeletal Mesh Component.
CameraRShoulderLocation->SetupAttachment(GetMesh());
CameraOriginLocation->SetupAttachment(GetMesh());
CameraComp->SetupAttachment(GetMesh());
}
// Called when the game starts or when spawned
void ACameraCharacter::BeginPlay()
{
Super::BeginPlay();
}
// Called every frame
void ACameraCharacter::Tick(float DeltaTime)
{
Super::Tick(DeltaTime);
}
// Called to bind functionality to input
void ACameraCharacter::SetupPlayerInputComponent(UInputComponent* PlayerInputComponent)
{
Super::SetupPlayerInputComponent(PlayerInputComponent);
}Creating and Binding Input Key Event Functions
With the Character Blueprint class created, you need to set up some scripted logic in order to transition the Camera Component's relative location between the two different Arrow Component locations.
-
From the Level Editor's toolbar, navigate to Edit > Project Settings and open the Input page.Then from the Bindings category, click the + icon next to Action Mappings to create a new input mapping.
![image alt text]()
-
Name the action mapping SwitchCamera and select the Right Mouse Button key value from the dropdown menu.
![image alt text]()
-
Navigate to the
CameraCharacter.hfile and declare the following class definitions.protected: // Sets the CameraComp's relative location to CameraRShoulderLocation arrow component. void SetCameraShoulderLocation(); // Sets the CameraComp's relative location to the CameraOriginLocation arrow component void SetCameraOriginLocation(); -
In the
CameraCharacter.cppfile, implement the following class methods.void ACameraCharacter::SetCameraShoulderLocation() { CameraComp->SetRelativeLocation(CameraRShoulderLocation->GetRelativeLocation()); } void ACameraCharacter::SetCameraOriginLocation() { CameraComp->SetRelativeLocation(CameraOriginLocation->GetRelativeLocation()); } -
Next navigate to the ACameraCharacter::SetupPlayerInputComponent method, and implement the following code.
Super::SetupPlayerInputComponent(PlayerInputComponent); PlayerInputComponent->BindAction("SwitchCamera", IE_Pressed, this, &ACameraCharacter::SetCameraShoulderLocation); PlayerInputComponent->BindAction("SwitchCamera", IE_Released, this, &ACameraCharacter::SetCameraOriginLocation);For additional documentation on Player Controllers and possessing Pawn Actors refer to Possessing Pawns .
-
Compile the code.


Finished Code
CameraCharacter.h
// Fill out your copyright notice in the Description page of Project Settings.
#pragma once
#include "CoreMinimal.h"
#include "GameFramework/Character.h"
#include "CameraCharacter.generated.h"
UCLASS()
class CAMERACOMPONENTS_API ACameraCharacter : public ACharacter
{
GENERATED_BODY()
public:
// Sets default values for this character's properties
ACameraCharacter();
protected:
// Called when the game starts or when spawned
virtual void BeginPlay() override;
public:
// Called every frame
virtual void Tick(float DeltaTime) override;
// Called to bind functionality to input
virtual void SetupPlayerInputComponent(class UInputComponent* PlayerInputComponent) override;
protected:
// Arrow Component for the Camera shoulder viewpoint location
UPROPERTY(EditDefaultsOnly, BlueprintReadWrite)
class UArrowComponent* CameraRShoulderLocation;
// Arrow Component for the Camera Origin viewpoint location
UPROPERTY(EditDefaultsOnly, BlueprintReadWrite)
class UArrowComponent* CameraOriginLocation;
UPROPERTY(EditDefaultsOnly, BlueprintReadWrite)
class UCameraComponent* CameraComp;
protected:
    // Sets the CameraComp's relative location to CameraRShoulderLocation arrow component.
    void SetCameraShoulderLocation();

    // Sets the CameraComp's relative location to the CameraOriginLocation arrow component
    void SetCameraOriginLocation();
};CameraCharacter.cpp
// Fill out your copyright notice in the Description page of Project Settings.
#include "CameraCharacter.h"
#include "Camera/CameraComponent.h"
#include "Components/ArrowComponent.h"
// Sets default values
ACameraCharacter::ACameraCharacter()
{
// Set this character to call Tick() every frame. You can turn this off to improve performance if you don't need it.
PrimaryActorTick.bCanEverTick = true;
// Instantiating your class Components
CameraRShoulderLocation = CreateDefaultSubobject<UArrowComponent>(TEXT("CameraRShoulderLocation"));
CameraOriginLocation = CreateDefaultSubobject<UArrowComponent>(TEXT("CameraOriginLocation"));
CameraComp = CreateDefaultSubobject<UCameraComponent>(TEXT("CameraComp"));
// Attaching your class Components to the dDefault Character's Skeletal Mesh Component.
CameraRShoulderLocation->SetupAttachment(GetMesh());
CameraOriginLocation->SetupAttachment(GetMesh());
CameraComp->SetupAttachment(GetMesh());
}
// Called when the game starts or when spawned
void ACameraCharacter::BeginPlay()
{
Super::BeginPlay();
}
// Called every frame
void ACameraCharacter::Tick(float DeltaTime)
{
Super::Tick(DeltaTime);
}
//Called to bind functionality to input
void ACameraCharacter::SetupPlayerInputComponent(UInputComponent* PlayerInputComponent)
{
Super::SetupPlayerInputComponent(PlayerInputComponent);
PlayerInputComponent->BindAction("SwitchCamera", IE_Pressed, this, &ACameraCharacter::SetCameraShoulderLocation);
PlayerInputComponent->BindAction("SwitchCamera", IE_Released, this, &ACameraCharacter::SetCameraOriginLocation);
}
void ACameraCharacter::SetCameraShoulderLocation()
{
    CameraComp->SetRelativeLocation(CameraRShoulderLocation->GetRelativeLocation());
}

void ACameraCharacter::SetCameraOriginLocation()
{
    CameraComp->SetRelativeLocation(CameraOriginLocation->GetRelativeLocation());
}Setting Up the Game Mode
With the character created and set up, you will need to modify the Game Mode in order to spawn the character when Play (PIE) is clicked.
-
Begin by navigating to the C++ classes folder. Right click the CameraComponentsGameModeBase class, select Create Blueprint Class based CameraComponentsGameModeBase from the dropdown menu, and name the Blueprint BP_CameraCompGameMode .
![image alt text]()
-
From the Details panel , navigate to the Classes category and select BP_CameraCharacter from the Default Pawn Class dropdown menu.
![image alt text]()
The Default pawn class can also be set from theGameModeBase DefaultPawnClassDefault Pawn variable in the code.
-
Compile and save .
-
From the Unreal Engine toolbar, select Edit > Project Settings and navigate to the Maps & Modes settings. From the Default Modes category select the newly-created BP_CameraCompGameMode class.
![image alt text]()
-
From the Level Editor click the Play (PIE) button to start previewing these changes.
![image alt text]()


End Result

When you select Play (PIE), you can now transition between the two camera perspectives by clicking and releasing the right mouse button.
Next Steps
Now that you have worked with Camera Components you may want to move on to the Spring Arm Component tutorial.
This tutorial will demonstrate how to prevent a camera from being obstructed when moving into tight spaces or when an object blocks the camera's view of the player.