Choose your operating system:
Windows
macOS
Linux
Earlier graphics APIs, such as Direct3D 11 , needed to make dozens of separate calls to configure GPU parameters on the fly before issuing draw calls. More recent graphics APIs, such as Direct3D 12 (D3D12) , Vulkan , and Metal , support using packages of pre-configured GPU state information, called Pipeline State Objects (PSOs), to change GPU states more quickly.
Although this greatly improves rendering efficiency, generating a new PSO on-demand can take 100 or more milliseconds, as the application has to configure every possible parameter. This makes it necessary to generate PSOs long before they are needed for them to be efficient.
In a highly programmable real-time rendering environment such as Unreal Engine (UE) , any application with a large amount of content has too many GPU state parameters that can change to make it practical to manually configure PSOs in advance. To work around this complication, UE can collect data about the GPU state from an application build at runtime, then use this cached data to generate new PSOs far in advance of when they are used. This narrows down the possible GPU states to only the ones used in the application. The PSO descriptions gathered from running the application are called PSO caches .
The steps to collect PSOs in Unreal are:
-
Play the game.
-
Log what is actually drawn.
-
Include this information in the build.
After that, on subsequent playthroughs the game can create the necessary GPU states earlier than they are needed by the rendering code.
This document describes the available PSO types in UE and the detailed processes for generating PSO caches.
Terminology and Supported PSO Types
This document universally refers to GPU state with the term Pipeline State Object (PSO), a name used in D3D12 API. Other APIs use slightly different names. For example, Vulkan uses pipeline , and Metal uses pipeline state . However, conceptually they all are similar.
The term PSO Cache refers to a file with PSO descriptions that is included in the build, so the game can create these states early. In other words, PSO caches are lists of PSOs to create early.
Unreal Engine supports two types of PSOs:
-
Graphics PSOs , which represent the state of the application's graphics pipeline and consist of many configurable variables.
-
Compute PSOs , which usually take the form of compute shaders .
In addition to the above PSO types, ray tracing PSOs also exist, but UE 5.0 does not support PSO caching for ray tracing data.
Most information in this document concerns Graphics PSO collection. Compute PSOs are included in the build differently (all compute shaders in the shader library will automatically have PSO entries created for them during the cook).
Recorded Caches and Stable Caches
The most important data in a PSO is shader information. However, shaders in Unreal can change between multiple builds as developers tweak materials. To avoid throwing out entire PSO caches after a long playthrough of an application, PSO cache files are divided into two varieties:
-
.upipelinecachefiles, or recorded PSO caches . These are recorded when running a build of your application.-
Shaders in recorded caches are identified by the SHA hash of their bytecode.
-
-
.spcfiles, or stable PSO caches . These are generated when cooking map files, and contain shader information that will predictably change when developers change maps or shaders in the project.-
These are identified by stable, high-level descriptions that are expected to stay the same between multiple builds, such as a material name, a vertex factory name, or a shader type. This description is called a stable key , and is represented by a
.scl.csvfile.
-
This ensures that recorded data is relatively robust against frequent changes. While you may still need to re-record PSO caches if there are extremely large-scale changes to your application, you can leave them alone once your application's overall content is finalized.
PSOs on Different Platforms and Graphics APIs
The cache described in this document contains high-level PSO descriptions, which in the engine's code maps to FGraphicsPipelineStateInitializer. However, PSO data is not universal. Each Rendering Hardware Interface (RHI) in Unreal Engine has different properties and may execute different rendering paths.
This results in the contents for PSO caches varying between different platforms and rendering levels. Information between these PSO caches is not interchangeable. For example, the cache collected with a game running with D3D12 RHI is not usable for the same game running on Vulkan.
If you are shipping on a platform that can use more than one graphics API, and you make it possible for your application to choose between them, you will need to include more than one cache file (one per API) in the build. For example, on Android, OpenGL ES remains a relevant API at the time of writing. If you ship an application on Android with both GLES and Vulkan, you need to collect and include two separate cache files, one for each RHI.
GLES does not have a concept of PSO. Instead, it uses a similar concept called a program object .
Platforms with fixed hardware usually neither need nor benefit from this higher-level PSO cache – they either have their own solutions or are able to avoid the runtime performance penalty altogether. Refer to the particular platform's documentation if developing for such a platform.
Legacy API like D3D11 are also not supported by this cache.
Collection Flow
This section assumes that you begin collecting data for a PSO cache from scratch, with a build that has no pre-recorded cache included in it. The collection process for PSO caches is iterative, meaning that rather than starting from a clean slate, you can add to it over time without losing previous data. However, it is usually a good idea to regenerate your PSO caches if the cache files are old, as their contents may not be relevant after substantial code or content changes since they were originally collected.
The sections below contain the steps needed to collect PSO caches and implement them in your project.
1. Setup and Required Settings
The following steps will set up your project to record PSO caches.
-
Open the project's DefaultEngine.ini or its (Platform)Engine.ini .
The
(Platform)Engine.ini
file is usually located in the (Project)/Config/(Platform) directory. Using this directory prevents other platforms that may not need the PSO cache from picking up the setting.
-
Set the following value in your
Engine.inifile:
[DevOptions.Shaders]
NeedsShaderStableKeys=true
-
In your
DefaultGame.inifile, set the following values:
[/Script/UnrealEd.ProjectPackagingSettings]
bShareMaterialShaderCode=True
bSharedMaterialNativeLibraries=True
-
If you're starting from scratch, make sure there are no files in (Project)/Build/(Platform)/PipelineCaches. This is the location where the cooker finds recorded cache files. This folder may not exist at all if this is the first time you collect PSOs.
-
Make sure the CVar r.ShaderPipelineCache.Enabled is set to 1.
2. Collecting Recorded PSO Caches
To record PSO caches, follow these steps:
-
Run the packaged application with the -logPSO command line switch.
-
Execute as many paths in the application as possible. For example, play through all of your application's levels and change your graphics settings.
-
Each time you run your application, it will produce recorded cache files (rec.pipelinecache) under Saved/CollectedPSOs. Collect them and put them in a new directory anywhere on your computer. This guide uses the directory C:\PSOCache.
When collecting recorded PSO caches, your end goal is to see every possible material or visual effect that a user can see in your application, so you should be thorough in visiting as many locations as possible and doing so with many different combinations of graphics settings.
Note that you do not need to collect all of your PSO caches in a single run. You can perform multiple runs over the course of developing your application, or you can split this task among multiple people. Recorded PSO caches will not be removed until you do so manually, so you can gradually accumulate them during development.
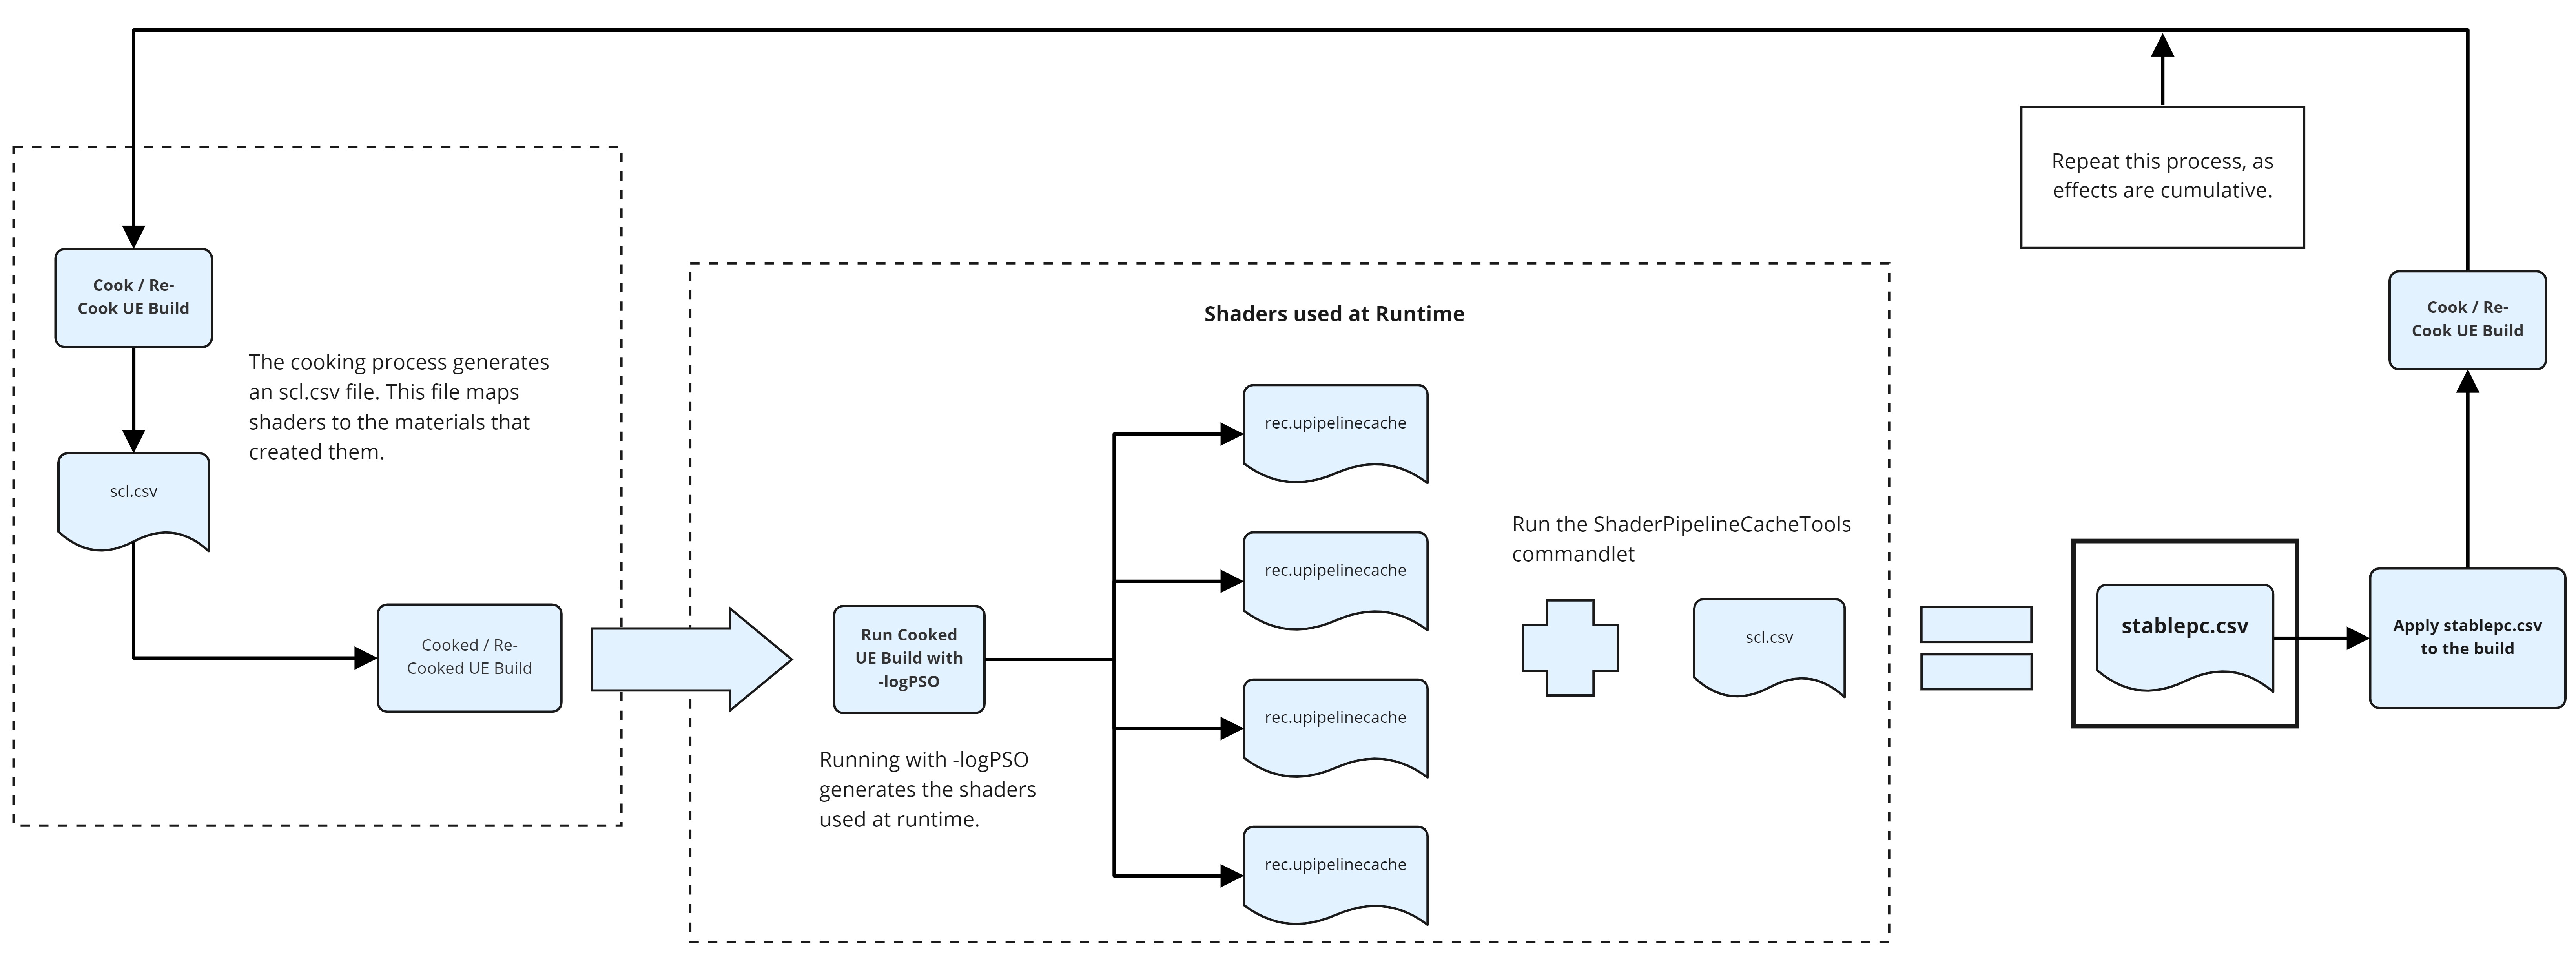
3. Converting PSO Caches (also known as expansion)
To convert your PSO data from the previous steps into a useful format, follow these steps:
-
Cook your project's content. You can do this by packaging your application.
-
Open (Project)/Saved/Cooked/(Platform)/(ProjectName)/Metadata/PipelineCaches. Copy the stable shader key (.shk) files from this directory into the folder where you put your rec.pipelinecache files. For example, C:\PSOCache.
-
Run the ShaderPipelineCacheTools commandlet using the arguments below (assuming your current directory is the engine installation directory):
Engine\Binaries\Win64\UnrealEditor-Cmd.exe -run=ShaderPipelineCacheTools expand C:\PSOCache*.rec.upipelinecache C:\PSOCache*.shk C:\PSOCache
The filename you provide should be constructed of the following:
-
(YourPrefix) – An arbitrary string, usually designating the moment of time when the collection happened. For example, this could be the changelist of a current build.
-
(ProjectName) – The name of your project. For example: ShooterGame. This must match your project's name exactly or else it won't be picked up.
-
(ShaderFormatName) – The shader format for your project, which must match the shader format's name exactly. For D3D12 this is PCD3D_SM5.
A full name for the project ShooterGame using the above conventions would be as follows: CL11122333_ShooterGame_PCD3D_SM5.spc
4. Including PSO Caches in Your Application
-
Place your
.spcfile produced in the previous section into the Build//PipelineCaches folder. For example: Build/Windows/PipelineCaches. -
Cook or package your project again. Your PSO cache files should be picked up by the cooker, and your log should include something like the following near the end:
LogCook: Display: ---- Running UShaderPipelineCacheToolsCommandlet for platform WindowsClient shader format PCD3D_SM5
LogCook: Display: With Args: build "../../../TestGame/Build/Windows/PipelineCaches/*TestGame_PCD3D_SM5.spc" "d:/build/++Test/Sync/TestGame/Saved/Cooked/WindowsClient/TestGame/Metadata/PipelineCaches/ShaderStableInfo-Global-PCD3D_SM5.shk" "d:/build/++Test/Sync/TestGame/Saved/Cooked/WindowsClient/TestGame/Metadata/PipelineCaches/ShaderStableInfo-TestGame-PCD3D_SM5.shk" "d:/build/++Test/Sync/TestGame/Saved/Cooked/WindowsClient/TestGame/Content/PipelineCaches/Windows/TestGame_PCD3D_SM5.stable.upipelinecache"
LogShaderPipelineCacheTools: Display: Sorting input stable cache files into chronological order for merge processing...
LogShaderPipelineCacheTools: Display: Loading d:/build/++Test/Sync/TestGame/Saved/Cooked/WindowsClient/TestGame/Metadata/PipelineCaches/ShaderStableInfo-Global-PCD3D_SM5.shk...
LogShaderPipelineCacheTools: Display: Loading d:/build/++Test/Sync/TestGame/Saved/Cooked/WindowsClient/TestGame/Metadata/PipelineCaches/ShaderStableInfo-TestGame-PCD3D_SM5.shk...
LogShaderPipelineCacheTools: Display: Loaded 3554 shader info lines from d:/build/++Test/Sync/TestGame/Saved/Cooked/WindowsClient/TestGame/Metadata/PipelineCaches/ShaderStableInfo-Global-PCD3D_SM5.shk.
LogShaderPipelineCacheTools: Display: Loaded 3833694 shader info lines from d:/build/++Test/Sync/TestGame/Saved/Cooked/WindowsClient/TestGame/Metadata/PipelineCaches/ShaderStableInfo-TestGame-PCD3D_SM5.shk.
LogShaderPipelineCacheTools: Display: Loaded 3837248 unique shader info lines total.
LogShaderPipelineCacheTools: Display: Loaded 13238 stable PSOs from ../../../TestGame/Build/Windows/PipelineCaches/++Test+GoldMaster-CL-17412694-TestGame_PCD3D_SM5.spc. 2329 PSOs rejected, 5840141 PSOs merged
LogShaderPipelineCacheTools: Display: Re-deduplicated into 35084 binary PSOs [Usage Mask Merged = 3].
LogShaderPipelineCacheTools: Display: Running sanity check (consistency of vertex format).
LogShaderPipelineCacheTools: Display: 0 vertex shaders are used with an inconsistent vertex format
LogShaderPipelineCacheTools: Display: === Sanitizing results ===
LogShaderPipelineCacheTools: Display: Before sanitization: .................................................................... 35382 PSOs
LogShaderPipelineCacheTools: Display: Filtered out due to inconsistent vertex declaration for the same vertex shader:.......... 0 PSOs
LogShaderPipelineCacheTools: Display: Filtered out due to VS being possibly incompatible with an empty vertex declaration:..... 1 PSOs
LogShaderPipelineCacheTools: Display: -----
LogShaderPipelineCacheTools: Display: Number of PSOs after sanity checks:...................................................... 35381 PSOs
LogShaderPipelineCacheTools: Display: Wrote 35381 binary PSOs (graphics: 34834 compute: 547 RT: 0), (18453KB) to d:/build/++Test/Sync/TestGame/Saved/Cooked/WindowsClient/TestGame/Content/PipelineCaches/Windows/TestGame_PCD3D_SM5.stable.upipelinecache
LogCook: Display: ---- Done running UShaderPipelineCacheToolsCommandlet for platform WindowsClient
To verify this worked, check the line that shows the number of binary PSOs written, which is written at the very end of the log. The number of graphics PSOs on this line must be greater than 0.
LogShaderPipelineCacheTools: Display: Wrote 35381 binary PSOs (graphics: 34834 compute: 547 RT: 0), (18453KB) to d:/build/++Test/Sync/TestGame/Saved/Cooked/WindowsClient/TestGame/Content/PipelineCaches/Windows/TestGame_PCD3D_SM5.stable.upipelinecache LogCook: Display: ---- Done running UShaderPipelineCacheToolsCommandlet for platform WindowsClient
5. Testing PSO Coverage
To determine whether your PSO cache has sufficient coverage, run the newly packaged application with the
-logpso
command and observe the log output. You should see lines similar to the following:
[2021.10.06-20.06.22:848][ 0]LogRHI: Opened FPipelineCacheFile: ../../../ShooterGame/Content/PipelineCaches/Windows/ShooterGame_PCD3D_SM5.stable.upipelinecache (GUID: EA50968D47BDE9A04A8524BCEB51615D) with 269 entries.
The number must agree with the number of binary PSOs written in the packaging log. For example, if the log reported that it wrote 35381 binary PSOs, expect to see 35381 entries.
You should also check if the build prints "Encountered a new graphics PSO" in the log. This should not be happening if you are seeing the same content under the same conditions (for example, the same scalability settings) as during the collection of the cache.
Partitioning the Cache
As of this writing, the resulting PSO cache is a single monolithic file that is included with the game build. The default behavior of the game is to attempt to open it on start and begin compiling PSOs from it. However, not all PSOs are relevant at all times. For example, some may have been collected from a different level, and some were recorded with different graphics settings.
To avoid compiling all of them needlessly, each PSO is currently associated with a bitmask called a game usage mask . The application can use the SetGameUsageMaskWithComparison function to avoid compiling PSOs recorded on a different level or with different graphics (quality) settings. The following is an example of such a function:
void SetPSOCacheUsageMask(int32 QualityLevel, int32 MapIndex)

{

    uint64 GameMask = 0;

    const int32 kMaxQualityLevels = 4;

    GameMask |= (1ULL << static_cast<uint64>(QualityLevel));

    check(MapIndex < 64 - kMaxQualityLevels);

    GameMask |= (1ULL << static_cast<uint64>(kMaxQualityLevels + MapIndex));

    // default bit-wise AND comparison will work, no need to overload comparison function

    FShaderPipelineCache::SetGameUsageMaskWithComparison(GameMask);

}
If there are more than 60 maps in game or you want to encode more granular quality settings, you can generate the mask differently, like treating uint64 as the structure of several bitfields, and then using a custom comparison function to compare them. For example:
union

{

    uint64 Packed;

    struct

    {

        uint64 MaterialQuality : 4;

        uint64 ShadowQuality : 4;

        uint64 MapIndex : 16;

    };

};
This function needs to be set by the application early during startup, such as when loading/saving user settings ( UGameUserSettings) . It is used in each of the following cases:
-
During the recording process – recorded PSOs will be associated with the current usage mask.
-
During compilation – only PSOs matching the current usage mask will be compiled from the cache.
Since the compilation starts very early, you may want to default to starting it paused (see below) and re-enabling explicitly after the correct mask has been set.
Limitations and Future Work
Currently, the concept of masks inherently relies on manual collection. By contrast, Compute PSOs, which are added to the cache automatically during the cook, all have masks of 0xffffffffffffffff (all 1s). Implementing programmatic population of the PSO cache means applying automatic caching to (some) graphics PSOs as well, and the user mask concept may evolve into a different approach or be retired altogether.
If your game content is split into multiple downloads, it is hard to split the PSO cache into chunks to correspond to independent bundles of content (this document does not cover splitting the cache, refer instead to Cooking and Chunking ).
Controlling PSO Compilation
PSOs included in the cache need to be compiled so they are ready when the rendering code needs them. In a new project using default settings, a bundled PSO cache file is opened automatically after the application starts, and compilation starts automatically. If this is not desirable (for example, because you need to set a custom usage mask), you can pause the compilation using r.ShaderPipelineCache.StartupMode=0 and later resume it with FShaderPipelineCache::ResumeBatching() .
There are several Startup Modes that you can use when compiling PSOs:
|
Value |
Mode |
Description |
|---|---|---|
|
0 |
Paused |
Compilation is suspended until resumed. |
|
1 |
Fast |
Using Fast mode is recommended during the loading screens or otherwise non-interactive parts of the game |
|
2 |
Background |
Background mode is more suitable for compilation while the player is navigating the UI. |
|
3 |
Precompile |
Combines properties of both Fast and Background. Uses a separate precompile usage mask (configured with r.ShaderPipelineCache.PreCompileMask) to compile PSOs that match it in the Fast mode, but uses Background mode for the rest (that only match the regular usage mask). |
You can also query the number of outstanding PSOs to compile by calling FShaderPipelineCache::NumPrecompilesRemaining() if the game wants to keep the loading screen for longer, until the compilation is complete.
Modes have more fine-grained settings, which means you can set the size of a batch taken for the precompilation all at once and the target time to spend precompiling per frame. The actual time it takes to compile a PSO is out of the game's control.
User Cache File
Even if you provide the PSO cache with the game, the user can run into content not covered during the collection. Some drivers can provide their own cache, but to be more independent from driver behavior, the game by default attempts to collect and save missed PSOs to local user cache files. These are located in the game's Saved directory ( FPaths::ProjectSavedDir () ), the same directory as for the game's user settings. The application loads those user cache files on start and merges their contents with the files included in the build.
User cache PSO files are in recorded cache format. This means they reference the shaders using their SHA hashes, and won't be usable across large game updates that change a lot of content. Because of that, each file embeds a game version , which is checked against the running application. It is configured in DefaultGame.ini, as in the example below, and needs to be increased each time the application issues a possibly incompatible update, such as an update that contains content changes or significant rendering code changes.
[ShaderPipelineCache.CacheFile]
GameVersion=1234
By default, GameVersion is taken from the EngineVersion, which in turn usually closely tracks Perforce changelists, making user caches written by any two different builds incompatible (even without relevant changes).
To prevent the cache file from growing indefinitely large, the application "garbage collects" entries in it immediately upon loading. This is based on the last used time of an entry and is configurable via a CVar r.ShaderPipelineCache.UserCacheUnusedElementRetainDays (the default value is 30 days).
Vulkan and OpenGL ES RHIs have their own, lower-level pipeline cache inside the RHI. After a PSO is compiled (whatever the source - cache or creation by the code) it will be saved into that cache and picked up on the next start. There may be no need to enable the user cache file when using those graphics APIs.
Q&A
How often do I need to collect PSOs?
Ideally, you should re-capture your project's PSO data each time content is added, updated, or changed in a significant way. However, in practice, this is not possible due to the rapid pace at which development happens. Since each project has different PSO collection requirements, establishing a rigid schedule is not possible. A rule of thumb is that you need to update the PSO cache if you feel your build has started hitching often. In particular, never measure the performance of a build that does not have an up-to-date cache, or at least don't use those measurements in comparisons.
Do I need to make special PSO caching levels?
While you can capture all needed PSO data from your project's standard levels, some projects may benefit from creating special PSO capture levels. These levels can be set up so they spawn all assets of a particular type and then capture their PSO data. This is especially true if your project has content that takes time to unlock or is dynamically spawned.
I haven't collected any PSOs, but my build has a PSO cache!?
If you have Niagara content, this is expected. Compute PSOs are added to the cache automatically during the cooking process (if you enabled the cache for the project).
I have a PSO cache in my build, but the game still hitches.
First, verify the following:
-
The game is running on a graphical API that is supported by the cache (For example, D3D12, but not D3D11),
-
The file is opened at the start of your game.
-
The right PSOs are being compiled in the background.
To do this, examine the log file and look for the LogRHI logging category. You should see lines like this:
LogRHI: Opened FPipelineCacheFile: ../../../TestGame/Content/PipelineCaches/Windows/TestGame_PCD3D_SM5.stable.upipelinecache (GUID: 91C5586843C2B5CEE3F4F7BE47E71253) with 908 entries.
LogRHI: Display: Opened pipeline cache after state change and enqueued 908 of 908 tasks for precompile.
The number of entries and tasks will vary, but it should not be 0.
Second, check how many new PSOs are being found. For that, run the build with the -logPSO command line switch (or with the user cache file enabled), and see how often you encounter a line like this:
LogRHI: Display: Encountered a new graphics PSO: 4233039161
The number given after PSO: will vary. If you see a substantial count and their appearance coincides with the hitches, there is likely a problem with your cache. Please collect the cache again on the current content. You may even need to start from scratch.
If you do not have these lines, or you are running on D3D11, but your build is still hitching, the hitches may not be directly PSO related. In that case, we recommend profiling the game with a CPU profiler to understand the nature of the hitches.