Choose your operating system:
Windows
macOS
Linux
実装方法を選んでください。
C++
このチュートリアルでは、 Engine Starter content で利用できるリソースを使って、 Timeline ブループリントで接近すると開くドアの設定方法を紹介します。

Door アクタを作成する
-
最初に、 [New] > [Games] > [Blank] > [Blueprint] プロジェクトへ進み、 スターターコンテンツ を有効にした TimelineDoorActor を作成します。
-
[Add/Import] ボタンをクリックして、Blueprint Actor クラスを新規作成し、 BP_DoorActor を名前をつけます。
-
コンテンツブラウザから BP_Door アクタをダブルクリックしてブループリント エディタで開いて Class Defaults を開きます。
![image alt text]()
-
次に、 [Components] タブから [Add Component (コンポーネントを追加)] ボタンをクリックし [Static Mesh] を選択して Static Mesh Component を追加します。
![image alt text]()
-
スタティックメッシュを右クリックし、 [Rename (名前を変更)] を選択して DoorFrame に名前を変更します。
![image alt text]()
-
次に、 [Components] タブから [Add Component (コンポーネントを追加)] ボタンをクリックし [Static Mesh] を選択して Static Mesh Component を追加します。(Repeating step 3)
-
スタティックメッシュを右クリックし、[Rename (名前を変更)] を選択して Door に名前を変更します。
![image alt text]()
-
[Add Component] をクリックし、ドロップダウン メニューから [Box Collision] を選択して Box に名前を変更します。
![image alt text]()
-
次にイベントグラフを開いて グラフ を右クリックし、 [Blueprint Context Menu] から [Add Timeline (タイムラインを追加)] を選択します。タイムラインに DoorTimelineComponent と名前をつけます。
![image alt text]()


この時点で、BP_DoorActor のクラス デフォルトは、以下の例のようになっているはずです。

Door Static Mesh を設定する
次に、 [Components] タブのアタッチメント階層を設定する必要があります。
DoorFrame スタティックメッシュ コンポーネントと Door スタティックメッシュ コンポーネントを視覚的に表示するスタティックメッシュ アセットも設定する必要があります。
-
BP_DoorActor の [Component] タブから DoorFrame スタティックメッシュを選択し、それを DefaultSceneRoot コンポーネント にドラッグして新しい ルート コンポーネント にします。
![image alt text]()
-
[Components] タブで DoorFrame スタティックメッシュを選択し、 [Details] パネルでスタティックメッシュを SM_DoorFrame に変更します。
![image alt text]()
-
[Components (コンポーネント)] パネルで DoorMesh コンポーネントを選択します。 [Details] パネルに移動し、スタティックメッシュを SM_Door に変更します。
![image alt text]()
-
Transform カテゴリに移動し、 Y Location 値を 45.0 に変更します。
![image alt text]()
-
[Save (保存する)] と [Compile (コンパイルする)] をクリックしてこれらの変更を Bp_DoorActor に保存します。


Timeline Float Track を作成する
Timeline Component では移動アニメーションを記述するために Timeline Curve を必要とします。それぞれのカーブには、時間と値を定義する複数のキーが含まれています。カーブはこれらのキーを補間して、タイムライン中の任意のポイントの値を計算します。
-
まず、イベントグラフの DoorTimelineComponent をダブルクリックして Timeline エディタを開きます。
-
[Add Float Curve (Float カーブを追加)] をクリックしてトラックに新しいカーブを追加して、そのカーブに DoorRotationZ と名付けます。
![image alt text]()
-
右クリックして Float カーブ トラックにキーを 2 つ追加します。値は (0,0) と (5,90) にします。
![image alt text]()
-
Shift キーを使って 2 つのキーを選択し、 [Key Interpolation (キー補間)] ドロップダウン メニューから [Auto (自動)] 補間を選択します。
-
Float トラックを保存します。


イベント トラック ロジックを更新する
次に、Door スタティックメッシュを回転させるための更新ロジックを作成する必要があります。
-
BP_DoorActor の [Components] タブに移動し、Door スタティックメッシュをイベントグラフにドラッグします。
![image alt text]()
-
Door ピンを引き出し、アクション コンテキスト メニューから SetRelativeRotation を選択します。
![image alt text]()
-
イベントグラフを右クリックし、コンテキスト メニューから Make Rotator を選択します。
![image alt text]()
-
DoorTimelineComponent ノードから Door Rotation Z float ピンを引き出して Make Rotator ノードの Z ( Yaw ) ピンにつなぎます。
![image alt text]()
-
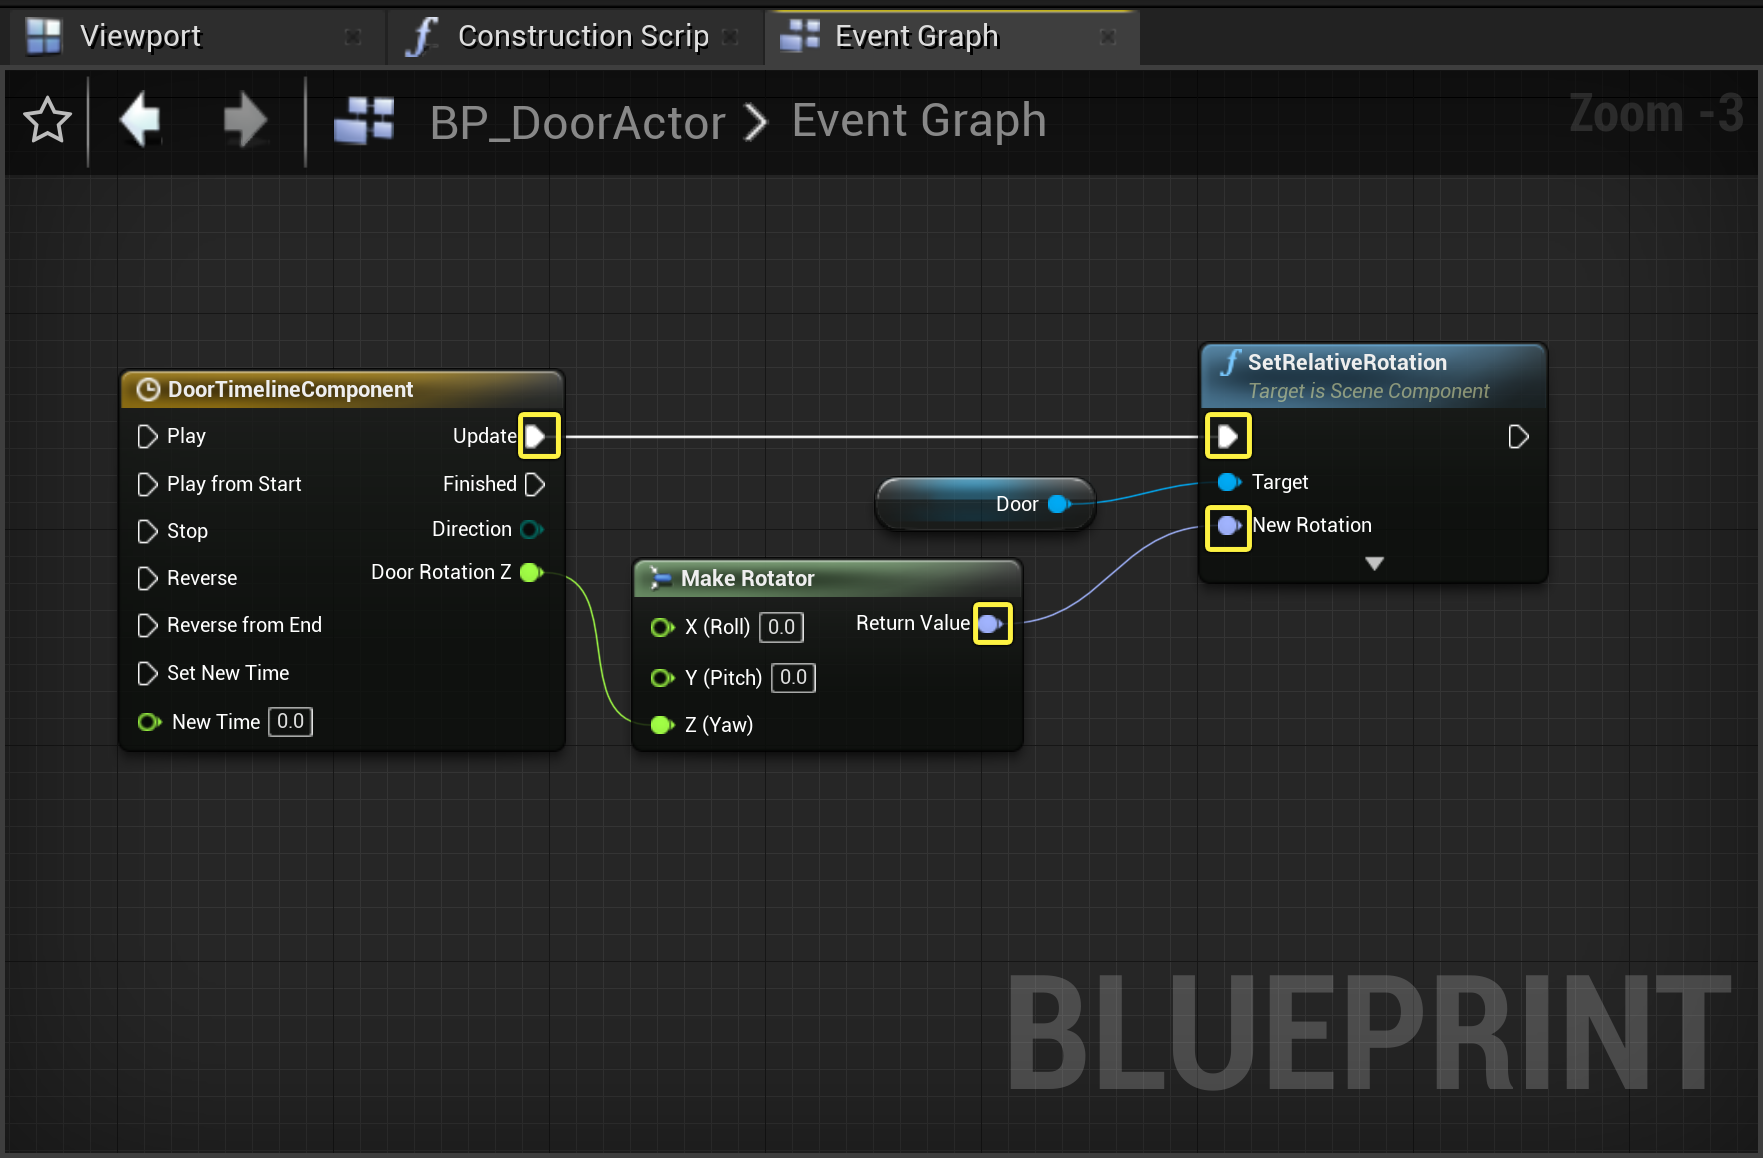
DoorTimelineComponent ノードから Update ピン を引き出して SetRelativeRotation ノードの入力実行ピンにつなぎます。
-
Make Rotator ノードの Return Value ピンを SetRelativeRotation ノードの New Rotation ピンにつなぎます。
![image alt text]()
-
コンパイル して 保存 します。


Binding Box Collision Overlap イベントを作成する
アクタがコリジョン領域に出入りするときに Box コンポーネントが反応する機能が必要です。
-
BP_DoorActor の [Components] タブで Box コンポーネントから Box コンポーネントを選択します。
-
[Details] パネルの Events カテゴリを下にスクロールし、 On Component Begin Overlap イベントの横にある [+] アイコンをクリックします。
![image alt text]()
-
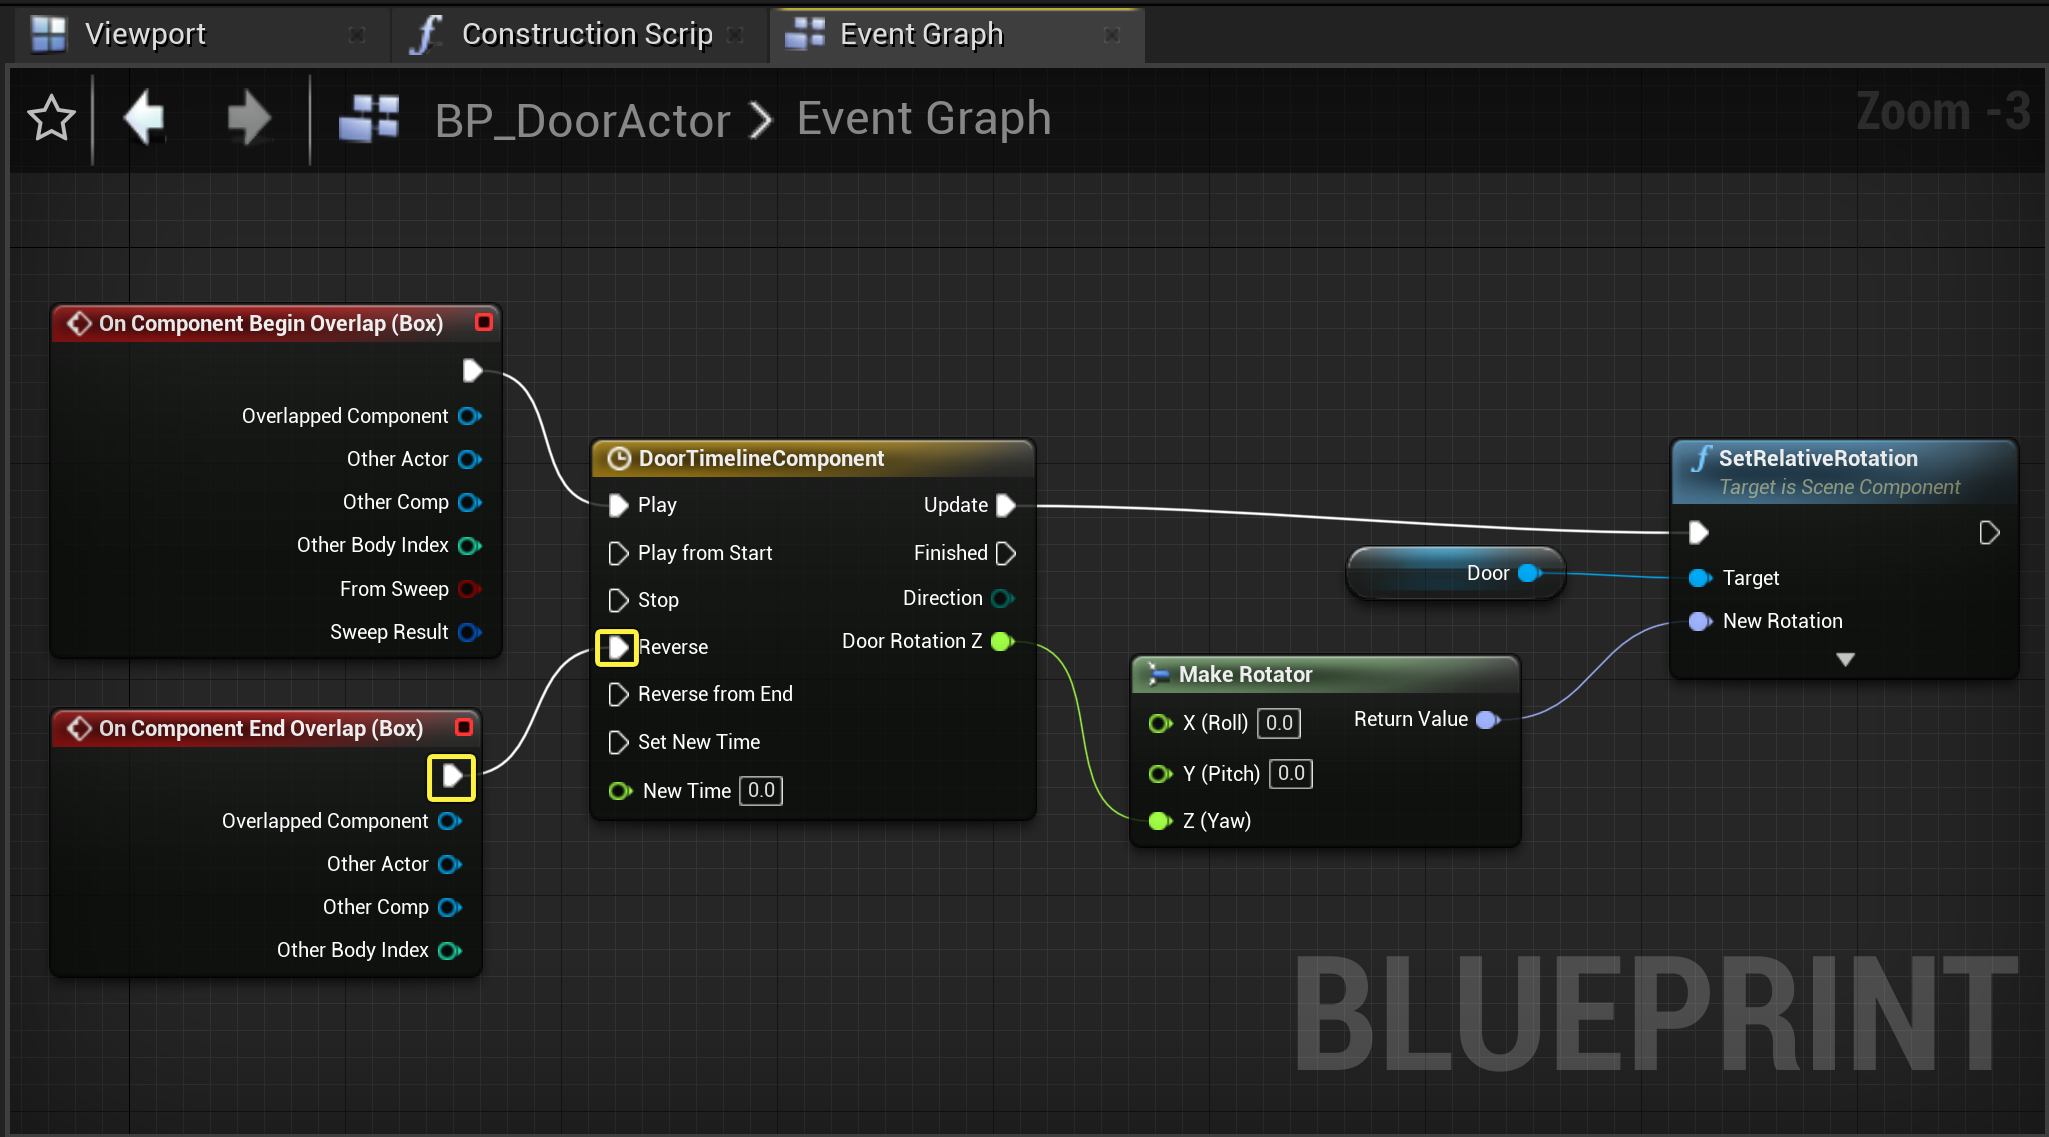
On Component Begin Overlap(Box) ノードの実行ピンを引き出して、DoorTimelineComponent ノードの Play ピンにつなぎます。
![image alt text]()
-
BP_DoorActor の [Components] タブで Box コンポーネントから Box コンポーネントを選択します。[Details] パネルの Events カテゴリを下にスクロールし、 On Component End Overlap イベントの横にある [+] アイコンをクリックします。
![image alt text]()
-
On Component Begin Overlap(Box) ノードの実行ピンを引き出して、DoorTimelineComponent ノードの Reverse ピンにつなぎます。
![image alt text]()
-
コンパイル して 保存 します。


アクタをレベルに配置する
-
コンテンツ ブラウザで BP_DoorActor を選択してビューポートにドラッグします。
![image alt text]()
-
[PIE] を押します。
![image alt text]()
WASD キーを使って、スペクテイター ポーンを制御することができます。DoorActor のコリジョン領域へ移動すると、ドアが開いた時にタイムラインがプレイするのが分かります。領域に存在している時は、タイムラインが反対にプレイすることがわかります。


完成したブループリント
BP_DoorActor

このチュートリアルでは、 Engine のスターターコンテンツ で利用できるリソースを使って、C++ Timeline で接近すると開くドアの設定方法を紹介します。
Door アクタを作成する
-
最初に、 [New] > [Games] > [Blank] > [C++] プロジェクトへ進み、 スターターコンテンツ を有効にした TimelineDoorActor を作成します。
-
C++ Class Wizard で DoorActor という名前の Actor クラスを新規作成します。「
DoorActor.h」ファイルで以下のインクルードを宣言します。#include "Components/TimelineComponent.h" -
次に
DoorActorクラス定義で以下のコードを実行します。protected: //MeshComponents to represent Door assets UPROPERTY(VisibleAnywhere, BlueprintReadWrite) UStaticMeshComponent* DoorFrame; UPROPERTY(VisibleAnywhere, BlueprintReadWrite) UStaticMeshComponent* Door; //TimelineComponent to animate Door meshes UPROPERTY(VisibleAnywhere, BlueprintReadWrite) UTimelineComponent* DoorTimelineComp; //BoxComponent which will be used as our Proximity volume. UPROPERTY(EditAnywhere, BlueprintReadWrite) class UBoxComponent* DoorProxVolume; -
DoorActor.cppに移動します。以下のクラス ライブラリをインクルードして Box コンポーネントを使用します。#include "Components/BoxComponent.h" -
ADoorActor::ADoorActor のコンストラクタで以下を宣言します。
//Create our Default Components
DoorFrame = CreateDefaultSubobject<UStaticMeshComponent>(TEXT("DoorFrameMesh"));
Door = CreateDefaultSubobject<UStaticMeshComponent>(TEXT("DoorMesh"));
DoorTimelineComp = CreateDefaultSubobject<UTimelineComponent>(TEXT("DoorTimelineComp"));
DoorProxVolume = CreateDefaultSubobject<UBoxComponent>(TEXT("DoorProximityVolume"));

//Setup our Attachments
DoorFrame->SetupAttachment(RootComponent);
Door->AttachToComponent(DoorFrame,FAttachmentTransformRules::KeepRelativeTransform);
DoorProxVolume->AttachToComponent(DoorFrame, FAttachmentTransformRules::KeepRelativeTransform);
注記:後で Door アクタnoカスタム メソッドを使って操作するために、ドアの相対トランスフォームをアタッチメント ルールとして保持します。 詳細は「 FAttachmentTransformRules 」を参照してください。
-
[Compile (コンパイル)] を選択して、エディタでコードを ホットリロード します。
![image alt text]()

Door Static Mesh を設定する
DoorFrame スタティックメッシュ コンポーネントと Door スタティックメッシュ コンポーネントを視覚的に表示するスタティックメッシュ アセットも設定する必要があります。
-
コンテンツ ブラウザから、 C++ Classes フォルダ に移動します。
-
DoorActor クラスをダブルクリックして Create Blueprint Class based on Door Actor を選択し、ブループリント アクタに Bp_DoorActor と名前を付けます。
-
[Components] タブで DoorFrame Static Mesh コンポーネントを選択します。
-
[Details] パネルに移動し、スタティックメッシュを SM_DoorFrame に変更します。
![image alt text]()
-
[Components (コンポーネント)] パネルで DoorMesh コンポーネントを選択します。 [Details] パネルに移動し、スタティックメッシュを SM_Door に変更します。
![image alt text]()
-
Transform カテゴリに移動し、 Y Location 値を 45.0 に変更します。
![image alt text]()
-
[Save (保存する)] をクリックしてこれらの変更を Bp_DoorActor に保存します。


UCurveFloat トラックと Timeline イベント トラックを作成する
Timeline Component では Timeline Curve を必要とします。各カーブには時間と値を定義する複数のキーを含むことができます。カーブはこれらのキーを補間して、タイムライン中の任意のポイントの値を計算します。
ここの例では、 UCurveFloat を使用します。
-
DoorActor.hのADoorActorクラス定義へ移動し、以下の変数を宣言します。public: // Variable to hold the Curve asset UPROPERTY(EditAnywhere) UCurveFloat* DoorTimelineFloatCurve; private: //Float Track Signature to handle our update track event FOnTimelineFloat UpdateFunctionFloat; //Function which updates our Door's relative location with the timeline graph UFUNCTION() void UpdateTimelineComp(float Output); -
DoorActor.cppに移動し、UpdateTimelineCompメソッドを実装します。void ADoorActor::UpdateTimelineComp(float Output)
{ // Create and set our Door's new relative location based on the output from our Timeline Curve FRotator DoorNewRotation = FRotator(0.0f, Output, 0.f); Door->SetRelativeRotation(DoorNewRotation); } -
BeginPlay メソッドで以下のコードを追加します。
//Binding our float track to our UpdateTimelineComp Function's output
UpdateFunctionFloat.BindDynamic(this, &ADoorActor::UpdateTimelineComp);

//If we have a float curve, bind it's graph to our update function
if (DoorTimelineFloatCurve)
{
   DoorTimelineComp->AddInterpFloat(DoorTimelineFloatCurve, UpdateFunctionFloat);
}
Work-In-Progress Code
// Copyright 1998-2021 Epic Games, Inc.All Rights Reserved.
#pragma once
#include "CoreMinimal.h"
#include "GameFramework/Actor.h"
#include "Components/TimelineComponent.h"
#include "DoorActor.generated.h"

UCLASS()
class TIMELINEDOORACTOR_API ADoorActor : public AActor
{
    GENERATED_BODY()

public:
    // Sets default values for this actor's properties
    ADoorActor();

    /*Variable to hold Curve asset*/
    UPROPERTY(EditAnywhere)
    UCurveFloat* DoorTimelineFloatCurve;

protected:
    // Called when the game starts or when spawned
    virtual void BeginPlay() override;

    //MeshComponents to represents Door assets
    UPROPERTY(VisibleAnywhere, BlueprintReadWrite)
    UStaticMeshComponent* DoorFrame;
    UPROPERTY(VisibleAnywhere, BlueprintReadWrite)
    UStaticMeshComponent* Door;

    //TimelineComponent to animate door meshes
    UPROPERTY(VisibleAnywhere, BlueprintReadWrite)
    UTimelineComponent* DoorTimelineComp;

    //BoxComponent which will be used as our proximity volume.
    UPROPERTY(EditAnywhere, BlueprintReadWrite)
    class UBoxComponent* DoorProxVolume;

    //Float Track Signature to handle our update track event
    FOnTimelineFloat UpdateFunctionFloat;

    //Function which updates our Door's relative location with the timeline graph
    UFUNCTION()
    void UpdateTimelineComp(float Output);

public:
    // Called every frame
    virtual void Tick(float DeltaTime) override;
};//Copyright 1998-2021 Epic Games, Inc.All Rights Reserved.
#include "DoorActor.h"
#include "Components/BoxComponent.h"
// Sets default values
ADoorActor::ADoorActor()
{
// Set this actor to call Tick() every frame. You can turn this off to improve performance if you don't need it.
PrimaryActorTick.bCanEverTick = true;
//Create our Default Components
DoorFrame = CreateDefaultSubobject<UStaticMeshComponent>(TEXT("DoorFrameMesh"));
Door = CreateDefaultSubobject<UStaticMeshComponent>(TEXT("DoorMesh"));
DoorTimelineComp = CreateDefaultSubobject<UTimelineComponent>(TEXT("DoorTimelineComp"));
DoorProxVolume = CreateDefaultSubobject<UBoxComponent>(TEXT("DoorProximityVolume"));
//Setup our Attachments
DoorFrame->SetupAttachment(RootComponent);
Door->AttachToComponent(DoorFrame,FAttachmentTransformRules::KeepRelativeTransform);
DoorProxVolume->AttachToComponent(DoorFrame, FAttachmentTransformRules::KeepRelativeTransform);
}
// Called when the game starts or when spawned
void ADoorActor::BeginPlay()
{
Super::BeginPlay();
//Binding our float track to our UpdateTimelineComp Function's output
UpdateFunctionFloat.BindDynamic(this, &ADoorActor::UpdateTimelineComp);
//If we have a float curve, bind it's graph to our update function
if (DoorTimelineFloatCurve)
{
DoorTimelineComp->AddInterpFloat(DoorTimelineFloatCurve, UpdateFunctionFloat);
}
}
void ADoorActor::UpdateTimelineComp(float Output)
{
//Create and set our Door's new relative location based on the output from our Timeline Curve
FRotator DoorNewRotation = FRotator(0.0f,Output,0.f);
Door->SetRelativeRotation(DoorNewRotation);
}
// Called every frame
void ADoorActor::Tick(float DeltaTime)
{
Super::Tick(DeltaTime);
}Collision Overlap イベントを作成してバインドする
アクタがコリジョン領域に出入りするときに Box コンポーネントが反応する機能が必要です。
-
「
TimelineDoorActor.h」ファイルのクラス定義から、以下を宣言します。// Begin and End Overlap Events for our DoorProxVolume UFUNCTION() void OnOverlapBegin(class UPrimitiveComponent* OverlappedComp, class AActor* OtherActor, class UPrimitiveComponent* OtherComp, int32 OtherBodyIndex, bool bFromSweep, const FHitResult& SweepResult); UFUNCTION() void OnOverlapEnd(class UPrimitiveComponent* OverlappedComp, class AActor* OtherActor, class UPrimitiveComponent* OtherComp, int32 OtherBodyIndex); -
Next, navigate to your
DoorActor.cppfile to implement yourOnOverlapBeginandOnOverlapEndclass methods:void ADoorActor::OnOverlapBegin(UPrimitiveComponent * OverlappedComp, AActor * OtherActor, UPrimitiveComponent * OtherComp, int32 OtherBodyIndex, bool bFromSweep, const FHitResult & SweepResult) { DoorTimelineComp->Play(); } void ADoorActor::OnOverlapEnd(UPrimitiveComponent * OverlappedComp, AActor * OtherActor, UPrimitiveComponent * OtherComp, int32 OtherBodyIndex) { DoorTimelineComp->Reverse(); } -
BeginPlay メソッドで以下のようにオーバーラップ関数をバインドします。
//Binding our Proximity Box Component to our Overlap Functions DoorProxVolume->OnComponentBeginOverlap.AddDynamic(this, &ADoorActor::OnOverlapBegin); DoorProxVolume->OnComponentEndOverlap.AddDynamic(this, &ADoorActor::OnOverlapEnd); -
コードをコンパイルします。
Unreal Editor でカーブ アセットを作成する
Timeline Actor Blueprint に割り当てるために Unreal Editor でカーブ アセットを作成する必要があります。
-
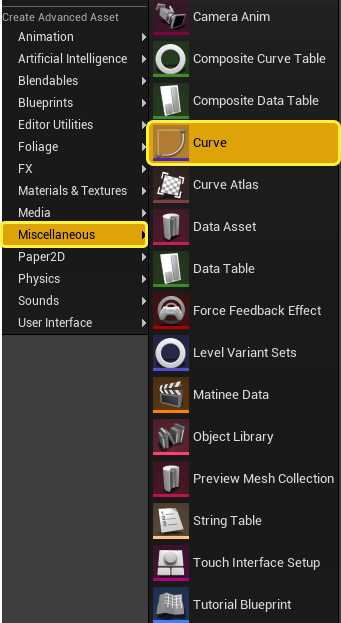
コンテンツ ブラウザ から、 [Add/Import] > [Miscellaneous] > [Curve] の順に選択します。
![image alt text]()
-
[CurveFloat] を選択して CurveFloat アセットに DoorCurveFloat と名前を付けます。
-
DoorCurveFloat アセットをダブル クリックして Timeline Editor を開きます。
-
Float Curve に 2 つのキーを追加します。時間値 (0,0) と (4,90) です。
![image alt text]()
Timeline カーブの編集に関する詳細は、「 キーとカーブ 」を参照してください。
-
Shift キーを押しながら 2 つのキーを選択し、それらに Auto Cubic interpolation を設定してカーブを保存します。
![image alt text]()
-
Bp_DoorActor を開いて [Components] タブで Bp_DoorActor を選択します。
-
[Details] パネルの [Door Timeline Float Curve] ドロップダウン メニューから DoorCurveFloat を選択します。
![image alt text]()
-
レベル エディタで Bp_DoorActor をシーンに配置します。
-
コンパイルして保存し、PIE を押します。
![image alt text]()
WASD を使って、スペクテイター ポーンを制御することができます。DoorActor のコリジョン領域へ移動すると、ドアが開いた時にタイムラインがプレイするのが分かります。


完成コード
// Copyright 1998-2021 Epic Games, Inc.All Rights Reserved.
#pragma once
#include "CoreMinimal.h"
#include "GameFramework/Actor.h"
#include "Components/TimelineComponent.h"
#include "DoorActor.generated.h"
UCLASS()
class TIMELINEDOORACTOR_API ADoorActor : public AActor
{
GENERATED_BODY()
public:
// Sets default values for this actor's properties
ADoorActor();
//Variable to hold Curve asset
UPROPERTY(EditAnywhere)
UCurveFloat* DoorTimelineFloatCurve;
protected:
// Called when the game starts or when spawned
virtual void BeginPlay() override;
/*MeshComponents to represents Door assets*/
UPROPERTY(VisibleAnywhere, BlueprintReadWrite)
UStaticMeshComponent* DoorFrame;
UPROPERTY(VisibleAnywhere, BlueprintReadWrite)
UStaticMeshComponent* Door;
//TimelineComponent to animate door meshes
UPROPERTY(VisibleAnywhere, BlueprintReadWrite)
UTimelineComponent* DoorTimelineComp;
//BoxComponent which will be used as our proximity volume.
UPROPERTY(EditAnywhere, BlueprintReadWrite)
class UBoxComponent* DoorProxVolume;
//Float Track Signature to handle our update track event
FOnTimelineFloat UpdateFunctionFloat;
//Function which updates our Door's relative location with the timeline graph
UFUNCTION()
void UpdateTimelineComp(float Output);
/*Begin and End Overlap Events for our DoorProxVolume*/
UFUNCTION()
void OnOverlapBegin(class UPrimitiveComponent* OverlappedComp, class AActor* OtherActor, class UPrimitiveComponent* OtherComp, int32 OtherBodyIndex, bool bFromSweep, const FHitResult& SweepResult);
UFUNCTION()
void OnOverlapEnd(class UPrimitiveComponent* OverlappedComp, class AActor* OtherActor, class UPrimitiveComponent* OtherComp, int32 OtherBodyIndex);
public:
// Called every frame
virtual void Tick(float DeltaTime) override;
};// Copyright 1998-2021 Epic Games, Inc.All Rights Reserved.
#include "DoorActor.h"
#include "Components/BoxComponent.h"
// Sets default values
ADoorActor::ADoorActor()
{
// Set this actor to call Tick() every frame.You can turn this off to improve performance if you don't need it.
PrimaryActorTick.bCanEverTick = true;
//Create our Default Components
DoorFrame = CreateDefaultSubobject<UStaticMeshComponent>(TEXT("DoorFrameMesh"));
Door = CreateDefaultSubobject<UStaticMeshComponent>(TEXT("DoorMesh"));
DoorTimelineComp = CreateDefaultSubobject<UTimelineComponent>(TEXT("DoorTimelineComp"));
DoorProxVolume = CreateDefaultSubobject<UBoxComponent>(TEXT("DoorProximityVolume"));
//Setup our Attachments
DoorFrame->SetupAttachment(RootComponent);
Door->AttachToComponent(DoorFrame,FAttachmentTransformRules::KeepRelativeTransform);
DoorProxVolume->AttachToComponent(DoorFrame, FAttachmentTransformRules::KeepRelativeTransform);
}
// Called when the game starts or when spawned
void ADoorActor::BeginPlay()
{
Super::BeginPlay();
UpdateFunctionFloat.BindDynamic(this, &ADoorActor::UpdateTimelineComp);
//If we have a float curve, bind it's graph to our update function
if (DoorTimelineFloatCurve)
{
DoorTimelineComp->AddInterpFloat(DoorTimelineFloatCurve, UpdateFunctionFloat);
}
//Binding our Proximity Box Component to our Overlap Functions
DoorProxVolume->OnComponentBeginOverlap.AddDynamic(this, &ADoorActor::OnOverlapBegin);
DoorProxVolume->OnComponentEndOverlap.AddDynamic(this, &ADoorActor::OnOverlapEnd);
}
void ADoorActor::UpdateTimelineComp(float Output)
{
FRotator DoorNewRotation = FRotator(0.0f,Output,0.f);
Door->SetRelativeRotation(DoorNewRotation);
}
void ADoorActor::OnOverlapBegin(UPrimitiveComponent * OverlappedComp, AActor * OtherActor, UPrimitiveComponent * OtherComp, int32 OtherBodyIndex, bool bFromSweep, const FHitResult & SweepResult)
{
    DoorTimelineComp->Play();
}

void ADoorActor::OnOverlapEnd(UPrimitiveComponent * OverlappedComp, AActor * OtherActor, UPrimitiveComponent * OtherComp, int32 OtherBodyIndex)
{
    DoorTimelineComp->Reverse();
}
// Called every frame
void ADoorActor::Tick(float DeltaTime)
{
Super::Tick(DeltaTime);
}