UDN
Search public documentation:
CharactersTechnicalGuide
日本語訳
中国翻译
한국어
Interested in the Unreal Engine?
Visit the Unreal Technology site.
Looking for jobs and company info?
Check out the Epic games site.
Questions about support via UDN?
Contact the UDN Staff
中国翻译
한국어
Interested in the Unreal Engine?
Visit the Unreal Technology site.
Looking for jobs and company info?
Check out the Epic games site.
Questions about support via UDN?
Contact the UDN Staff
UE3 Home > Gameplay Programming > Characters Technical Guide
Characters Technical Guide
Last tested against UDK June, 2011
Overview
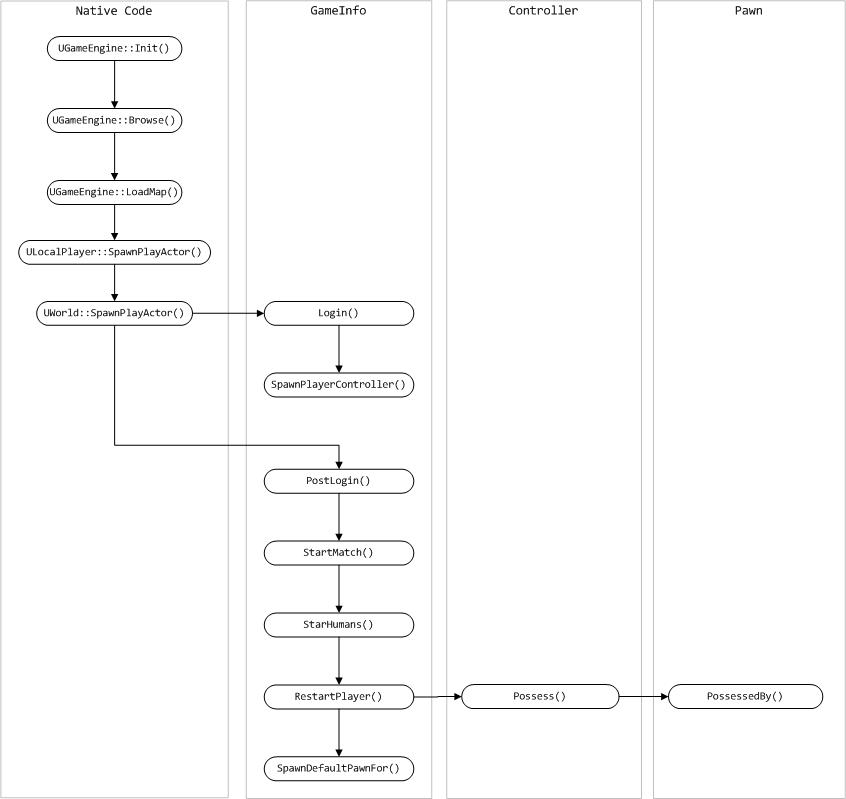 Of course, this does not have to be the case. Your game may consist of a world populated by NPCs that are hand-placed in the world and not created dynamically. These NPCs would most likely be a subclass of the base Pawn class which would handle the creation of their own Controllers and assign themselves to that Controller.
Controllers
PlayerController and AIController. When creating your new character, you will extend from one of these classes, or one of their subclasses, depending on what type of character you are creating.
Controllers, especially AIControllers, also make heavy use of States which allows the Controller to override functions within the same class and have them perform different actions depending on the current state of the Controller. States also provide the ability to use latent code and latent functions, such as the movement functions that AI characters use to navigate the world.
Controller
The base Controller class contains generic functions and events that pertain to the controlling of a Pawn in general and not necessarily specific to whether it is a player-controlled Pawn or an AI-controlled Pawn.Pawns and Possession
These functions have to do with the possessing and unpossessing of Pawns.- Possess [inPawn] [bVehicleTransition] - This assigns the specified Pawn as this Controller’s Pawn and notifies the Pawn by calling its PossessedBy() function.
- UnPossess - This clears this Controller’s Pawn reference and notifies the Pawn it is no longer controlled by this Controller by calling its UnPossessedBy() function.
Inventory
These functions have to do with pickups, weapons, and other inventory-specific functionality.- RatePickup [PickupHolder] [PickupClass] - This is a callback from the PickupFactory which calculates the desirability of the pickup.
- HandlePickup [InvetoryItem] - This function is an empty placeholder to be overridden allowing you to implement additional functionality for handling items that are picked up.
- FireWeaponAt [inActor] - This function causes the Controller’s Pawn to fire the currently active weapon at the specified actor.
- StopFiring - This forces the Controller’s Pawn to stop firing the currently active weapon.
- SwitchToBestWeapon [bForceNewWeapon] - This calculates which of the weapons in the inventory of this Controller’s Pawn is the best and makes it the active weapon. The options bool parameter can force a different weapon than the currently active one to be chosen whether the active weapon is the best or not.
- ClientSetWeapon [WeaponClass] - This forces this Controller’s Pawn to switch to the specified weapon, assuming a weapon of that type exists in the Pawn’s inventory.
Movement and Navigation
These functions have to do with latently moving the possessed Pawn around the world; meaning a command is given to go to a particular destination and the movement is automatic without needing to be updated every tick.- MoveTo [NewDestination] [ViewFocus] [DestinationOffset] [bShouldWalk] - This causes the Pawn to move to the specified destination, or within the optional specified offset thereof, while keeping its focus on the given optional actor. This function will use the path network to help the Pawn navigate to the destination.
- MoveToDirectNonPathPos [NewDestination] [ViewFocus] [DestinationOffset] [bShouldWalk] - This is identical in functionality to MoveTo() except that it should only be used when moving to the final goal and not following a path.
- MoveToward [NewTarget] [ViewFocus] [DestinationOffset] [bUseStrafing] [bShouldWalk] - This causes the Pawn to move to the given actor, specified as the NewTarget. This function will take advantage of the navigation network when moving to another Pawn or an inventory actor.
- FindPathTo [aPoint] [MaxPathLength] [bReturnPartial] - This calculates a path to the navigation node closest to the given destination and returns the next node along that path.
- FindPathToward [anActor] [bWeightDetours] [MaxPathLength] [bReturnPartial] - This calculates a path to the navigation node closest to the given actor and returns the next node along that path.
- FindPathTowardNearest [GoalClass] [bWeightDetours] [MaxPathLength] [bReturnpartial] - This calculates a path to the nearest node of the specified class and returns the next node along that path.
- FindPathToIntercept [Pawn] [InRouteGoal] [bWeightDetours] [MaxPathLength] [bReturnpartial] - This calculates a path to intercept the given pawn as it moves through the world and returns the next node along that path.
- PointReachable [aPoint] - This returns whether the specified location is directly reachable given the Pawn’s movement capabilities. This function can be expensive and should be avoided in favor of ActorReachable() if possible.
- ActorReachable [anActor] - This returns whether the specified Actor is directly reachable given the Pawn’s movement capabilities. Though potentially more optimized than PointReachable(), this function also can be expensive and should be used sparingly.
- FindRandomDest - This returns a random node on the navigation network. This can be good for creating a state where the character roams the world.
Camera / Aiming
The functions in this section have to do with the viewpoint and aiming of the Controller and its Pawn.- GetPlayerViewPoint [out_Location] [out_Rotation] - This returns the point of view of the Controller’s Pawn. For human players, this is the camera’s viewpoint. For AI-controlled players, this is the viewpoint from the Pawn’s eyes. In this base implementation, it is simply the location and rotation of the Controller itself.
- GetActorEyesViewPoint [out_Location] [out_Rotation] - This returns the point of view of the Controller or its Pawn if one exists. Essentially, this returns where the player is looking from and in which direction.
- IsAimingAt [Target] [Epsilon] - This returns whether the Controller is currently aiming at the specified target, within a given amount of wiggle room. An Epsilon of 1.0 means aiming directly at the target, while lower values allow for some error.
Player Controller
The PlayerController, and its subclasses, implements functionality for receiving input from the human player and processing that input into the action you see in the game. For the most part, this means the PlayerController handles actions like moving the Pawn, controlling the camera (by way of the Pawn), and switching or firing weapons based on the buttons or keys the player has pressed. Below are some of the main functions from the PlayerController classes with descriptions of each.General
These functions are general in nature and belong to no specific category.- Playertick [DeltaTime] - This is the main update function for players. It is executed every cycle.
- ConsoleCommand [Command] - This executes the given command as though it were a console command entered by the player.
Player Input / Movement
These functions pertain to the input and movement of the player.- InitInputSystem - This function initializes the input system by creating a new instance of the PlayerInput class of the PlayerController.
- PlayerMove [DeltaTime] - This calculates the new acceleration and rotation values for the current move and then calls either ProcessMove() (for single-player or listen servers) or ReplicateMove() (for network clients). This is simply a stub in the base PlayerController class but is overridden within certain states which involve movement, such as the PlayerWalking state. This function is called from the PlayerTick() function every cycle.
- ProcessMove [DeltaTime] [newAccel] [DoubleClickMove] [DeltaRot] - This handles the current move on the client. This function is overridden inside certain states which require special functionality for movement.
- ReplicateMove [DeltaTime] [newAccel] [DoubleClickMove] [DeltaRot] - This function starts off the movement process. It saves the current move in the PendingMove list, then calls ProcessMove() and ServerMove() (executed on the server).
- ServerMove [TimeStamp] [inAccel] [ClientLoc] [MoveFlags] [ClientRoll] [View] - This is executed only on the server and performs the current move by calling MoveAutonomous(). It also determines if an update Is necessary based on whether enough time has passed since the last update or if there is enough error between the client and server positions.
- Move Autonomous [DeltaTime] [MoveFlags] [newAccel] [DeltaRot] - This calls ProcessMove() and updates any autonomous physics calculations that need to be performed.
- ClientUpdatePosition - This updates the player’s position on the client to match that of the server. This is called from the PlayerTick() function, but only after the ServerMove() function has determined it necessary.
- UpdateRotation [DeltaTime] - This updates the rotation of the Controller and that of the Controller’s Pawn based on the player’s input
- ProcessViewRotation [DeltaTime] [out_ViewRotation] [DeltaRot] - This processes the player’s view rotation based on the player’s input and outputs the resulting rotation. This is called from UpdateRotation().
AI Controller
The AIController, and its subclasses, implements functionality for observing the Pawn’s environment and making intelligent decisions based on that information. It essentially uses its own self-contained decision loop to continually cycle through the decision-making process and carry out the appropriate actions based on those decisions. The main functions from the AIController classes are explained below.Decision Making
When dealing with AI-controlled entities, the decision-making process is clearly very important. Without something processing information and deciding what to do or how to behave based on that information, your NPC characters are really nothing more than statues. Obviously, discussions of how to create good AI are well beyond the scope of this document, but you still need to know how and where to add your AI code into the AIController class structure. The functions below are the main workhorses in the decision-making process. Note: These functions are implemented in the UDKBot class and not in the base AIController class. You would need to extend from UDKBot or UTBot in order to make use of these.- ExecuteWhatToDoNext - This is the main entry point for the decision-making process and should contain the majority of the decision logic. This function gets executed during the physics tick, however; so it should not contain anything that could change the physics state.
- WhatToDoNext - This causes ExecuteWhatToDoNext() to be called during the next tick and can also contain any code which is unsafe to perform during the physics tick. This would not be called from within state code in favor of using LatentWhatToDonext().
- LatentWhatToDoNext - This encapsulates calling WhatToDoNext() and waiting for the tick-delayed decision-making process to occur. This is called from state code so that the state is paused while waiting for the next decision-making loop.
Pawn
Controllers and Possession
These functions contain functionality related to the Pawn’s interaction with Controllers and being possessed and unpossessed.- PossessedBy [controller] [bVehicleTransition] - This sets the Controller passed in as the Pawn’s new Controller and performs any other necessary actions or initialization. This is called by the Controller when it takes possession of the Pawn.
- Unpossessed - This clears the Pawn’s Controller and resets any other relevant properties. This is called from the Controller when the Pawn dies, the round ends, or when the Controller no longer wishes to be in possession of the Pawn, i.e. if the Controller wishes to take possession of a different Pawn.
- SpawnDefaultController - This spawns an instance of the ControllerClass for the Pawn, if the Pawn does not currently have a controller, and causes the Controller to possess the Pawn. This is called in the Pawn’s PostBeginPlay() function to ensure that Pawns placed in the level or Pawns spawned during gameplay get possessed by a Controller.
- DetatchFromController [bDestroyController] - This causes the Controller to no longer possess the Pawn and optionally to destroy the Controller after the possession is broken. This is called when the Pawn dies, is reset, is being destroyed, or is being assigned another Controller.
Inventory and Weapons
Most of the inventory functionality is handled by the InventoryManager of the Pawn which is spawned in the PostBeginPlay() event. The Pawn does, however, handle some of the functionality and relays commands to the InventoryManager through the use of several inventory-specific functions as well. The Pawn class also contains several functions pertaining to weapons and the firing of those weapons. These functions are listed below.- AddDefaultInventory - This adds the inventory items listed in the default inventory to the Pawn’s inventory. This function Is called from the AddDefaultInventory() function of the GameInfo class.
- CreateInventory [inventoryClass] [bDoNotActivate] - This creates an instance of the specified inventory class, adds it to the Pawn’s inventory, and returns the new inventory item. This function simply passes the call onto the InventoryManager to handle the actual work.
- FindInventoryType [inventoryClass] [bAllowSubclass] - This searches the Pawn’s inventory for an instance of the specified class and returns that instance if one is found.
- TossInventory [invenetoryItem] [forceVelocity] - This causes the Pawn to throw away the specified inventory item with an optional velocity, removing it from the Pawn’s inventory.
- ThrowActiveWeapon - This causes the Pawn to throw the currently active weapon onto the ground, removing it from the Pawn’s inventory. This simply passes the command to the TossInventory() function to handle the work.
- SetActiveWeapon [newWeapon] - This sets the specified weapon as the Pawn’s active weapon. This simply passes the command on to the InventoryManager to handle the work.
- PlayWeaponSwitch [oldWeapon] [newWeapon] - This is used to cause the Pawn to play the necessary animations for switching its weapon from the old weapon to the new weapon. This is called from the InventoryManager’s ChangeWeapon() function.
- StartFire [fireModeNum] - This causes the Pawn to start firing the active weapon using the specified firemode. This passes the command to the Inventorymanager.
- StopFire [fireModeNum] - This causes the Pawn to stop firing the active weapon and firemode. This passes the command on to the InventoryManager.
- WeaponFired [weapon] [bViaReplication] [hitLocation] - This is used to delegate the creation of all effects related to firing the active weapon. This calls the active weapon’s PlayFireEffects() function.
- WeaponStoppedFiring [weapon] [bViaReplication] - This is used to delegate the destruction of all the effects related to firing the active weapon. This calls the active weapon’s StopFireEffects() function.
Taking Damage
The Pawn class contains functionality for healing as well as taking damage from weapons and other circumstances. Functions relating to damage and health are listed below.- TakeDamage [damage] [instigatedBy] [hitLocation] [momentum] [damageType] [hitInfo] [damageCauser] - This decreases the health of the Pawn by the specified amount.
- Damage - The amount by which to decrease the health.
- InstigatedBy - The Controller of the Pawn who is responsible for the damage being taken.
- HitLocation - The position from which the damage is to be applied.
- Momentum - A velocity to be applied to the Pawn as a result of the damage.
- DamageType - The damage type class describing the type of damage being done.
- HitInfo - An optional TraceHitInfo struct of information about the damage.
- DamageCauser - An optional Actor responsible for the damage being done.
- HealDamage [amount] [healer] [damageType] - This increases the Pawn’s health by the specified amount, limiting the resulting health amount to the Pawn’s maximum health and only if the Pawn is not dead or already at full health.
- TakeFallingDamage - This applies damage to the Pawn based on the velocity at which it is falling. This passes the appropriate damage amount on to the TakeDamage() function.
- CrushedBy [otherPawn] - This causes the Pawn to take damage when another Pawn becomes based on it. The amount of damage is based on the velocity of the Pawn that became based on this Pawn. This is called from the Pawn’s BaseChange() function and passes the damage amount to the TakeDamage() function.
- TakeRadiusDamageOnBones [instigatedBy] [baseDamage] [damageRadius] [damageType] [momentum] [hurtOrigin] [bFullDamage] [damageCauser] [bones] - This function applies a radius-dependent attenuated damage to a list of specific bones on the Pawn’s skeletal mesh.
- NotifyTakeHit [instigatedBy] [hitLocation] [damage] [damageType] [momentum] - This function sends out notifications to anything that needs to be notified that the Pawn has taken damage. This calls the Controller’s NotifyTakeHit() function.
- TakeDrowningDamage - This applies damage based on whether the Pawn is in water and has been underwater for too long.
Animations
Pawns use a skeletal mesh as their main visual component. While a great deal of the playing of animations for actions such as movement is handled by the AnimTree assigned to the Pawn, they do have some limited functionality for playing animations built in. Much of this comes in the form of helper functions which pass commands on to the skeletal mesh component of the Pawn. These functions are described below. Note: The SkeletalMeshComponent of the Pawn, referenced by the Mesh variable, contains animation-related functionality for playing individual animation sequences. Keep in mind that using this requires that the one and only animation node in the Pawn’s AnimTree is an AnimNodeSequence node. This means you would be losing all the advanced functionality of the AnimTree system, such as blending; but the functionality is present, if needed.- SetMorphWeight [MorphNodeName] [MorphWieght] - Sets the weight of a particular morph node within the AnimTree assigned to the Pawn.
- SetSkelControlScale [SkelControlName] [Scale] - Sets the scale of a particular SkelControl node within the AnimTree assigned to the Pawn.
- PlayActorFaceFXAnim [AnimSet] [GroupName] [SeqName] [SoundCueToPlay] - This causes the Pawn to play the specified FaceFX facial animation sequence.
- StopActorFaceFXAnim - This stops the currently playing FaceFX facial animation sequence.
- IsActorPlayingFaceFXAnim - This returns a Boolean value saying whether the Pawn is currently playing a FaceFX facial animation.
Camera Perspective / Aiming
These functions contain functionality for controlling the position and orientation of the player’s camera when the Pawn is the current view target as well as setting the current aim for the player or NPC.- CalcCamera [DeltaTime] [out_CamLoc] [out_CamRot] [out_FOV] - This calculates the camera’s viewpoint when viewing from the Pawn. This is the main camera calculation for the player.
- GetDefaultCameraMode [controller] - This returns the default camera mode, as a name, that should be used for this Pawn. This is usually called by the controller when possessing the Pawn.
- ProcessViewRotation [deltaTime] [out_ViewRotation] [out_DeltaRot] - This processes the player’s view rotation and returns the final view rotation as the out_ViewRotation parameter. This is called from the UpdateRotation() function of the PlayerController.
- SetViewRotation [NewRotation] - Sets the rotation of the Controller, if one exists, or of the Pawn itself if no Controller exists.
- GetActorEyesViewPoint [out_Location] [out_Rotation] - This returns the location and orientation of the Pawn’s eyes, or the point of view of the player. For a first person perspective this is identical to the camera location and orientation. It is also the view point most traces will be performed from.
- GetBaseAimRotation - This returns the aiming rotation, as a Rotator, of the Pawn without any adjustments, such as aim error, autolock, adhesion, etc.
- GetAdjustedAimFor [Weapon] [StartFireLoc] - This allows an intermediate point to apply any adjustments to the base aim rotation, like aim error, auto-aiming, etc. By default, this passes the command to the GetAdjustedaimFor() function of the Controller. If no Controller exists for the Pawn, it returns the base aim rotation.
Example Player
Player Pawn Class
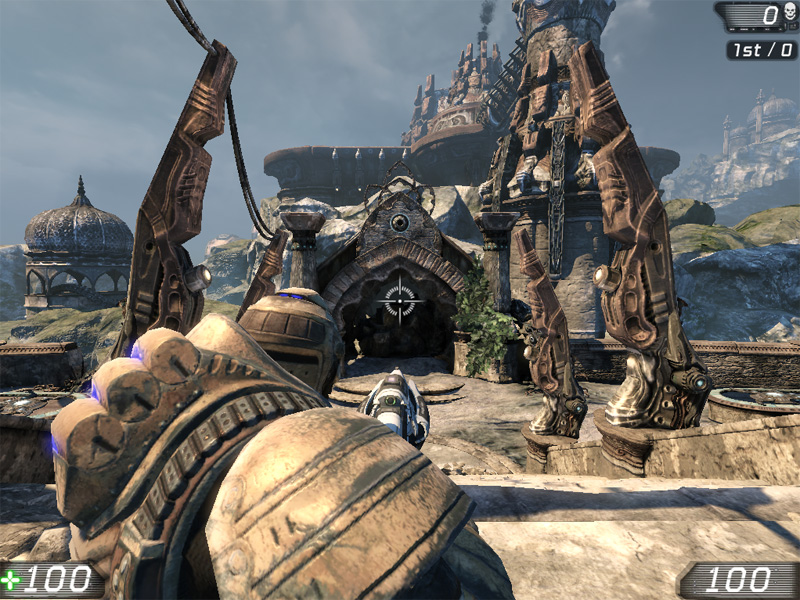
For this example, the new Pawn class has a little added functionality. We have decided to give it a built-in health regeneration feature. Inside the Tick() function, a specified amount of health is added to the Pawn’s current Health every so often. To accomplish this, a few class variables were added and then the Tick function was overridden and the regeneration was added.
class UDNPawn extends UTPawn;

var float ElapsedRegenTime;
var float RegenAmount;
var float RegenTime;

event Tick(float DeltaTime)
{
  //calculate elapsed time
  ElapsedRegenTime += DeltaTime;

  //has enough time elapsed?
  if(ElapsedRegenTime >= RegenTime)
  {
    //heal the Pawn and reset elapsed time
    HealDamage(RegenAmount, Controller, class'DamageType');
    ElapsedRegenTime = 0.0f;
  }
}

defaultproperties
{
  //set defaults for regeneration properties
  RegenAmount=2
  RegenTime=1
}
Player Controller Class
The new PlayerController class is a very basic extension of the UTPlayerController class. It simply adds a new class variable to hold the class of the character to use as the player and then sets that as the player’s character using the existing ServerSetCharacterClass() function.
class UDNPlayerController extends UTPlayerController;

var class<UTFamilyInfo> CharacterClass;

simulated event PostBeginPlay()
{
  super.PostBeginPlay();

  SetupPlayerCharacter();
}

/** Set player's character info class & perform any other initialization */
function SetupPlayerCharacter()
{
  //Set character to our custom character
  ServerSetCharacterClass(CharacterClass);
}

defaultproperties
{
  //Points to the UTFamilyInfo class for your custom character
  CharacterClass=class'UTFamilyInfo_Liandri_Male'
}
GameInfo Class
A new gametype is needed in this case in order to specify that the new Pawn and PlayerController classes should be used. You will most likely be using a custom gametype anyway in the creation of your game using UDK so you would just add the appropriate default properties to that class instead of creating a new one. For this example, the new gametype is created and simply sets the DefaultPawnClass and PlayerControllerClass properties to point to the new Pawn and PlayerController classes.
class UDNGame extends UTDeathMatch;

defaultproperties
{
  //Points to your custom Pawn class
  DefaultPawnClass=class'UDNPawn'

  //Points to your custom PlayerController class
  PlayerControllerClass=class'UDNPlayerController'
}
Example NPC
NPC Pawn Class
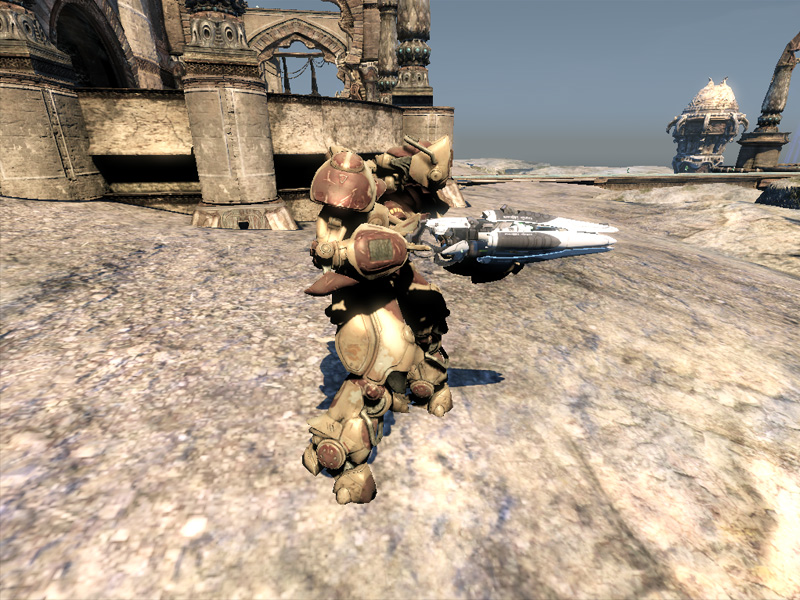
The Pawn class is fairly simple. It has a couple of added properties, but these are really just duplicates of existing properties meant to make it easy to use for the designer. A SkeletalMeshComponent is used to set up all the visual properties, such as the mesh, AnimTree, AnimSets, PhysicsAsset, etc. Some default values for this are set in the default properties block. A class is used to set the class of Controller to use to control the NPC. The PostBeginPlay() function is used to set the existing ControllerClass variable to the new NPCController variable. Finally, the SetCharacterClassFromInfo() function is overridden to do nothing as it will not be needed for this NPC implementation. The full source for the class is shown here:
class UDNPawn_NPC extends UTPawn
  placeable;

var(NPC) SkeletalMeshComponent NPCMesh;
var(NPC) class<AIController> NPCController;

simulated event PostBeginPlay()
{
  if(NPCController != none)
  {
    //set the existing ControllerClass to our new NPCController class
    ControllerClass = NPCController;
  }

  Super.PostBeginPlay();
}

//override to do nothing
simulated function SetCharacterClassFromInfo(class<UTFamilyInfo> Info)
{
}

defaultproperties
{
  //Setup default NPC mesh
  Begin Object Class=SkeletalMeshComponent Name=NPCMesh0
    SkeletalMesh=SkeletalMesh'CH_LIAM_Cathode.Mesh.SK_CH_LIAM_Cathode'
    PhysicsAsset=PhysicsAsset'CH_AnimCorrupt.Mesh.SK_CH_Corrupt_Male_Physics'
    AnimSets(0)=AnimSet'CH_AnimHuman.Anims.K_AnimHuman_BaseMale'
    AnimtreeTemplate=AnimTree'CH_AnimHuman_Tree.AT_CH_Human'
  End Object
  NPCMesh=NPCMesh0
  Mesh=NPCMesh0
  Components.Add(NPCMesh0)

  //Points to your custom AIController class - as the default value
  NPCController=class'UDNBot'
}
NPC Controller Class
The Controller class is about the most basic navigation implementation possible. The ExecuteWhatToDoNext() function, which is the main decision-making function, is overridden to send the Controller continuously into the Roaming state. This state simply checks to see if a destination exists or if the Pawn has reached the current one, sets a new destination if necessary, and then tells the Controller to move toward the destination. Finally, the LatentWhatToDoNext() function is called to cause the ExecuteWhatToDoNext() function to be called again next tick, restarting the decision loop all over again. The source for the controller class is shown here:
class UDNBot extends UTBot;

var Actor Destination;

protected event ExecuteWhatToDoNext()
{
  //Go to the roaming state
  GotoState('Roaming');
}

state Roaming
{
Begin:
  //If we just began or we have reached the Destination
  //pick a new destination - at random
  if(Destination == none || Pawn.ReachedDestination(Destination))
  {
    Destination = FindRandomDest();
  }

  //Find a path to the destination and move to the next node in the path
  MoveToward(FindPathToward(Destination), FindPathToward(Destination));

  //fire off next decision loop
  LatentWhatToDoNext();
}

defaultproperties
{
}
Testing out your new custom NPC
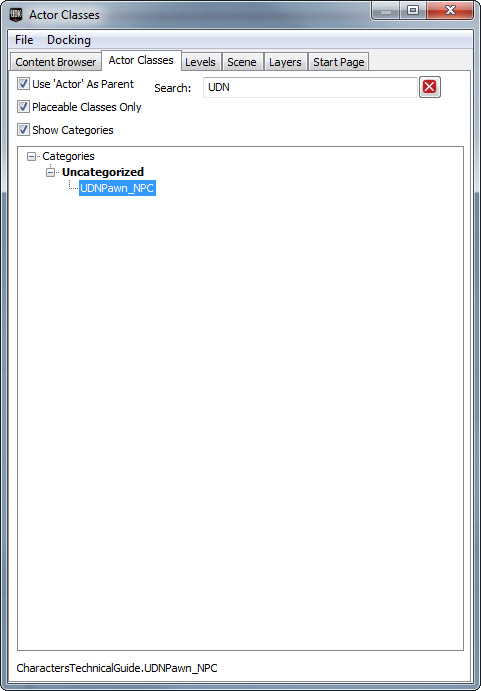 Once the actor is selected in the Actor Classes tab within the Content Browser, you can now right click within the game view port to bring up the context menu. Within the context menu, select the menu item Add UDN_PawnNPC Here.
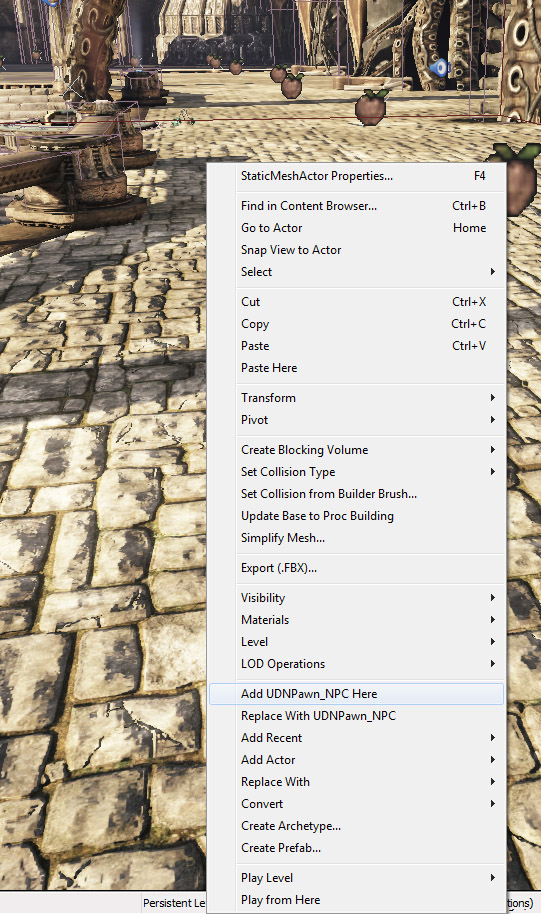 The NPC is now within the world. Now you can use PIE to test the game.
