UDN
Search public documentation:
MasteringUnrealScriptClasses
日本語訳
中国翻译
한국어
Interested in the Unreal Engine?
Visit the Unreal Technology site.
Looking for jobs and company info?
Check out the Epic games site.
Questions about support via UDN?
Contact the UDN Staff
中国翻译
한국어
Interested in the Unreal Engine?
Visit the Unreal Technology site.
Looking for jobs and company info?
Check out the Epic games site.
Questions about support via UDN?
Contact the UDN Staff
- CHAPTER 3 – CLASSES IN UNREAL
CHAPTER 3 – CLASSES IN UNREAL
As we jump in and begin looking at the UnrealScript language, we will begin y taking a look at the implementation of classes within UnrealScript. More specifically, you will be given an overview of what a class in UnrealScript represents and how to declare a class along with explanations of the various keywords that can be used when declaring classes which determine how that particular class is treated.3.1 OVERVIEW
Classes are basically templates that specify a set of properties, abilities, and behaviors which can either be extended to create new classes which inherit those properties, abilities, and behaviors or instanced to create objects for use in game which will each have their own unique values for those properties and act independently of each other instance. What does this mean with regards to Unreal and UnrealScript? In essence, each class created in UnrealScript is a type of game item that may be used to create objects for use within the game. This could range from items which are readily identifiable and visible to the player to items which are merely used by other items as helpers behind the scenes. Some examples might be weapons and vehicles or the PlayerReplicationInfo class which is used to hold the values of the player's important properties for purposes of replicating them across the network.3.2 NATIVE VS NON-NATIVE
At the most basic level, there are two types of classes in UnrealScript: native and non-native. A native class is simply a class which has native code, or code written in the native language of the engine which in this case would be C++. This is not to say that native classes do not have code written in UnrealScript as well, just that they do have C++ code associated with them. Many of the lower level classes present in the game are native classes as they have quite a bit of complex functionality which benefits from the speed of native code. Non-native classes are written exclusively in UnrealScript. Since all classes must at the very least extend from Object which is a native class, these still have native code associated with them through inheritance, but they have no distinct native code of their own. All of the classes you will write will be non-native since creating native classes requires rebuilding the source code for the engine.3.3 CLASS DECLARATION
In order to create a new class in UnrealScript, a new UnrealScript file must be created which contains a class declaration. Each UnrealScript file can contain only one class declaration and, therefore, represents a single class within Unreal. The class declaration is the first line of the script, comments notwithstanding, and is where, at minimum, the name of the class to be created and the name of the class to extend from, or parent class, are specified. The declaration can also contain one or more of the keywords, or Class Specifiers, which will be discussed in the next section. Below is the generic form of a class declaration:class ClassName extends ParentClassName;Using this as a template, we could declare a new vehicle class named PickupTruck that inherits functionality from the base Vehicle class like so:
class PickupTruck extends Vehicle;Note: It is important to note that the name of the class and the name of the UnrealScript (.uc) file it is within must be identical or the compiling process will fail.
EXTENDS KEYWORD
You may have noticed the use of the Extends keyword in the above class declaration examples. This keyword in essence means “inherits from”. All classes must extend, or inherit, from another class. The only exception to this is the Object class as it is the base class of all other classes within UnrealScript. When one class inherits from another, it contains all the variables, functions, states, etc. of the class it inherits from. When creating classes in UnrealScript, you will usually be extending from Actor or one of its subclasses, although there may be isolated cases where you might extend from Object.TUTORIAL 3.1 YOUR FIRST CLASS DECLARATION
The tutorials in this chapter will be fairly simple in that you will simply be writing class declarations. These classes will not actually do anything at this point as we are concentrating on creating classes and how their declarations affect their appearance and behavior. In this first tutorial, you will be creating a class which extends from the Actor class. Once created, you will compile the new script and then open UnrealEd to see that the new class is now recognized by the engine and displayed in the Actor Classes Browser. 1. Open ConTEXT if it is not already open. 2. Create a new file by choosing New from the File menu or pressing the New File button in the toolbar.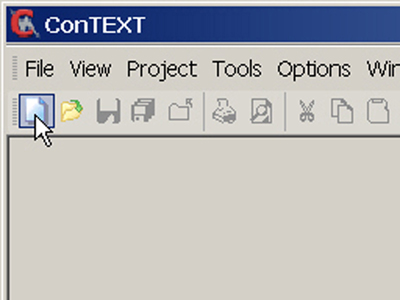
FIGURE 3.1 – The New File button. 3. Select the UnrealScript highlighter you have installed using the Select Active Highlighter dropdown.
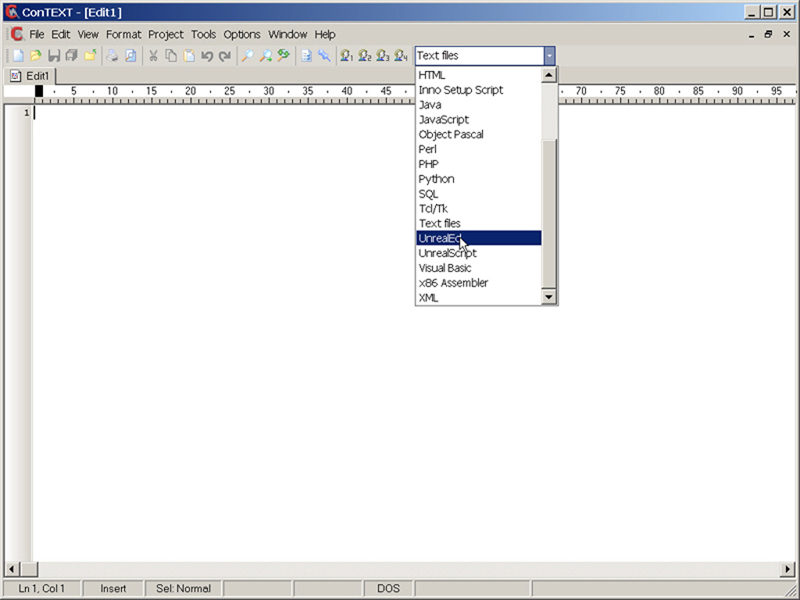
FIGURE 3.2 – The Select Active Highlighter dropdown menu. 4. On the first line of the new script file, type the following text:
class ExampleClass extends actor;That’s it! That completes the class declaration and technically constitutes the creation of an entirely new class. 5. Save the file in the ..\Src\MasteringUnrealScript\Classes directory created in the previous chapter. Name the new script file ExampleClass.uc to match the name of the new class. 6. Run the Make commandlet to compile the scripts. As in the previous chapter, you can do this using the method of your choice. Once the scripts have been successfully compiled, launch UnrealEd. 7. Open the Generic Browser if it is not already open and switch to the Actor Classes tab. You should notice that ExampleClass is not one of the classes listed in the class hierarchy tree. This is because the Placeable Classes Only? option is toggled on and the ExampleClass class is not placeable.
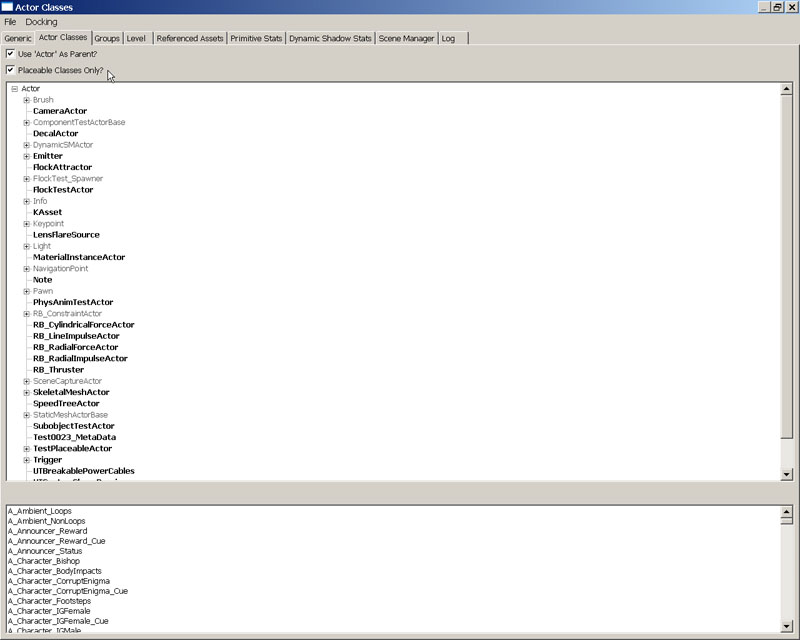
FIGURE 3.3 – The Placeable Classes Only? option is checked. Uncheck the Placeable Classes Only? option and you should now see the new ExampleClass class listed in the hierarchy.
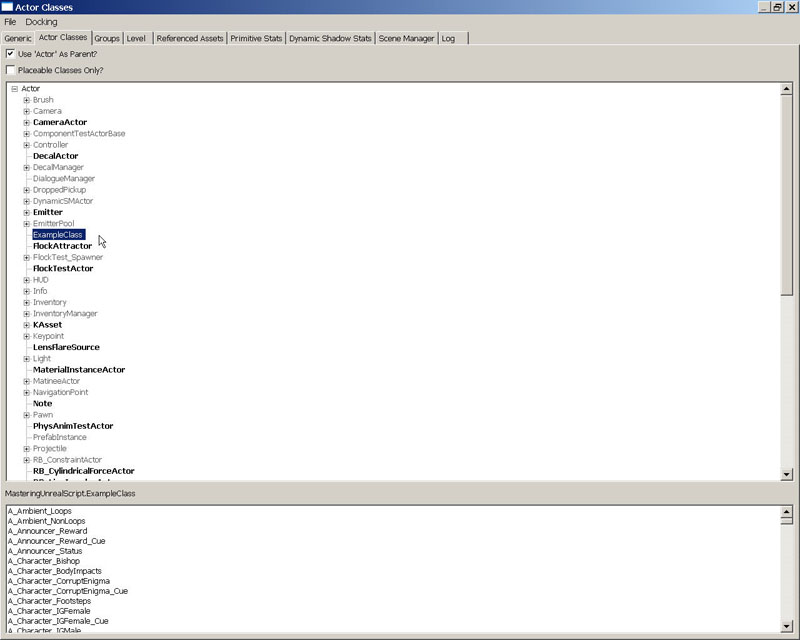
FIGURE 3.4 – The ExampleClass class is displayed in the hierarchy once the option is unchecked. 8. We can see that this is the case by attempting to place an instance of the ExampleClass class in a map. Open the DM_TestRoom.ut3 map provided on the DVD. Select ExampleClass in the Actor Classes Browser and right-click on the floor of the room in the perspective viewport. If this class were placeable, there would be an option to Add ExampleClass here from the context menu. You can clearly see this option is not present demonstrating that this class is not placeable.
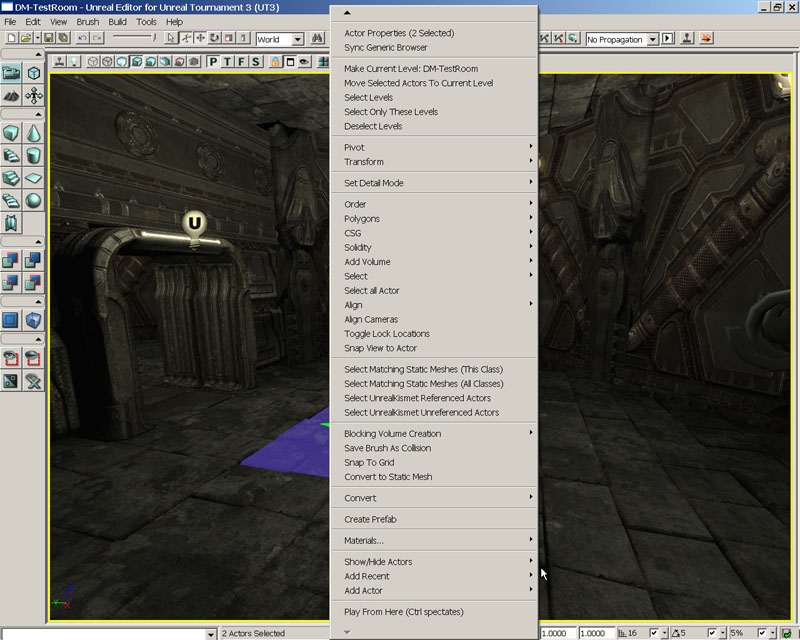
FIGURE 3.5 – There is no option to add an instance of the ExampleClass class. You now have seen how to declare a class which is part of the Unreal class hierarchy. This class is in essence nothing more than a copy of the Actor class and cannot be placed in a map. In the next tutorial, you will expand on what you have learned here in order to create a class which can be placed in a level, a very basic yet extremely important concept of scripting in the Unreal Engine. Without being able to place items in a map, the designer’s job would basically be impossible. <<<< End of Tutorial >>>>
3.4 CLASS SPECIFIERS
Class Specifiers are keywords which tell the compiler and/or the engine itself certain aspects about the class. Each of these keywords is described below:NATIVE(PACKAGENAME)
The Native specifier labels the class as having native code associated with it. What this means is that the engine will look for a C++ declaration and implementation of the class. If this does not exist, an error will occur. Native classes have the distinction of being the only classes which can declare native functions and implement native interfaces. This may not make a great deal of sense at this point as we have not discussed functions and interfaces, but they will be discussed in detail later on at which time the previous statement should become clear. The (PackageName) refers to the name of the package in which the class resides. The compiler uses this name to auto-generate a declaration for the class within a C++ header file whose name would be the PackageName +Classes.h. In other words, if the Package name was specified as follows:Class NativeClass extends Actor Native(MasteringUnreal);The native declaration of this class would be placed inside a MasteringUnrealClasses.h file.
NATIVEREPLICATION
The NativeReplication specifier only has meaning inside of native classes and indicates that the values of the variables belonging to the class are replicated through native code.DEPENDSON(CLASSNAME[,CLASSNAME,...])
The DependsOn specifier is used to determine the order of compiling when classes have dependencies which require certain classes to be compiled before others within the same package. The class, or classes, listed inside the parentheses will be compiled before the class the specifier is within. This can be useful when the current class needs to access a struct or enumeration that is declared in another class. If the current class is compiled first, the compiler does not know the struct or enumeration exists and will throw an error. By adding the DependsOn specifier, the other class is ensured to be compiled first and compiler will know about the struct or enumeration.ABSTRACT
The Abstract specifier tells the engine that the class is not allowed to be placed in a level or instanced in any way. It is used for classes which are meant to be bases for a wide range of other classes, but have no direct use in a level inside the game themselves. Because of the object-oriented nature of Unreal, it is completely possible, and actually desirable from an extensibility perspective, that some classes will not actually be used in the game themselves. These classes will serve as the basis for several other classes which all have certain common characteristics. To illustrate this point, imagine you want to add some vehicles to your game. All vehicles have certain things in common, such as they move, they probably have weapons, they may have a driver, etc. Generic code can be incorporated into a single base Vehicle class to handle the movement of vehicles, the usage of weapons, and the placement of the driver. This base Vehicle class would use the Abstract specifier since, on its own, it is not tru ly functional as it most likely has no mesh or actual weapons assigned to it and should never be used in the game. All the individual vehicles which extend from the Vehicle class would have meshes and weapons specific to each vehicle assigned in their own classes and these would then be used in the game.DEPRECATED
The Deprecated specifier is used to declare a class as no longer being used. This is not a keyword that would be used when first creating a class by any means. There will be times when a class is no longer being used in favor of another class or method of performing the desired function. When this occurs, the old class declaration will be changed to use the Deprecated specifier. Once recompiled, any instances of this class used within the game will continue to be loaded inside of the editor, but will cause a warning to be shown and will no longer be allowed to be saved. This will force the designers to replace the existing class with the new class. All classes which extend from a deprecated class will inherit the Deprecated specifier and will be considered deprecated as well.TRANSIENT
The Transient specifier prevents the class from ever being saved to disk. It is used with classes which should not be saved when saving in-game progress or at any other time. This keyword will be inherited by any child classes of this class.NONTRANSIENT
The NonTransient specifier overrides the Transient keyword when inherited from a parent class allowing this class to be saved to disk.CONFIG(ININAME)
The Config specifier declares that any variables within this class declared as Config or GlobalConfig will be written out to an .ini file matching the name specified. The values of these variables is therefore stored when the game exits and will be read in as the starting values when the game begins. As an example, take the following class snippet:class MyScript extends MyParentScript Config(MyConfig); Var Config Int Score; Var Config String Name; ...This will result in a MyConfig.ini file being created which would have lines similar to the following contained within it:
...
Score=5
Name=Gorge
...
Of course, the values shown here are made up. The actual values would depend on what happened during the game and what the Name variable represented. The next time the game is run these values would be read in and used as the values for the Score and Name variables respectively. This keyword is inherited by any class which extends from the current class and cannot be negated. The name of the .ini file to use can be overridden by child classes, however, by redeclaring the Config specifier with a new IniName. This means planning must accompany the use of the Config specifier as you could potentially end up with many unnecessary variables being written to files. There are also a few reserved names that can be used as the IniName to cause the variables and their values to be written to certain existing .ini files. These are as follows:
Engine
This name will cause the values of the variables of this class to be written to the [GameName]Engine.ini file, where [GameName] represents the name of the game. In the case of Unreal Tournament 3, this would be the UTEngine.ini file.Editor
This name will cause the values of the variables of this class to be written to the [GameName]Editor.ini file, where [GameName] represents the name of the game. In the case of Unreal Tournament 3, this would be the UTEditor.ini file.Game
This name will cause the values of the variables of this class to be written to the [GameName]Game.ini file, where [GameName] represents the name of the game. In the case of Unreal Tournament 3, this would be the UTGame.ini file.Input
This name will cause the values of the variables of this class to be written to the [GameName]Input.ini file, where [GameName] represents the name of the game. In the case of Unreal Tournament 3, this would be the UTInput.ini file.PEROBJECTCONFIG
The PerObjectConfig specifier is similar to the Config keyword in that it declares that the class will be using an .ini file to store values. In this case, the values for individual instances of the class are stored in separate sections designated by a header as follows:[ObjectName ClassName]ObjectName represents the name to be given to the instance of the class and ClassName represents the name of the class to instance. Under this heading will be a listing of the Config variables contained within the class and the values for that specific instance of the class. This information is used to initialize several instances of a class, such as for populating a list in a UIScene. This specifier is inherited by any classes extending from the current class.
EDITINLINENEW
The EditInlineNew specifier declares that this class may have a new instance created directly from within the Property Window inside of UnrealEd. This can be used in base abstract classes to allow the designer to choose the type of object to use inside of UnrealEd for certain properties. An example would be inside of the Actor Factory Kismet action. The designer is allowed to choose which type of ActorFactory to use based upon which type of object is desired to be spawned. The property in the action's class is of type ActorFactory, which by itself is not really meaningful as it is an abstract class with no specific functionality. It is extended by several other classes which do have specific functionality. Since ActorFactory is declared as EditInlineNew and this keyword is inherited by all child classes, the property can be set within UnrealEd to any of these child class types making the action very versatile.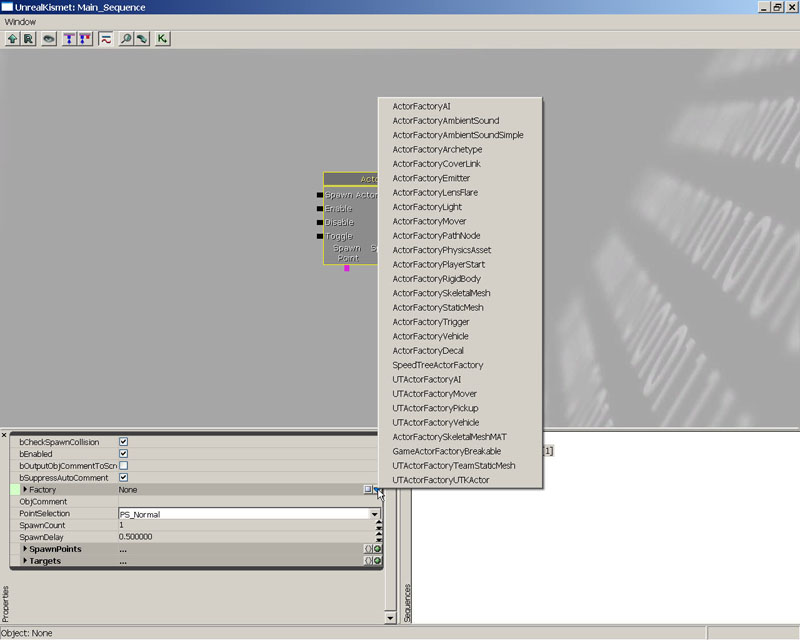
FIGURE 3.6 – Creating a new ActorFactory object in the Actor Factory sequence action.
NONEDITINLINENEW
The NotEditInlineNew specifier removes the inherited EditInlineNew keyword from a class. This will only have an effect if the parent class was declared as EditInlineNew.PLACEABLE
The Placeable specifier declares that the class has the ability to be placed within a map, UIScene, or Kismet sequence inside of UnrealEd. Any game items which the level designer should have access to and be able to use directly in UnrealEd should have this keyword designated. This specifier is inherited by child classes.TUTORIAL 3.2 MAKING A PLACEABLE ACTOR
In this tutorial, you will create a new class that extends the ExampleClass created in the previous tutorial. This class, however, will be able to be placed in a map inside of UnrealEd. 1. Open ConTEXT if it is not already open. 2. Once again, create a new file by choosing New from the File menu or pressing the New File button in the toolbar. 3. Select the UnrealScript highlighter you have installed using the Select Active Highlighter dropdown. 4. On the first line of the new script file, place the following code:class ExampleClass_Placeable extends ExampleClassNotice this time, there is no semicolon ending the line. This is because the declaration is not complete. We are going to use a specifier to determine some specific behavior we would like this class to have. 5. Press the Enter key to go to the next line and then press the Tab key to indent the line. Add the code below:
placeable;This will declare this new class as being allowed to be placed in a map in UnrealEd whereas its parent class, ExampleClass, was not placeable. The final script should consist of the following text:
class ExampleClass_Placeable extends ExampleClass
   placeable;
6. Save this file within the ..\Src\MasteringUnrealScript\Classes directory with the name ExampleClass_Placeable.uc to match the class name. 7. Run the Make commandlet to compile the scripts. As in the previous chapter, you can do this using the method of your choice. Once the scripts have been successfully compiled, launch UnrealEd. 8. Open the Generic Browser if it is not already open and switch to the Actor Classes tab. You should now see the ExampleClass class listed in the hierarchy even with the Placeable Classes Only? option checked since it now has a subclass that is placeable, signified by the plus sign beside it.
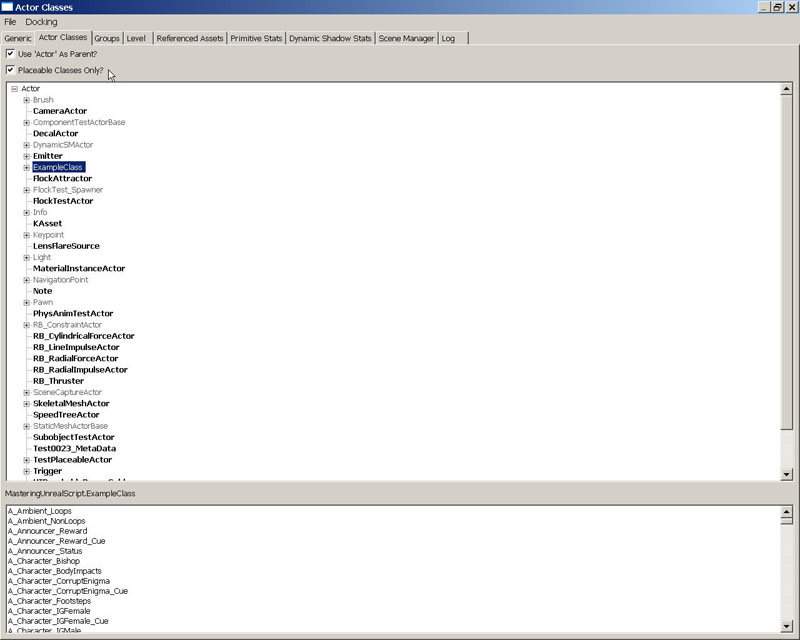
FIGURE 3.7 – The ExampleClass class is displayed with the Placeable Classes Only? option checked. Click on the plus sign to display its subclasses and you should now see the ExampleClass_Placeable class you just created displayed in bold meaning that is can be placed in a map.
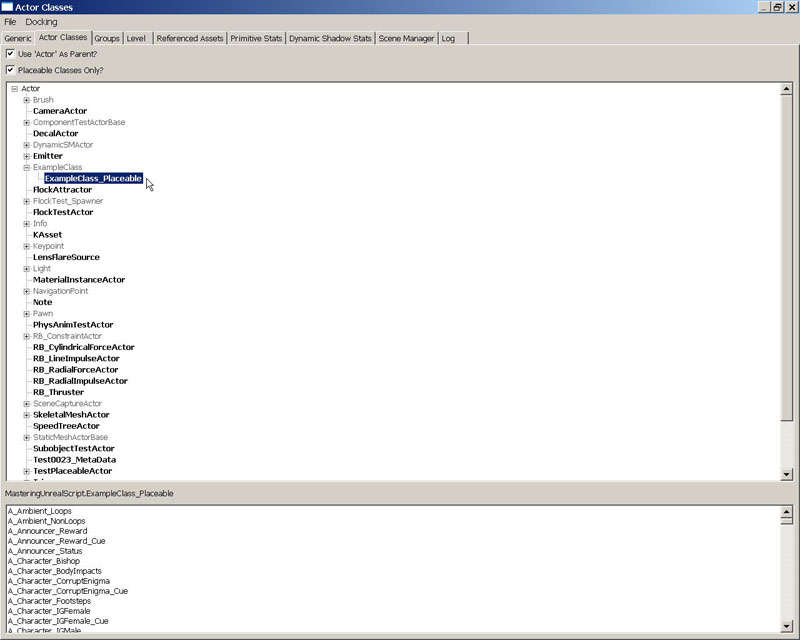
FIGURE 3.8 – The ExampleClass_placeable class is listed under ExampleClass in the hierarchy. 9. Just to make sure everything worked properly; let’s place an instance of the ExampleClass_Placeable class in a map. Open the DM_TestRoom.ut3 map provided on the DVD. Select ExampleClass_Placeable in the Actor Classes Browser and right-click on the floor of the room in the perspective viewport. Choose Add ExampleClass_Placeable here from the context menu. You have now successfully created an instance in the map although it will have no visual component other than the presence of the transformation widget when selected.
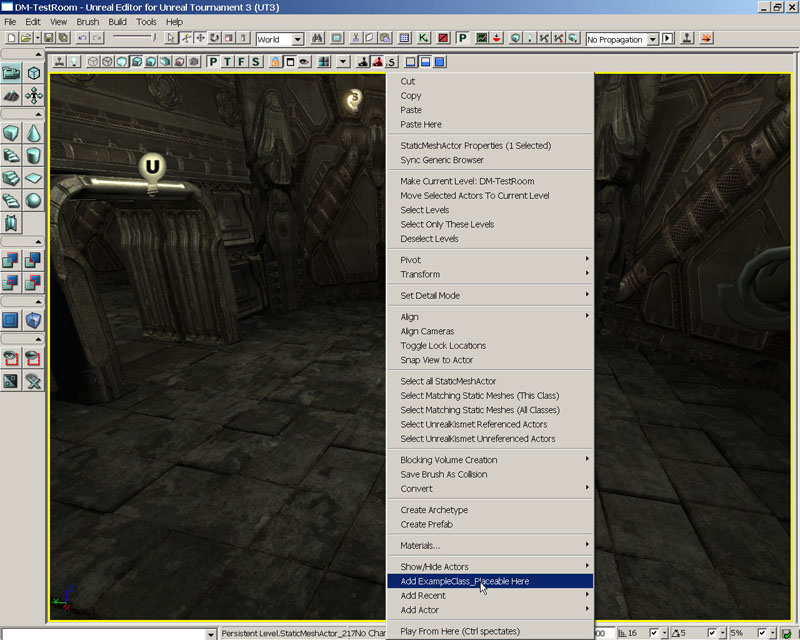
FIGURE 3.9 – An instance of the ExampleClass_Placeable class can be added to the map. <<<< End of Tutorial >>>>
NOTPLACEABLE
The NotPlaceable specifier is used to remove the ability of the class to be placed inside of UnrealEd. This would be used on a class which is the child of a class declared as Placeable, but which should not be allowed to be placed in UnrealEd.HIDEDROPDOWN
The HideDropDown specifier makes the class not show up in class-type dropdown lists within UnrealEd. This type of list might be used to let the designer choose a type of effect to use for a destructible object, for example. By using the HideDropDown keyword, a specific class could be prevented from appearing in that list.HIDECATEGORIES(CATEGORY[,CATEGORY,...])
The HideCategories specifier allows certain groups, or categories, of properties for instances of the class to be hidden inside of the Property Window in UnrealEd. This allows unnecessary properties to be kept from cluttering the Property Window and getting in the designer's way. This keyword and its hidden categories are inherited by all child classes.TUTORIAL 3.3 HIDING PROPERTY CATEGORIES
Now that you have created a new class which can be added as an actor to a map, we can start to take a look at manipulating how the properties of the class will be displayed to the designer inside of UnrealEd. In this tutorial, we will be determining which categories of properties will be displayed to the designer by hiding certain categories. 1. Open ConTEXT if it is not already open. 2. Once again, create a new file by choosing New from the File menu or pressing the New File button in the toolbar. 3. Select the UnrealScript highlighter you have installed using the Select Active Highlighter dropdown. 4. On the first line of the new script file, place the following code:class ExampleClass_HiddenCategories extends ExampleClass_PlaceableAs was the case in the previous tutorial, there is no semicolon ending the line because the declaration is not complete. From this line of the declaration, we can see that the new class will automatically be placeable in a map because it extends from ExampleClass_Placeable which was declared as placeable. 5. Press the Enter key to go to the next line and then press the Tab key to indent the line. Add the code below:
   HideCategories(Movement)
   HideCategories(Display);
You may be wondering where we get the Movement and Display category names from. The properties in the Actor Class are split up into several categories by the way they are declared. Since, this class inherits indirectly from the Actor class, it contains those properties and the categories as well. We are simply telling UnrealEd not to display the Movement or Display categories and the properties contained within them. The completed script should contain the following text:
class ExampleClass_HiddenCategories extends ExampleClass_Placeable
   HideCategories(Movement)
   HideCategories(Display);
6. Save this file within the ..\Src\MasteringUnrealScript\Classes directory with the name ExampleClass_HiddenCategories.uc to match the class name. 7. Run the Make commandlet to compile the scripts. As in the previous chapter, you can do this using the method of your choice. Once the scripts have been successfully compiled, launch UnrealEd. Open the DM_TestRoom.ut3 map provided on the DVD. 8. Open the Generic Browser if it is not already open and switch to the Actor Classes tab. After fully expanding the ExampleClass hierarchy, you should now see the ExampleClass_HiddenCategories class listed under the ExampleClass_Placeable class.

FIGURE 3.10 – The ExampleClass_HiddenCategories class is listed un ExampleClass_Placeable. 9. Select ExampleClass_Placeable in the Actor Classes Browser and right-click on the floor of the room in the perspective viewport. Choose Add ExampleClass_Placeable here from the context menu. Press F4 to open the Properties Window and notice all the categories of properties, especially the Movement and Display categories.
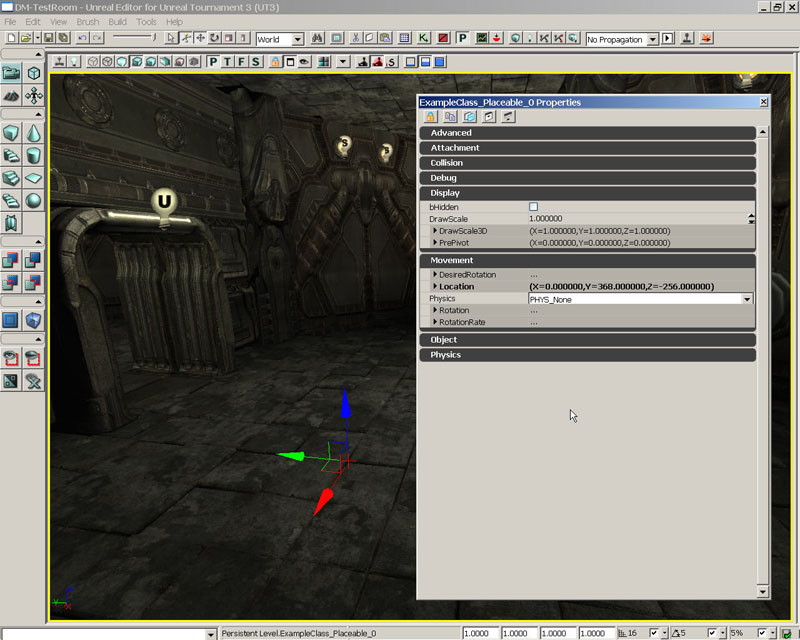
FIGURE 3.11 – The Properties Window for the ExampleClass_Placeable actor. 10. Now select ExampleClass_HiddenCategories in the Actor Classes Browser and right-click on the floor of the room in the perspective viewport. Choose Add ExampleClass_HiddenCategories here from the context menu. Again, press F4 to open the Properties Window. You should notice the absence of the Movement and Display categories even though this class contains the exact same properties as the ExampleClass_Placeable it extends from. This is due to the use of the HideCategories specifier in the class declaration.
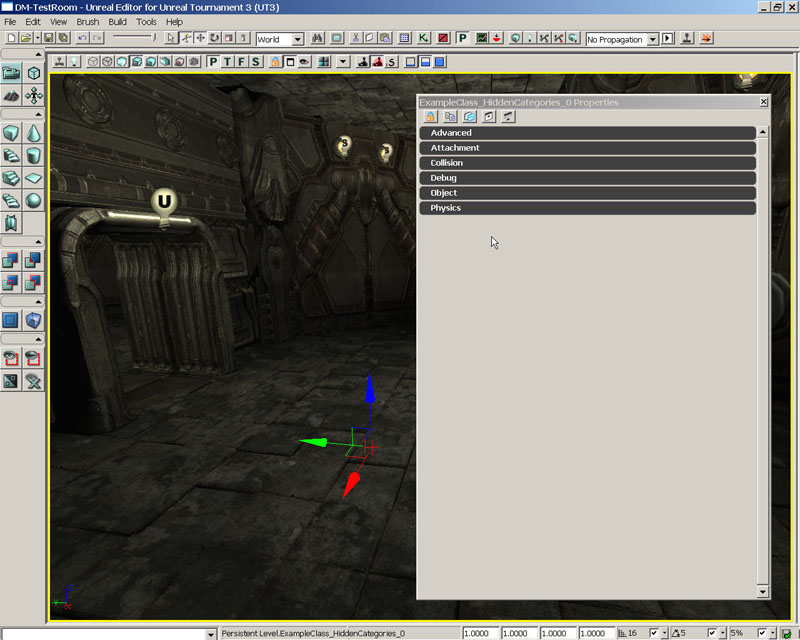
FIGURE 3.12 – The Properties Window for the ExampleClass_HiddenCategories actor. <<<< End of Tutorial >>>>
SHOWCATEGORIES(CATEGORY[,CATEGORY,...])
The ShowCategories specifier has the exact opposite effect as the HideCategories keyword. It causes specific categories which have been hidden through the use of the HideCategories specifier in a parent class. If no HideCategories specifiers have been used in any parent classes, this will have no effect as all categories should be displayed by default.AUTOEXPANDCATEGORIES(CATEGORY[,CATEGORY,...])
The AutoExpandCategories specifier allows certain categories of properties to be fully expanded by default when viewed in the Property Window in UnrealEd. This can be useful if the properties inside of a specific category are used quite often by saving the designer the trouble of constantly expanding the category manually each time the properties are viewed.TUTORIAL 3.4 AUTOMATICALLY EXPANDING CATEGORIES
Continuing with the manipulation of how the properties of the class will be displayed to the designer inside of UnrealEd, will now be specifying which categories of properties will be automatically expanded in the Properties Window. 1. Open ConTEXT if it is not already open. 2. Once again, create a new file by choosing New from the File menu or pressing the New File button in the toolbar. 3. Select the UnrealScript highlighter you have installed using the Select Active Highlighter dropdown. 4. On the first line of the new script file, place the following code:class ExampleClass_ExpandCategories extends ExampleClass_PlaceableAgain we will extend from the ExampleClass_Placeable class in a similar fashion to the ExamplEClass_HiddenCategories, but this time we will expand the Movement and Display categories instead of hiding them. 5. Press the Enter key to go to the next line and then press the Tab key to indent the line. Add the code below:
AutoExpandCategories(Movement,Display);Instead of suing individual specifier statements for each category, we have used a single specifier statement with multiple categories. Which method you use is completely personal preference. Since you have seen how to use either method, we will continue with the single statement method from now on as it is somewhat quicker to type. The completed script should contain the following text:
class ExampleClass_ExpandCategories extends ExampleClass_Placeable
   AutoExpandCategories(Movement,Display);
6. Save this file within the ..\Src\MasteringUnrealScript\Classes directory with the name ExampleClass_ExpandCategories.uc to match the class name. 7. Run the Make commandlet to compile the scripts. As in the previous chapter, you can do this using the method of your choice. Once the scripts have been successfully compiled, launch UnrealEd. Open the DM_TestRoom.ut3 map provided on the DVD. 8. Open the Generic Browser if it is not already open and switch to the Actor Classes tab. After fully expanding the ExampleClass hierarchy, you should now see the ExampleClass_ ExpandCategories class listed along with the ExampleClass_HiddenCategories class under the ExampleClass_Placeable class.
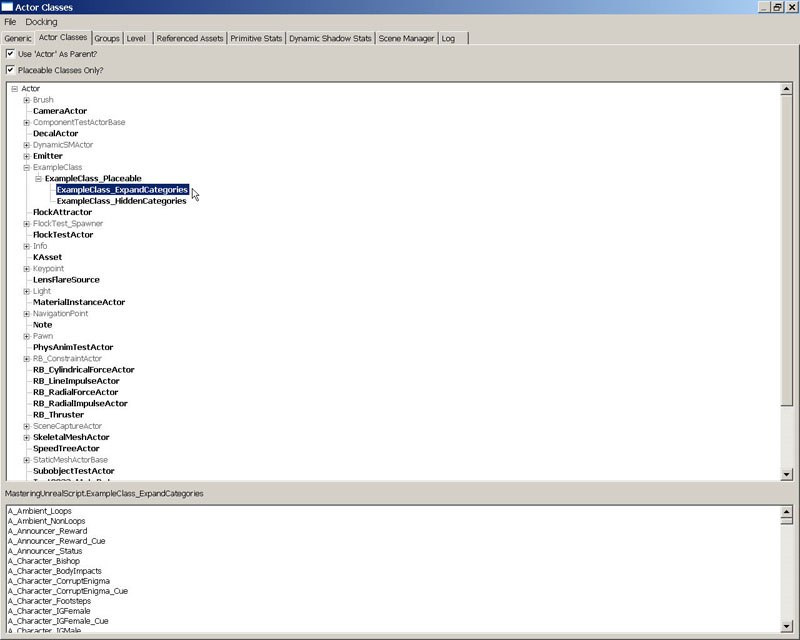
FIGURE 3.13 - The ExampleClass_ExpandCategories class is listed un ExampleClass_Placeable. 9. Select ExampleClass_ ExpandCategories in the Actor Classes Browser and right-click on the floor of the room in the perspective viewport. Choose Add ExampleClass_ ExpandCategories here from the context menu. Press F4 to open the Properties Window and notice all the categories of properties, especially the Movement and Display categories which should be fully expanded making the properties within these categories visible when the Properties Window is opened.
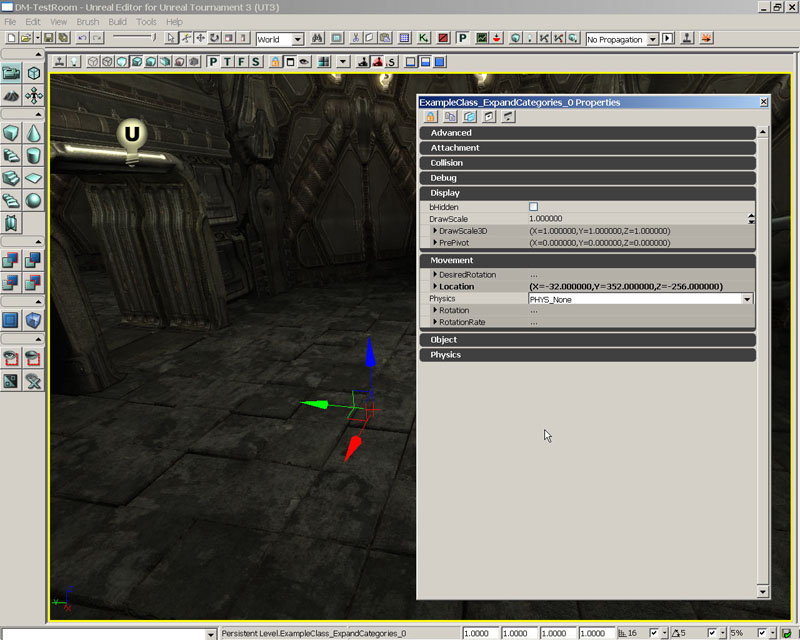
FIGURE 3.14 – The Movement and Display categories are automatically expanded. <<<< End of Tutorial >>>>
COLLAPSECATEGORIES
The CollapseCategories specifier causes the Property Window within UnrealEd to forego the use of categories when displaying the editable variables for this class. All editable variables will appear in a single list ordered alphabetically. This keyword will be inherited by classes which are children of this class.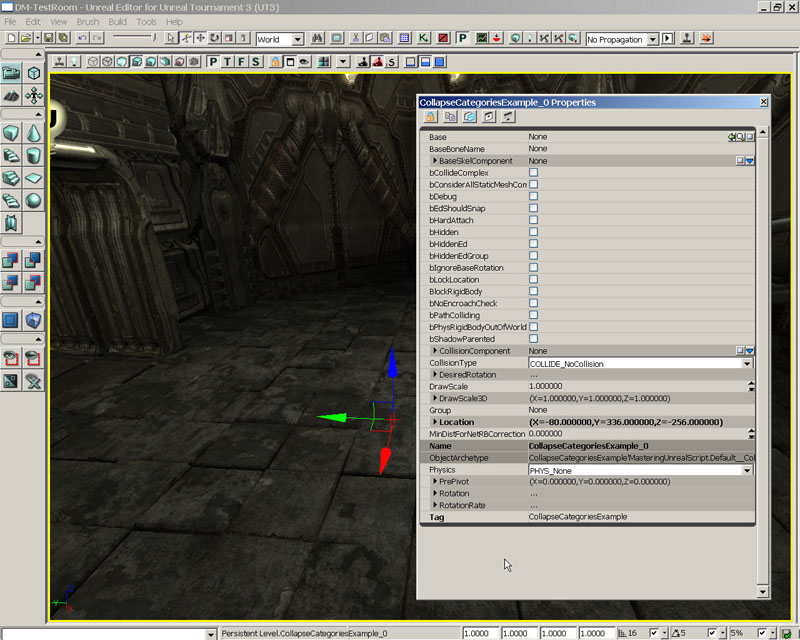
FIGURE 3.15 – The effects of the CollapseCategories specifier.
DONTCOLLAPSECATEGORIES
The DontCollapseCategories specifier reverses a CollapseCategories specifier from a parent class. This means this keyword can be used to force the editable variables of this class to be displayed using the categories in which they were specified to be located.WITHIN CLASSNAME
The Within specifier designates that instances of this class can only be created within an instance of the ClassName class, meaning that an object of type ClassName must be assigned as the new instance’s Outer property at the time of creation. An example of this might be a MaterialExpression. It would have no reason to exist outside of a Material so that class is declared using the Within specifier and the Material ClassName making it impossible for a MaterialExpression to be created anywhere but within a Material.INHERITS(CLASSNAME[,CLASSNAME,...])
The Inherits specifier allows a class to extend, or inherit, from multiple parent classes. This specifier is only applicable to native classes. When specifying multiple classes to inherit from, this can be done in a single Inherits statement or a separate Inherits statement can be used for each class to inherit from.IMPLEMENTS(CLASSNAME[,CLASSNAME,...])
The Implements specifier allows a class use, or implement, one or more Interfaces. Interfaces and how to use them will be discussed in a subsequent chapter. When specifying multiple Interfaces to implement, this can be done in a single Implements statement or a separate Implements statement can be used for each Interface to implement.NOEXPORT
The NoExport specifier causes the native declaration for this class to be excluded from the automatically generated C++ header file. When using this specifier, the native class declaration must be created manually in a separate header file. This specifier is only applicable to native classes.3.5 SUMMARY
Classes are the basis for everything we do I UnrealScript. Without them, the interesting and rich gameplay found in Unreal Tournament 3 would simply not be possible. Although the classes you have created in this chapter were not overtly useful, now that you know how to declare your own new classes, we can begin to focus on implementing functionality that will make that interesting and rich gameplay possible. That will be our goal over the course of the remainder of this book; to use UnrealScript to create new and fun situations within the Unreal universe.SUPPLEMENTAL FILES
- DM-TestRoom.rar: DM-TestRoom.ut3 map
- Chapter3_CompleteSource.rar: Complete Source Files
