Matinee AnimControl Track
Overview
Instructions to use Matinee's AnimControl tracks with advanced character animation blending.
If you want to just play one animation on an actor using Matinee it is quite easy. First add the AnimSet you want to use to the GroupAnimSets array in the Actor's Group. Then add an AnimControl track to the Group, and when you add a key it should offer a list of AnimSequences to choose from. You do not need to assign Slot names or anything if you are only using one AnimControl track.
Matinee uses "Slots" to play multiple animations on SkeletalMeshes. Each slot corresponds to a specific region of the mesh. For example the Head only, the torso, the right arm, or the whole mesh.
Then, each slot has several channels. A channel represents one potential animation being played at one time, so having more channels means more animations blended together on one slot.
This quick tutorial will walk you through the steps needed to get Matinee play animations on a skeletal mesh by using AnimControl tracks.
Animation Tree Setup
Place AnimNodeSlot animation nodes in combination with AnimNodeBlendPerBone to mask certain body parts of your characters' skeleton. This process creates Slots to be used by matinee.
A Slot defines a skeleton mask to play animations on. If no AnimNodeBlendPerBone animation node is used, then the animations will affect all bones of the skeleton and therefore play on "full body". So in that case, place an AnimNodeSlot node, and name it (NodeName property of the node) "Slot_FullBody".
You can then cover sub regions of the skeleton, for example place an AnimNodeBlendPerBone node, and mask out the legs. You can then place an AnimNodeSlot and name it "Slot_UpperBody". And so on, repeat for all the body parts you'd like to play custom animations on (legs, head...).
AnimNodeSlot has its first child (source) connected to default animations. By default, it means no Matinee specified animation, so it will play whatever has been setup in the AnimTree. This will let you have an AnimTree handling default animations, for instance when a character moves, a walk animation will be played. But Matinee will be able to overlay an animation on top of that. For example a waving hand animation on the upper body of the character.
Additional children (Channels) of the AnimNodeSlot will be available through Matinee's AnimControl track to play animations on. The more tracks, the more simultaneous animations you'll be able to play at the same time (and blend to/from).
See the following screenshot of a simple AnimTree setup.
 3 Slots have been defined, Slot_LowerBody, Slot_UpperBody, which have precedence over Slot_FullBody.
The default animation here, is an AnimNodeBlendBySpeed to play a walk forward animation when the actor is moving, and an Idle animation when standing still.
Note the order in which the nodes have been placed, this allows to play a full body animation on Slot_FullBody, and be able to overlay another custom animation on either Slot_LowerBody or Slot_UpperBody (or both).
If the Slot_FullBody would have been placed before the AnimNodeBlendPerBone, then it wouldn't have been possible to overlay an upper body animation on top of a custom full body animation, as the full body node would have clobbered the upper body one.
Level Setup
Place your character in a map via a SkeletalMeshActorMAT actor. Note that the code contained in that class can be added to any Actor, like Pawns for example, to take control of them during gameplay and play animations from Matinee. SkeletalMeshActorMAT provides a quick way to throw in a mesh and hook it up to matinee to play animations on.
Make sure the mesh is correctly set up, by setting up the AnimTreeTemplate property with a reference to the AnimTree you created earlier. Also in the Movement tab, set Physics to PHYS_interpolating.
Matinee Setup
The InterpGroup should feature the animations you are going to use through the property GroupAnimSets.
Add AnimControl Tracks from the InterpGroup (right click).
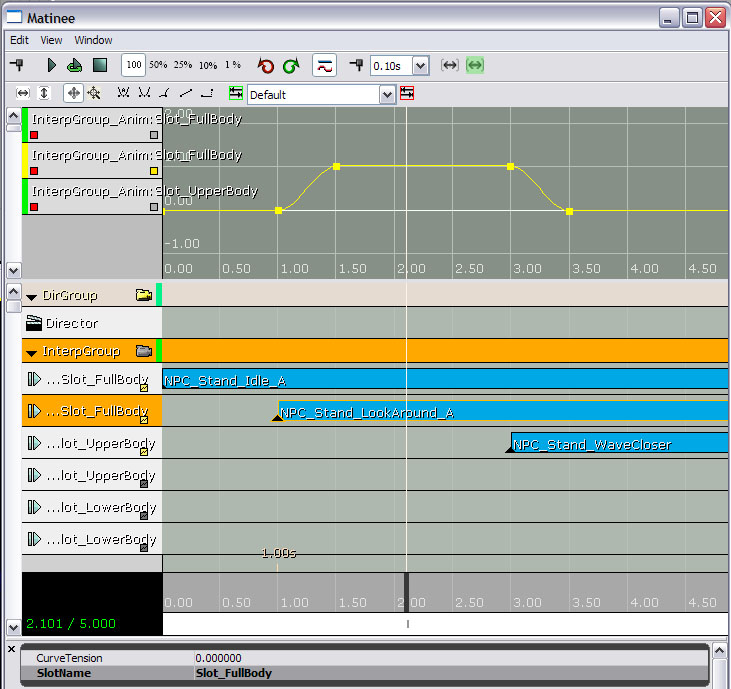
SlotName is the name of the AnimNodeSlot set up in the AnimTree. So in our example, we have Slot_FullBody, Slot_UpperBody and Slot_LowerBody.
Create duplicate tracks of these slots to create additional channels.
The weighting priority goes from bottom to top. So bottom most channels will have precedence over top most channels. If you have 2 channels for Slot_FullBody, both of weight 1.0, then only the bottom channel will feed in animations.
To set the weight of each channel, use the curve editor. Valid range for weights is 0.0 to 1.0.
See the following screenshot for an example of setup by using the AnimTree made earlier.

Important!
You are viewing documentation for the Unreal Development Kit (UDK).
If you are looking for the Unreal Engine 4 documentation, please visit the Unreal Engine 4 Documentation site.
 3 Slots have been defined, Slot_LowerBody, Slot_UpperBody, which have precedence over Slot_FullBody.
The default animation here, is an AnimNodeBlendBySpeed to play a walk forward animation when the actor is moving, and an Idle animation when standing still.
Note the order in which the nodes have been placed, this allows to play a full body animation on Slot_FullBody, and be able to overlay another custom animation on either Slot_LowerBody or Slot_UpperBody (or both).
If the Slot_FullBody would have been placed before the AnimNodeBlendPerBone, then it wouldn't have been possible to overlay an upper body animation on top of a custom full body animation, as the full body node would have clobbered the upper body one.

