UDN
Search public documentation:
SpeedTree
日本語訳
中国翻译
한국어
Interested in the Unreal Engine?
Visit the Unreal Technology site.
Looking for jobs and company info?
Check out the Epic games site.
Questions about support via UDN?
Contact the UDN Staff
中国翻译
한국어
Interested in the Unreal Engine?
Visit the Unreal Technology site.
Looking for jobs and company info?
Check out the Epic games site.
Questions about support via UDN?
Contact the UDN Staff
Speed Tree
Document Summary: How to use SpeedTree Actors in the editor, This document has been updated with Speedtree5 information. Document Changelog: Created by Daniel Wright.Broad Concepts
There are 3 components to Speedtree 5.0: the SpeedTree Modeler, SpeedTree Compiler and the integration into the UE3 game/editor. In the modeler you iterate on the tree's shape, wind and collision. The modeler renders using an external application and may not match up with what you get in UE3. The modeler exports .SPM files, which can only be read by the compiler. The compiler takes the .SPM file and generates texture atlases, vertex data and other information about the tree. It saves everything but the textures into a .SRT file, which is what you import into UE3. For artists: Be sure to read the documentation from IDV at:%speedtree apps folder%/Content/Tools/5.0/SpeedTree_Applications_v5.0_Full/Documentation For programmers: Be sure to read the Speedtree SDK documentation from IDV.
Atlases
Speedtree likes to combine all textures onto an atlas. This works best for our games if we only combine the billboard images onto an atlas. This allows us to share leaf and trunk textures across multiple trees to save memory. If you want you can create your own atlas in Photoshop of bark and leaves that can be shared across multiple trees, just skip the Atlas generation step in the compiler.Leaves
Speedtrees support using billboards as leaves but this isn't very effective, it looks much better to define a mesh as a group of leaves or a branch.Branches
Branches look better and run better if they are meshes rather than the frond type mesh that uses masked materials. Using the meshes reduces overdraw and can be optimized out at distances.Compiling
Compiling is fairly straightforward. Load your speedtree. Don't create a texture atlas but do create a billboard atlas. Select finish. In the left window unselect Texture Copy otherwise it'll always copy textures used on the tree to the export directory. Select a valid file type for the atlas file types (usually .tga). You can then select Session->Compile Now.LODs
Speedtree 5.0 has two or more LOD's of geometry and then a final LOD which is just a billboard. The high detail geometry LOD morphs into the low detail geometry LOD based on distance and the parameters you setup on the SpeedtreeActor in the editor. Then the billboard screendoor fades in, and the low detail geometry LOD fades out.LOD setup in the Modeler
Under 'Object Properties - Tree', check 'Enabled' under the 'Level of Detail' category. Change the 'Count' to the value you need. Switch 'Preview style' to 'Use near and far', and either use mouse wheel or click left and middle mouse buttons and drag to zoom in and out. You can change the LOD distances under this category to preview geometry LOD transitions, but keep in mind that you can't view billboard transitions, and the distances you set here will not be used in UE3.LOD setup in the Compiler
Before you open your tree in the compiler make sure there are no errors when loading it in the modeler. The compiler will not tell you if there are any errors, but they will mess up your export in difficult to detect ways. For example if your leaf meshes are missing when you compile, billboards will be exported off-center and partly clipped. It will notify you in the Output window that a mesh failed to load. When you create a new session and select your tree, use these settings on the 'Compilation Settings' dialog: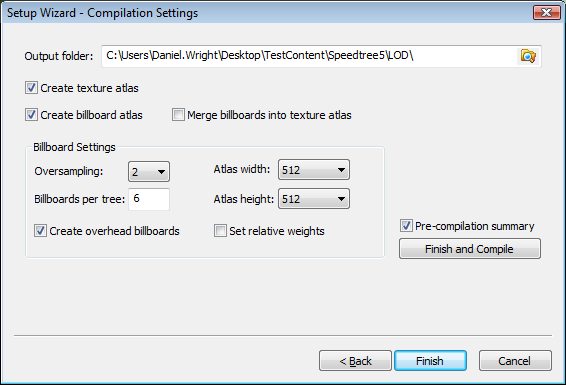 Click Finish (not Finish and Compile).
Change Compilation Image types to output tga's so they can be imported into the editor.
Change Billboard border to be larger if you get flickering hairline artifacts around billboards in the editor when you are far away like you can see in the top left of this screenshot:
Click Finish (not Finish and Compile).
Change Compilation Image types to output tga's so they can be imported into the editor.
Change Billboard border to be larger if you get flickering hairline artifacts around billboards in the editor when you are far away like you can see in the top left of this screenshot:
 Finally click Start Compilation and keep track of where you told the compiler to output files for the next step.
LOD setup in UE3
Import the .SRT file from the compiler. Next, import BillboardAtlas_Diffuse.tga and when you get to the Import dialog, check 'Dither Mip-maps alpha'. This will create noise in the alpha channel which will be used to screendoor fade the billboards, and do the same thing for TextureAtlas_Diffuse.tga. If you want the branches to dither fade, do the same thing when importing the branches texture. For bushes where the branches aren't noticeable from a distance you can skip the dithering and use an opaque material which will be more efficient. Remember to pick TC_Normalmap for compression when you import BillboardAtlas_Normal. Create a material for the leaves. Here's a minimal setup for dither fading during LOD to work: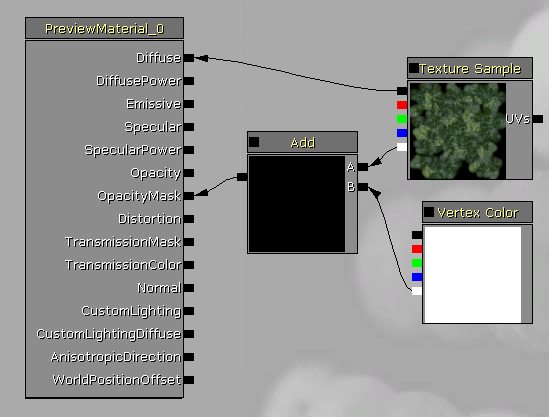 The speedtree runtime will pass an LOD value into the vertex color alpha to make this work. Setup the billboard material in the same way. Open the USpeedtree asset that you imported and assign these new materials to it.
Place a SpeedTreeActor in a level and set Lod Level Override to -1. Use the various LOD distances (Lod 3DStart, etc) to control how the LOD's transition.
Another method to use is to utilize Speedtrees scaling and pruning of leaves and branches. This can be more visually appealing and requires less material work. These options are set in the Speedtree modeler.
The speedtree runtime will pass an LOD value into the vertex color alpha to make this work. Setup the billboard material in the same way. Open the USpeedtree asset that you imported and assign these new materials to it.
Place a SpeedTreeActor in a level and set Lod Level Override to -1. Use the various LOD distances (Lod 3DStart, etc) to control how the LOD's transition.
Another method to use is to utilize Speedtrees scaling and pruning of leaves and branches. This can be more visually appealing and requires less material work. These options are set in the Speedtree modeler.
