UDN
Search public documentation:
UT3CustomCharacters
日本語訳
中国翻译
한국어
Interested in the Unreal Engine?
Visit the Unreal Technology site.
Looking for jobs and company info?
Check out the Epic games site.
Questions about support via UDN?
Contact the UDN Staff
中国翻译
한국어
Interested in the Unreal Engine?
Visit the Unreal Technology site.
Looking for jobs and company info?
Check out the Epic games site.
Questions about support via UDN?
Contact the UDN Staff
Creating Custom Characters for UT3
Document Summary: Guide to creating custom characters for the third generation Unreal Tournament game. Document Changelog: Created by Paul Jones?; updated by Chris Mielke and Aaron Herzog. Maintained by Richard Nalezynski?.Overview
This document discusses the UT3 Character skeletons, as well as how to import the mesh content into the engine and configure it to run in-game.Skeletons
In UT3 there are 4 different main skeletons used:- human male
- human female
- krall
- corrupt
- UT3_Male.max (3D Studio Max 9)
- UT3_Female.max (3D Studio Max 9)
- UT3_Krall.max (3D Studio Max 9)
- UT3_Corrupt.max (3D Studio Max 2009)
Weighting a Mesh to a Skeleton
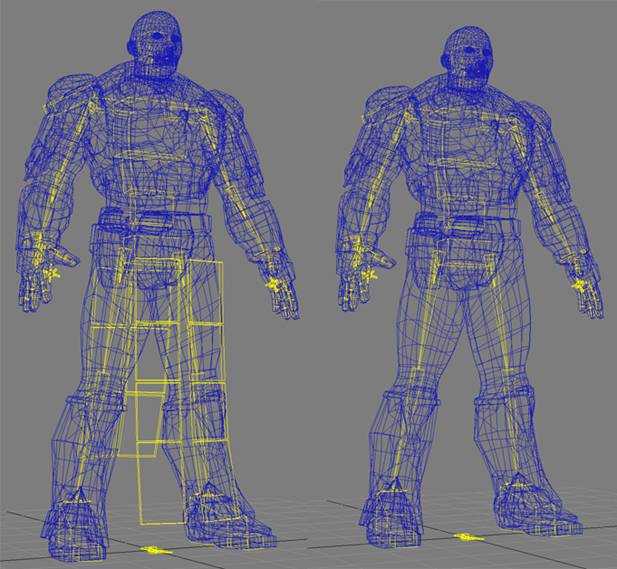
When creating a custom mesh, it is best to create the mesh with the skeleton in mind. The mesh should be modeled with all the joints matching the location already defined by the skeleton. For meshes that don’t follow this rule, the skeleton joints can be rotated to get them to line up to joints in a mesh. The animations in game will orient the bones back to where they need to be to play correctly. Although bones can be rotated, they should never be translated or moved to try and place them where joints are in a mesh. This will give unexpected results in game and squash or stretch a mesh because the animations define where the bones translation will be. For example, if a mesh has shorter legs than defined by the skeleton, and the skeleton’s leg bones are moved to compensate, the legs will be stretched longer in game to match the length of the other character’s legs. This keeps all pieces connected correctly during the in-game character setup. The correct way to fit meshes to the skeleton is to rotate the joints as needed to get them as close as possible if needed and/or modify the mesh to fit. Creating characters with different proportions will require a new master skeleton, and if the proportions are very different than characters that already exist, they may require their own animations as well which is beyond the scope of this document. Consider the Malcolm mesh. He has been modeled in pieces so that he works with character creation. The pieces are made to match the in game character creation pieces. These mesh pieces are ready to be weighted to the skeleton:- Head
- Arms
- Shoulderpads
- Torso
- Thighs
- Boots
 Merge in the bones from the UT3_Male.max file, delete the bones that aren’t needed, and then weight the mesh to the skeleton. In this case, Malcolm doesn’t have any use for the cloth bones so those can be deleted.
Exporting
Next is to export your character and get it into the engine. Each mesh piece will be exported separately as its own skeletal mesh using ActorX. Download ActorX plugins here: ActorX Malcolm’s boots will be used as an example for getting mesh pieces into the engine. Use the same process for the other pieces. To export Malcolm’s boots, first load up ActorX. Then make sure the Skin Export settings are correct.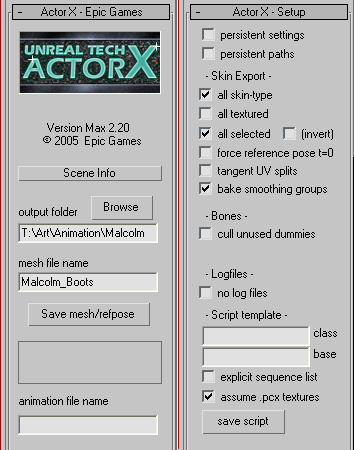 The all skin-type setting ensures that weighted meshes in the scene will be exported. The all selected setting is an easy way to export each piece one at a time. If for some reason all selected isn’t working or isn’t available in a version of ActorX, simply delete the meshes you do not wish to export, but DO NOT delete any part of the skeleton. Just make sure to save your scene before deleting any meshes, so you have a complete version to go back to; and remember not to overwrite that file after deleting meshes.
Fill in the output folder and mesh file name fields in ActorX, and with the boot mesh selected, press the Save mesh/refpose button to create a skeletal animation (.psk) file. If there is any animation on the skeleton, ActorX will use the first frame of the timeline (usually frame 0), as the export pose.
The all skin-type setting ensures that weighted meshes in the scene will be exported. The all selected setting is an easy way to export each piece one at a time. If for some reason all selected isn’t working or isn’t available in a version of ActorX, simply delete the meshes you do not wish to export, but DO NOT delete any part of the skeleton. Just make sure to save your scene before deleting any meshes, so you have a complete version to go back to; and remember not to overwrite that file after deleting meshes.
Fill in the output folder and mesh file name fields in ActorX, and with the boot mesh selected, press the Save mesh/refpose button to create a skeletal animation (.psk) file. If there is any animation on the skeleton, ActorX will use the first frame of the timeline (usually frame 0), as the export pose.
Importing
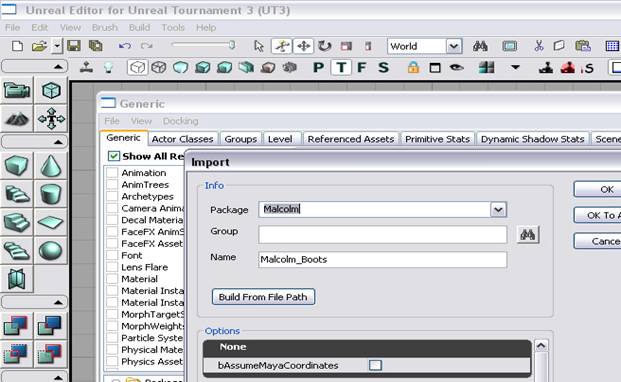
Open up the editor and in the Generic Browser window, go up to “file” -> “import”. Navigate to the psk file that your export created and click “open”.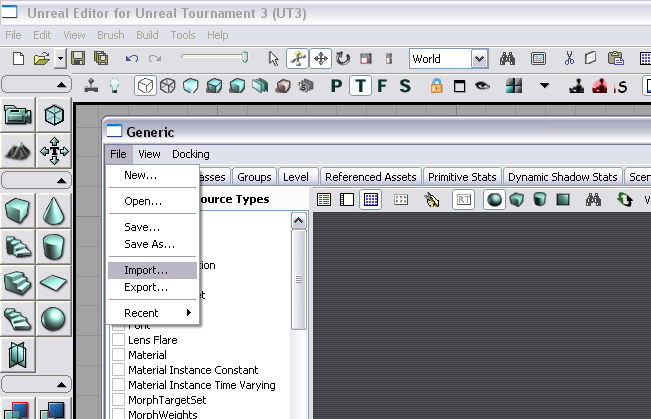 After you select Open, another window will come up asking what you want to do with your animation file. The Package field in this window lets you import into an existing package or create a new one. To create a new package, type the name of a package that doesn't already exist. The new package will be created and your mesh will be imported into it when you select OK. To import to an existing package, type the name of an existing package or select it from the drop-down list. In this window, you can also create a group within the package via the Group field, as well as change the mesh name via the Name field.
 Once the mesh has been imported, save the package in the following directory:
\My Documents\My Games\Unreal Tournament 3\UTGame\Unpublished\CookedPC\CustomChars
Adding Sockets to the Mesh
Sockets are user-defined points on a skeletal mesh. They can be added to any skeletal mesh, and in UT3, they are used for multiple things, including points from which to emit particles or places to attach weapons. These need to be added to each mesh in order for your character to function correctly in-game. To add sockets, double-click on the skeletal mesh on which you would like to add them in the Generic Browser window. A skeletal mesh/animation set editor window will come up. Click on the Socket Manager icon, or select Socket Manager from the Mesh menu to bring up the Socket Manager window.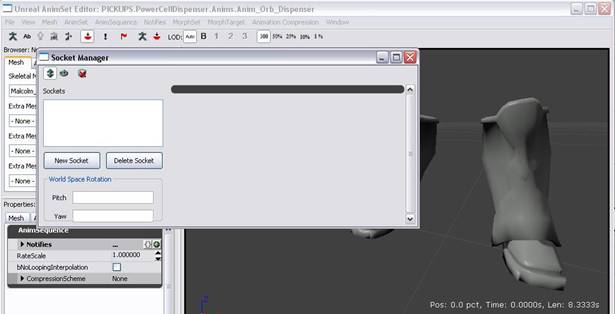 Sockets are created by selecting New Socket, choosing which bone the socket will be attached to, and then creating a name for the socket.
Here is a list of sockets needed:
Sockets are created by selecting New Socket, choosing which bone the socket will be attached to, and then creating a name for the socket.
Here is a list of sockets needed:
| Mesh Name | Socket Name | Bone Name |
| Arm Mesh | WeaponPoint | b_RightWeapon |
| DualWeaponPoint | b_LeftWeapon | |
| Boot Mesh | L_JB | b_LeftAnkle |
| R_JB | b_RightAnkle | |
| Torso Mesh | HeadShotGoreSocket | b_Neck |
Configuring the Mesh for Use In-Game
All that is left is configure the custom character to let the game know where your skeletal meshes are and how to use them. This is done by editing a configuration (.ini) file:\My Documents\My Games\Unreal Tournament 3\UTGame\Config\UTCustomChar.iniTo add Malcolm’s boots to the UT3 Character Creation menu, a line needs to be added to the configuration file indicating that there is another pair of boots to be used. Malcolm looks like an Iron Guard character so the piece would fit best there. Scrolling down in the configuration file you come to where all the Boots are located, and narrowed down further by which family they are located in – in this case, the ironguard family (shown as IRNM).
Parts=(Part=PART_Boots,ObjectName="CH_IronGuard_Male.Mesh.SK_CH_IronG_Male_Boots01",PartID="A",FamilyID="IRNM")
Parts=(Part=PART_Boots,ObjectName="CH_IronGuard_Male.Mesh.SK_CH_IronG_Male_Boots02",PartID="B",FamilyID="IRNM")
Parts=(Part=PART_Boots,ObjectName="CH_IronGuard_Male.Mesh.SK_CH_IronG_Male_Boots03",PartID="C",FamilyID="IRNM")
The naming convention for the Objectname is:
Package.Group.Subgroup.Mesh (note the periods between each section). For example, if the new mesh was named “Malcolm_Boots”, and existed in a package called “Malcolm”, with no group, the Objectname would simply be “Malcolm.Malcolm_Boots”.
The naming convention for the Objectname is: Package.Group.Subgroup.Mesh (note the periods between each section). For example, if the new mesh was named “Malcolm_Boots”, and existed in a package called “Malcolm”, with no group, the Objectname would simply be “Malcolm.Malcolm_Boots”.
Parts=(Part=PART_Boots,ObjectName="Malcolm.Malcolm_Boots",PartID="D",FamilyID="IRNM")Save the configuration file and run the game. Your new piece should now show up in the UT3 Character Creation menu.
