Epic Games Texturing Guidelines
Overview
This document summarizes some lessens we have learned about creating textures. After switching to Lightmass for our Global Illumination lighting solution we found many of our textures we had created were too dark, had too much contrast and contained too much noise.
Some information shared in here may feel counterproductive to making good looking visuals. One thing to remember is in the past we have created textures that represent many aspects of a material with one texture, therefore a lot of data was "baked" into a single texture. Now that lighting and materials have become more complex we should separate and remove some of that data so that we represent materials in a realistic manner.
Gamma Space vs Linear Space
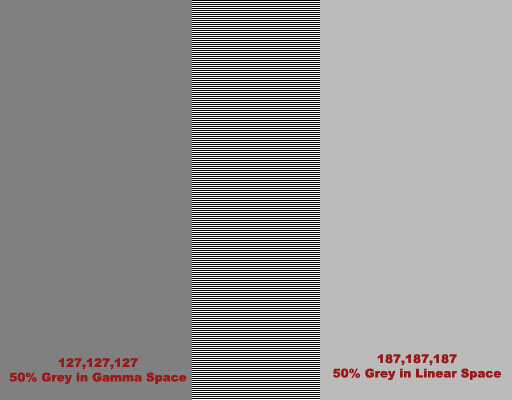
Before talking about specific textures and techniques we should understand what happens when a texture is manipulated in Photoshop and imported into Unreal Engine. When you create a texture in Photoshop you should be using a color profile of sRGB. This means your texture is stored with a gamma curve applied which is called Gamma Space. When your texture is imported into UE3 with default settings (sRGB value enabled) you are telling the engine to convert your texture to Linear Space before calculating lighting. There's a lot of math and technical information behind what is happening and why we do it but the important thing to remember is values you painted in gamma space are darker in linear space. For example, if you wanted to paint a surface that reflected 50% of light, Photoshop would tell you 50% grey is 127,127,127. 127,127,127 in gamma space converts to 55,55,55 or 21% light reflected in Linear Space. This means your scene would be darker and reflect much less light when calculating Global Illumination than you had intended.
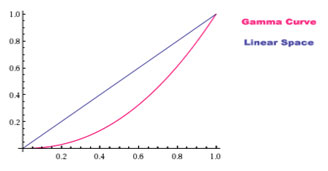
The curve below depicts the distribution of values in gamma space vs linear space. When you paint an image in Photoshop it's storing the image and measuring the brightness using this curve.
 Here is a visual example of how different 50% grey appears when measured in Gamma Space vs Linear Space.
Diffuse Textures
The first thing to consider when creating diffuse textures is you are not painting a final image of a surface. You're painting a surface property that represents light reflected at many angles. This means the diffuse texture should not have large shadows or light variances in value. Any large amount of ambient occlusion should be represented by LightmassAO or SSAO. Sometimes details represented in normal maps will still require a small amount of AO represented in the diffuse texture but this value should not be too dark.
Secondly, diffuse textures should be bright and have low contrast values. If you create a texture that is too dark you are limiting its ability to be bright in the game. You should remember that the texture you are creating is describing how bright that surface is when lit by a 100% bright white light. Also consider that if you paint a texture too dark or include ambient occlusion that is too dark you will inhibit the surfaces ability to show shadows and lighting. Textures with too much noise and too high of contrast will also make it difficult to read a surface's shape and lighting.
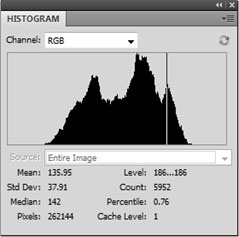
If you want a guideline for Photoshop for what will be middle grey when rendered you can use 186 on the histogram as "middle".
 Here is an example of a texture that was too dark and saturated compared to how bright it should be.
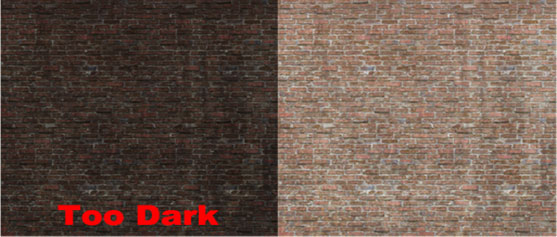
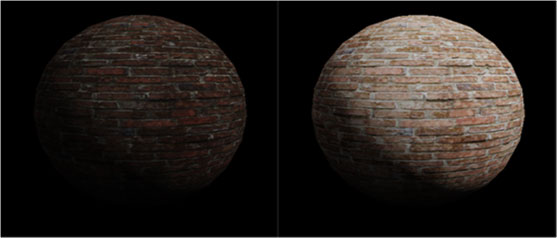 The original texture's values averaged at 46, which means when converted to linear space they would only bounce 2% of light! The adjusted textures average value is 150 which means it'll bounce 31% of incoming light which is decent for a brick wall. The adjusted texture will also show shading better since there's much more of a difference between it being fully lit and fully shadowed.
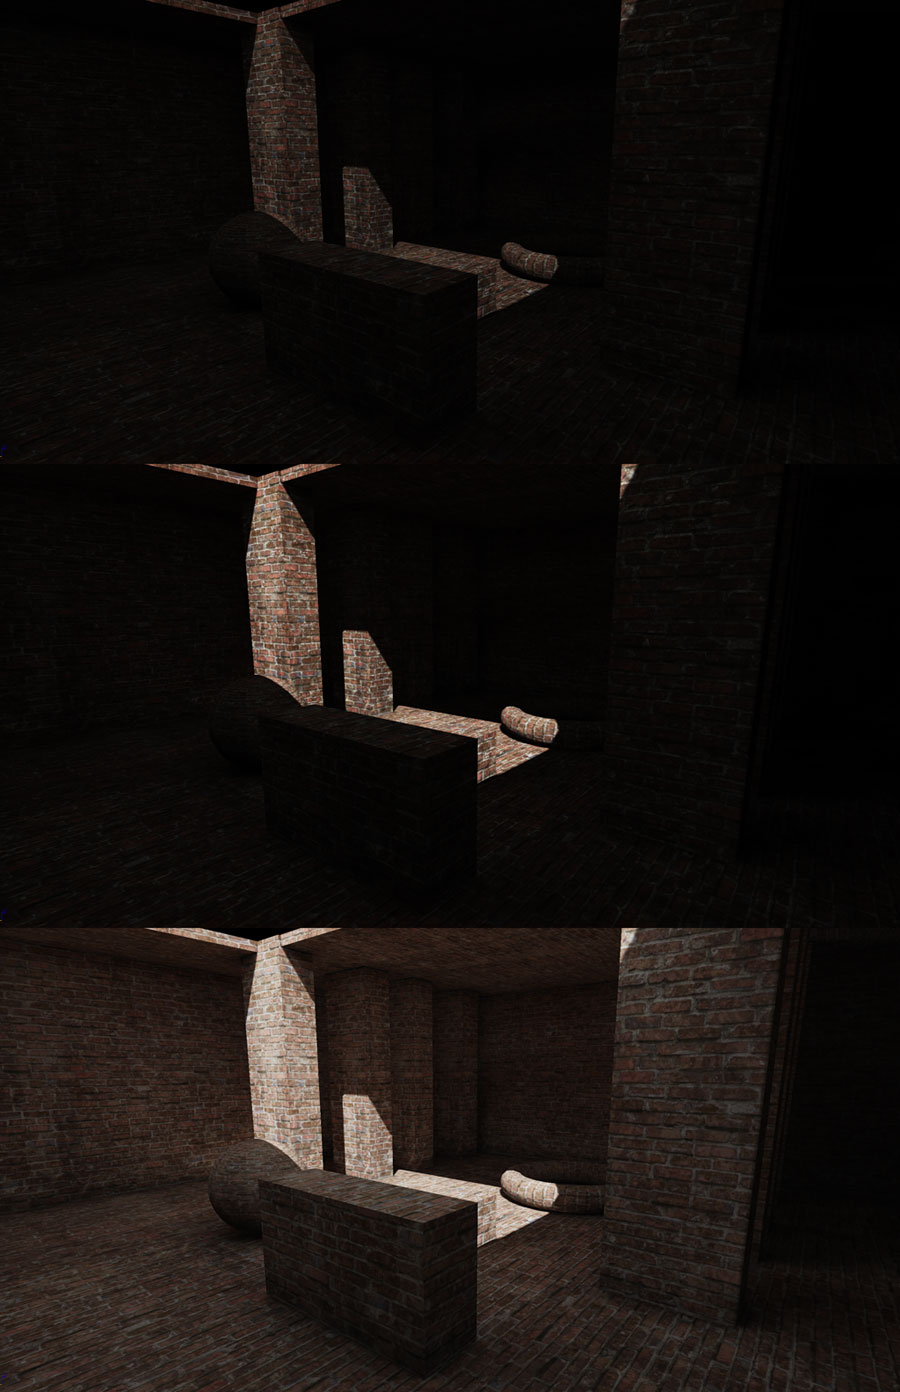
Below is a practical example of how dark textures affect lighting. The top image is using the original dark texture. The 2nd image is trying to fix the image brightness by increasing light intensity from 2 to 12. You can see this doesn't help GI or the dark areas at all. The final image is using the adjusted texture with a light brightness back at 2. These images show that if the textures are too dark they will not result in good lighting no matter how much you try to fix it with brighter lights.
The original texture's values averaged at 46, which means when converted to linear space they would only bounce 2% of light! The adjusted textures average value is 150 which means it'll bounce 31% of incoming light which is decent for a brick wall. The adjusted texture will also show shading better since there's much more of a difference between it being fully lit and fully shadowed.
Below is a practical example of how dark textures affect lighting. The top image is using the original dark texture. The 2nd image is trying to fix the image brightness by increasing light intensity from 2 to 12. You can see this doesn't help GI or the dark areas at all. The final image is using the adjusted texture with a light brightness back at 2. These images show that if the textures are too dark they will not result in good lighting no matter how much you try to fix it with brighter lights.
Specular Textures
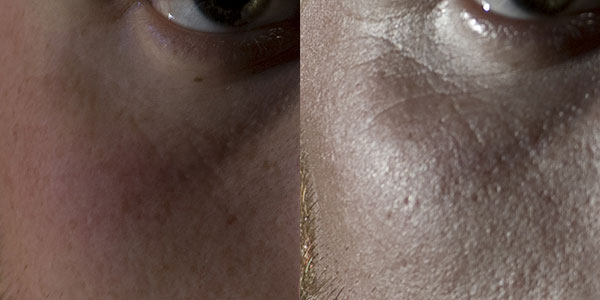
For various reasons in the past (using renderers that were not in linear space and approximating complex materials in simple lighting) artists have painted specular maps with varying amounts of color. A good example is skin. In the past artists would paint blue or sometimes orange specular textures. Skin's specular response is actually white. Very few materials actually have a color specular, most of them are metals. Here you can see that the specular reflection is white.
 It is important to remember that every surface has some form of specular reflection. It may be dull and low intensity which means it may not warrant its own texture. In those cases it's acceptable to use the diffuse texture but you should either desaturate the texture in the material or only grab one of the color channels to use for the specularity.
Specular Power/Masks
Specular Power and masks are often used to drive a lerp of two values. This means that you usually do not want this texture to go through the gamma-correction process. You can either pack these textures in an alpha channel (does not get gamma corrected) or pack them in channels together and uncheck []sRGB in its texture properties. Doing this means that using a value of 0 will be a 100% blend of value A, using a value of 255 will be a 100% blend value of B and using 127 will be an absolute 50% blend of the two.
Emissive Textures
Emissive textures should attempt to use the full range of values to avoid compression and precision artifacts. In the past some emissive textures had been created with dim textures and multiplied by large numbers in the material to compensate. This will create banding and incorrect colors in the emissive rendering. It's best to create your Emissive texture then use the Levels or Curves tools in Photoshop to maximize the range they utilize. Below is an emissive texture that only uses a small range of values and is multiplied by a very large number in the material compared to one that uses a broader range of values and is multiplied by a more reasonable number in the material.

Normal maps
One important thing to remember about editing normal maps is that it is always good to normalize your blending operations. This means either blend normal maps using Crazybump or if you have blended them in photoshop, import them into Crazybump and re-export and it'll normalize your map for you.
Also remember that multiplying detail normal maps by values higher than 1,1,0 can expose DXT compression artifacts and create materials that do not light correctly in all situations.
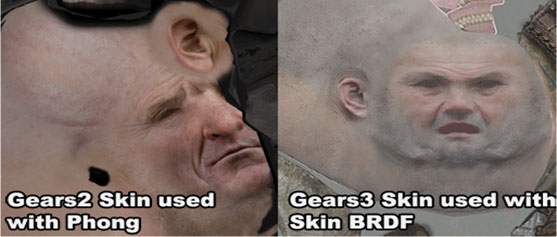
Special Notes on Skin
Skin is a complex material that we now represent with lighting models more complex than phong. In directX11 we do this with Screen Space Sub-Surface Scattering, in DirectX9 we do this with CustomLighting that utilizes a colored lighting falloff with a soft normal. Both techniques treat the diffuse texture as epidermal layer and colorize it to represent the meaty red lighting under the skin. This means the diffuse texture for skin should be much more light and pale than we have typically created. Photos of skin already have the "material" in them and contain the redness that is created by SSS so when you create your texture you essentially have to remove that from the texture so that it can be done by the material.
Important!
You are viewing documentation for the Unreal Development Kit (UDK).
If you are looking for the Unreal Engine 4 documentation, please visit the Unreal Engine 4 Documentation site.
