UDN
Search public documentation:
APEXClothing
日本語訳
中国翻译
한국어
Interested in the Unreal Engine?
Visit the Unreal Technology site.
Looking for jobs and company info?
Check out the Epic games site.
Questions about support via UDN?
Contact the UDN Staff
中国翻译
한국어
Interested in the Unreal Engine?
Visit the Unreal Technology site.
Looking for jobs and company info?
Check out the Epic games site.
Questions about support via UDN?
Contact the UDN Staff
APEX Clothing in UE3
Overview
Getting the Tools
Tutorials
Importing
- Import the Skeletal Mesh and animation files (.psk and .psa) for the asset which will have clothing.
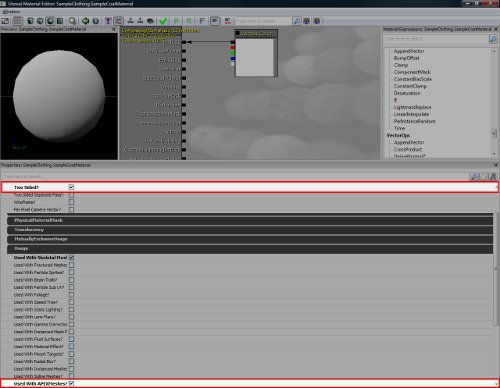
- In the Material Editor create a material with the Two Sided? and Used With APEXMeshes? flags set.
- Import the .apx file that you have created with the Max/Maya clothing plugin.
- Note
- Ensure that you export using the "APEX Clothing" export option and NOT "APEX ARM"
- Open the AnimSet Viewer and connect the Apex Clothing Asset to the mesh.
- By default, only 1 clothing slot is available. Adding a APEX Clothing node here, will create a new empty slot. 1 slot will always be empty to allow for multiple clothing assets to be added.
- There is a new Clothing LOD Map section under Skeletal Mesh. This section is used to associate a Clothing Asset with graphical materials and to manage LOD's.
- To associate a APEX Clothing Asset with a graphical material, set the Clothing Section Info of the corresponding Clothing Asset to the Material ID desired. This will replace the graphical version of the mesh section with the APEX Clothing Asset.
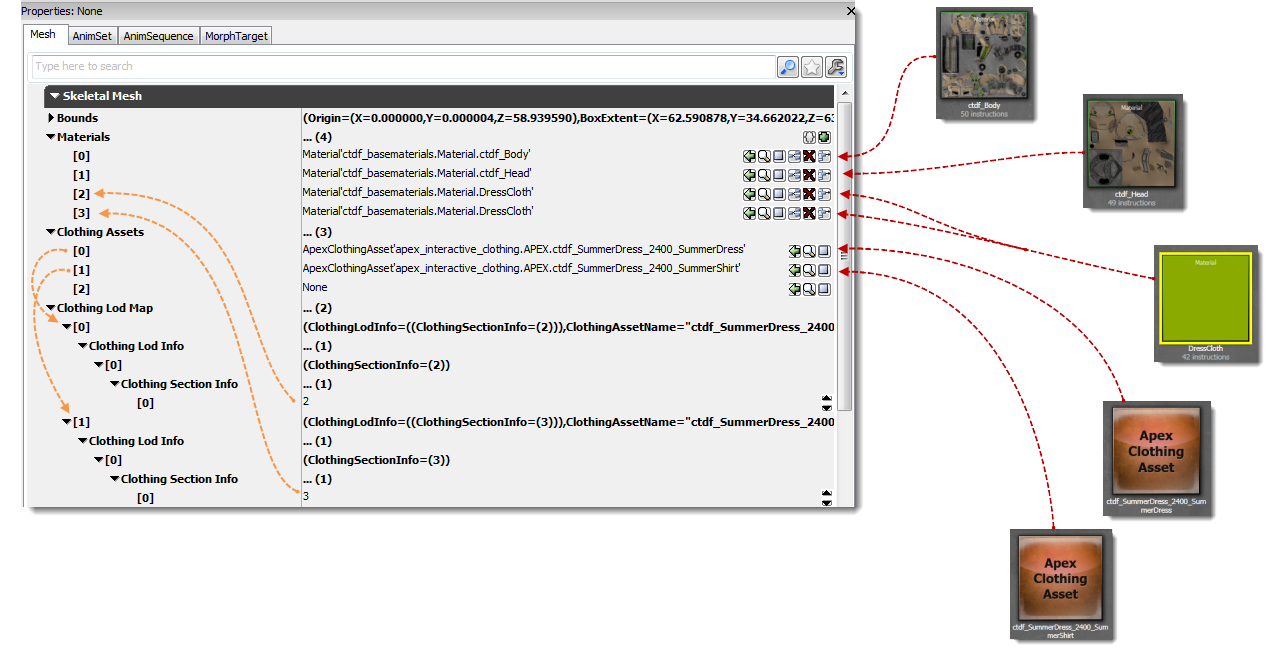
- Use Clothing Asset Material - On the Skeletal Mesh in Anim Set Viewer, there is now an Apex Clothing section at the bottom. This control allows you to override the graphics material with a substitute graphics material that is defined in the APEX Clothing Asset. This supports multiple materials per clothing asset. The default is unchecked. This means that the APEX Clothing Asset will inherit the material from the skeletal mesh by default. Checking this control on causes all Clothing materials on the given skeletal Mesh to be overridden by their respective Clothing Assets.
 .
.
- If the override is enabled, Set the materials in the APEX Clothing Node. ( See image in Asset Settings below)
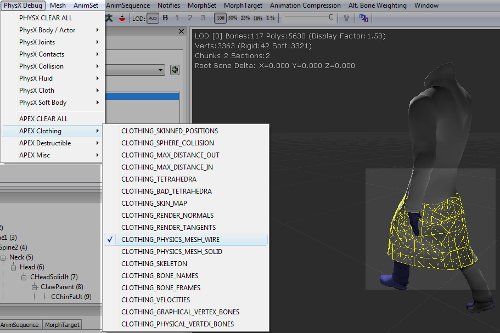
- You can use the PhysX Debug menu in order to view various aspects of the APEX Clothing.
Asset Settings
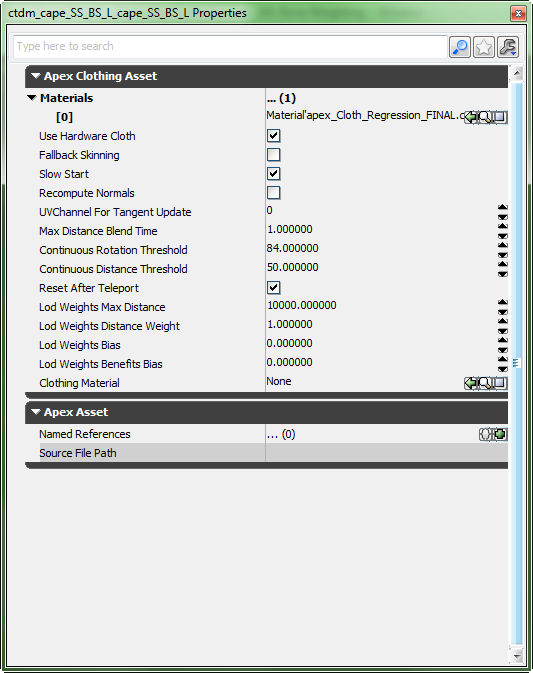
- Continuous Rotation Threshold – If your character rotates two quickly in some situations it can cause collision problems with clothing. (i.e.)Character does a complete 180 in one frame. By setting this threshold you can force the clothing to snap to the new position so that it doesn’t have to go through a violent rotation simulation
- Continuous Distance Threshold - In the case where you character moves an abnormally far distance in one frame you may have an unrealistic physical simulation, which would cause clothing to stretch abnormally. Setting this threshold will teleport the clothing to the new position to avoid adding energy into the cloth.
- Reset After Teleport - This flag tells the cloth to reset itself after the teleport occurs. This puts the cloth back to the skinned pose and then start the simulation. This can avoid situations where the cloth may have been in an extreme pose and you teleport the player next to an object that the cloth might penetrate otherwise.
Controlling Behavior During Animation (Choreographing Clothing)
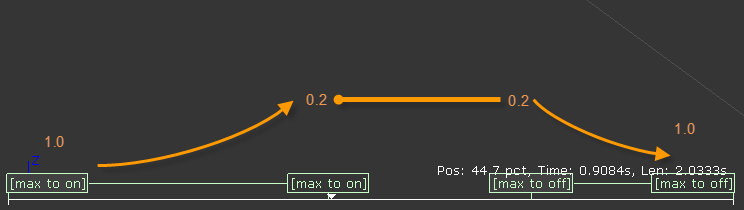
 ClothingMaxDistanceScale Anim Notifies should always be used in pairs so that you can smoothly blend into your desired value, and then blend back out to the previous value when leaving an animation.
Graphical LOD
- If you have authored your Clothing with LOD's in DCC tools, then when you connect the APEX Clothing Asset to the Skeletal Mesh(the same way as mentioned above), then the Clothing LOD Map for the corresponding Clothing Asset slot will be populated by however many LODs are in the APEX Clothing Asset. In the following example, there is 3 LODs.
- Set the clothing Section Info (mentioned above) for each level.
- If the desire is to override a graphical material for any clothing LOD, use the material override in the LOD info section of the Skeletal Mesh.

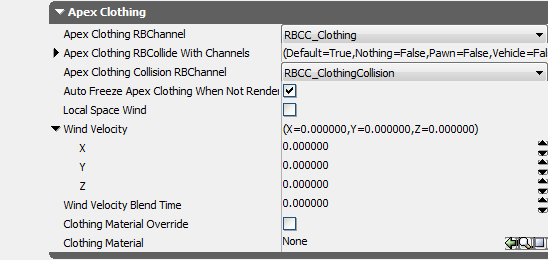
Wind
- Wind Velocity Blend Time - You are setting the target velocity of the clothing verts with these settings. The Wind Velocity Blend Time is the amount of time it takes for the clothing to reach the velocity. A value of .01 should get you a quick response. Setting this value to 0.0 turns the wind off.
- Wind Velocity Vector - A direction and force for the wind.
Clothing Lag Hints
- Preventing Lag with Attachments - If you are seeing clothing lag when attaching it via attachments in script try setting the bForceUpdateAttachmentsInTick to true for that SkeletalMeshComponent. Will ensure that the clothing component is updated twice a frame - once in Tick and again when UpdateTransform is called. This comes at a penalty cost but clothing must be updated after the actor has been moved in order to avoid the lag.
- Lag on Characters - Ensure that actors with clothing have their TickGroup set to TG_PreAsyncWork
- Tick Order - When debugging in general you can put logging in to ensure that the following are happening in the correct order. (Print out the names with GetPathName to ensure you are seeing the correct actor.)
- Begin Frame
- Tick
- Update Transform (bFinalUpdate is set)
- Sync Transform
Samples
- Waving_Flag_Kinematic.max: Sample Flag Max file for APEX Clothing
