UDN
Search public documentation:
ContentBrowserDatabase
日本語訳
中国翻译
한국어
Interested in the Unreal Engine?
Visit the Unreal Technology site.
Looking for jobs and company info?
Check out the Epic games site.
Questions about support via UDN?
Contact the UDN Staff
中国翻译
한국어
Interested in the Unreal Engine?
Visit the Unreal Technology site.
Looking for jobs and company info?
Check out the Epic games site.
Questions about support via UDN?
Contact the UDN Staff
UE3 Home > Unreal Editor and Tools > Content Browser Database
UE3 Home > Level Designer > Content Browser Database
UE3 Home > Technical Artist > Content Browser Database
UE3 Home > Level Designer > Content Browser Database
UE3 Home > Technical Artist > Content Browser Database
Content Browser Database
- Content Browser Database
- Overview
- Why do I need a game asset database?
- Content Browser Database Interaction
- Build System Database Interaction
- Database Setup
- This seems like a lot of work...
- Create a checkpoint file
- Regularly checkpointing game content
- Setting up the journal server
- Installing MS SQL Server
- Automatic journal server setup (recommended!)
- Manual journal server setup (only if needed)
- Configure Unreal Editor
- Generating thumbnails for assets
- Advanced topics
Overview
Why do I need a game asset database?
- All game content is instantly available for browsing, whether it's loaded or not.
- Users never have to check out packages to tag assets or add them to collections.
- Thumbnails are displayed for all game assets, even assets that aren't loaded.
- All tag data is still properly source-controlled (e.g. roll backs are possible.)
Content Browser Database Interaction
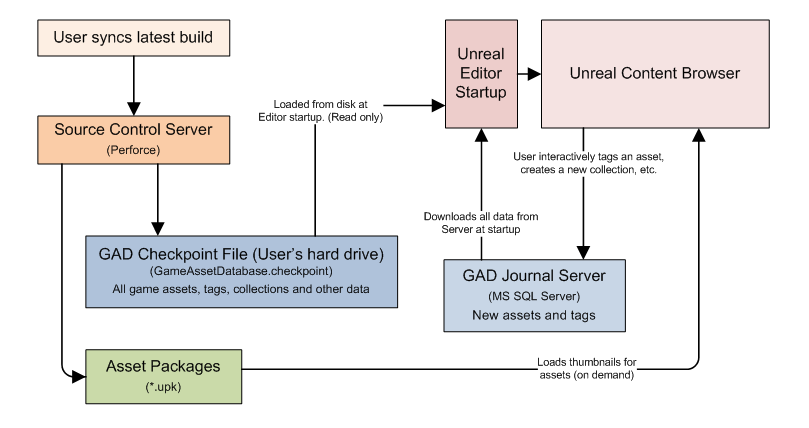 Additionally, it's possible to run the editor in "Offline Mode" which allows for limited functionality without using a live server. See the section near this bottom of this page about "Offline Mode" for more information about that.
Build System Database Interaction
Database Setup
- Run a commandlet to create a new Checkpoint file for your game.
- Setup a regular build process to 'checkpoint' the asset database and update the file in source control. (We run this automatically every night.)
- Install and configure the journal server.
- Set the database/branch settings in each game's editor configuration file.
- Optionally, resave all asset packages to automatically generate thumbnails (only if necessary)
This seems like a lot of work...
- Users won't be able to browse the entirety of the game's content. Only loaded assets will be searchable and interactive.
- Some types of meta data won't be available (e.g. the date an asset was added.)
- The experience will be similar to that of the Generic Browser, except you'll still see all packages and directories.
- Users won't be able to tag assets or search by tags (except in Offline Mode)
- Users can't place assets into collections, even private collections (except in Offline Mode.)
- Users can't share tags and collections with others
- Various "live" features won't be available
Create a checkpoint file
- Make sure you're synced up to the latest game content
- Run the checkpoint commandlet:
- MyGame.exe CheckpointGameAssetDatabase
- (It will take a few minutes as it digests all of the game content.)
- That's it! You now have a working checkpoint file for this game.
- If you load up the editor you'll now be able to browse all assets in the game using the Content Browser.
- Normally, you should check this file into source control. You can read more about that in the next section.
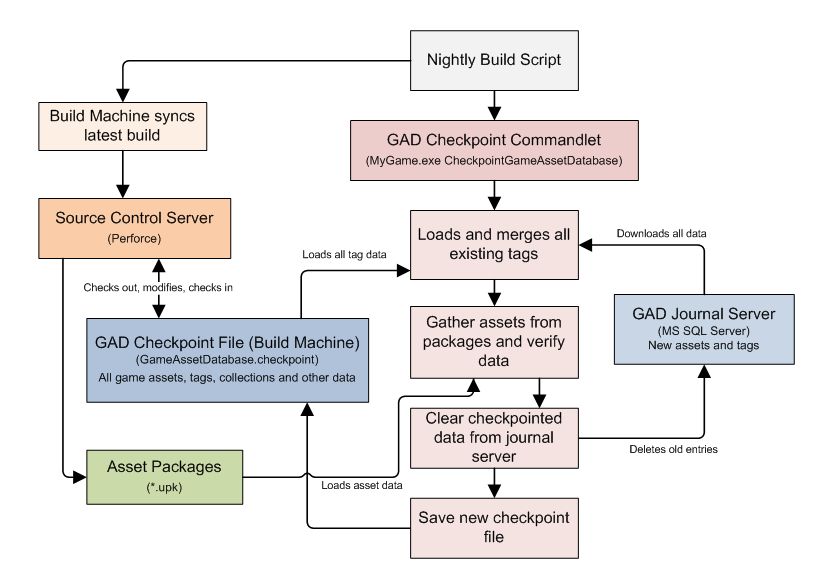
Regularly checkpointing game content
- Every night around 3:00 AM, a machine running our build system (Controller) executes a build script (CheckpointGAD.build) that performs the following:
- For each game (or game branch):
- Syncs to the last successful engine build (including binaries). Often, the last good build had just completed immediately prior.
- Syncs all game content (and only game content) to the head revision. This is so that the asset checkpoint will be as up-to-date as possible, even if we're running a slightly older build of the engine.
- Checks out the game's GAD checkpoint file (GameAssetDatabase.checkpoint)
- Executes the checkpoint commandlet to update the checkpoint file.
- MyGame.exe CheckpointGameAssetDatabase
- The commandlet's output is checked for error text by the build system engine. If something went wrong, the checkpoint fails and the file is reverted, and emails are sent to appropriate folks.
- Submits the updated GAD checkpoint file (GameAssetDatabase.checkpoint)
- For each game (or game branch):
Setting up the journal server
Installing MS SQL Server
- The installer may warn you about some prerequisites that must be installed first (e.g. Windows Installer, Windows Powershell.) Go ahead and install those first if prompted.
- For MS SQL Server Express 2008, you can use the default installation settings the entire way through. If your using a different version of the application, make sure that MS SQL Server Management Studio is installed along with the server so you can easily edit/audit settings.
- If prompted for a Server Admin name you can you your own user name, or check with your IT department for what to use there.
- You can name the database whatever you'd like, just take note of it because we'll need that name later on when configuring Unreal Editor.
- The examples here will use the default database name: SQLEXPRESS
Automatic journal server setup (recommended!)
- Use the CreateContentJournal.sql script to create a journal server instance
- The script can be found in the UE3 source drop: /Development/Src/Engine/SQL/CreateContentJournal.sql
- Use the sqlcmd.exe command-line application to execute this script.
- You'll need to pass in the name of the computer running the server along with the server's name (unless it's the default server instance.)
- You'll also pass in the path and file name of the CreateContentJournal.sql file from UDN
- For example: sqlcmd -S Computer_Name\Server_Name -i CreateContentJournal.sql
- If everything goes well you won't see any error messages, and your journal server is ready to rock!
- Note: Normal Windows authentication should be enabled by default on your new server, but you may need to talk to your IT department to make sure everything is configured such that your team member's computers can communicate with it directly.
- If for some reason you need to create the server instance manually, follow the steps in the next section.
Manual journal server setup (only if needed)
- Load up MS SQL Server Management Studio and connect to your database.
- In the Object Explorer on the left, right click no "Databases" and click "New Database...". The "New Database" dialog window will pop up.
- Set the "Database name" to: ContentJournal
- Click "OK" to close the dialog and save the new database.
- Under "Databases" in the Object Explorer, expand "ContentJournal" so that you can see it's compnents (Tables, Views, etc.)
- Under "ContentJournal" in the Object Explorer, right click on "Tables" and click "New Table...". The table designer will open up in the content area of the application.
- Configure the table's columns as such:
- First column:
- Set "Column Name" to: DatabaseIndex
- Set "Data Type" to: int
- Set "Allow Nulls" to: No (Unchecked)
- First column's properties:
- Set "Identity Specification -> (Is Identity)" to: Yes
- Right click on the first column ("DatabaseIndex") and click "Set Primary Key"
- Second column:
- Set "Column Name" to: Text
- Set "Data Type" to: nvarchar(MAX)
- Set "Allow Nulls" to: No (Unchecked)
- First column:
- Press Ctrl+S to save the new table. The save dialog will pop up.
- Save the new table with the following name: Entries
- Configure the table's columns as such:
- Great! The journal server is now alive and kicking.
- Note: Normal Windows authentication should be enabled by default on your new server, but you may need to talk to your IT department to make sure everything is configured such that your team member's computers can communicate with it directly.
Configure Unreal Editor
- Open BaseEditor.ini in a text editor. (/Engine/Config/BaseEditor.ini)
- If you need a game-specific settings, you can make these changes in /MyGame/Config/DefaultEditor.ini instead
- Locate the [GameAssetDatabase] section in the .ini file. If it doesn't exist yet, then go ahead and create this section.
- Set JournalServer to the path to the journal SQL server (Computer_Name\SQL_Server_Name)
- For example: JournalServer=ServerComputer\MYSERVERNAME
- If your server is the default SQL server instance on the remote computer, then you can omit the server name
- For example: JournalServer=ServerComputer
- Set BranchName appropriately for your game's depot path.
- For example: BranchName=Main
- You can use whatever name for your branch you think is appropriate, but you must use only alpha-numeric characters.
- Try to keep the branch name somewhat short as it will be attached to every single journal entry.
- While we're on the subject of .ini settings, there are a few user preferences that can be set for the Content Browser to allow or disallow creation and deletion of tags and collections. You should have your art leads and tech artists enable tag creation by setting the following:
- In MyGameEditorUserSettings.ini, add a section for [ContentBrowserSecurity]
- Under this section, set bIsUserTagAdmin=True and bIsUserCollectionsAdmin=true
- Note that this isn't really supposed to be a security system -- it just helps to prevent people from accidentally destroying data.
Generating thumbnails for assets
Advanced topics
Offline Mode
It's possible to run the Content Browser in "Offline Mode", where no SQL connection is required but you can still make use of tagging and collections. To use Offline Mode, set the following in yourOffline Journal Alarm
The first time the Editor is run, the date field "UserJournalUpdateAlarm" is added to UTEditorUserSettings.ini and set to 7 days in the future. This represents the next time the alarm will go off (Note - this is saved when the app closes). To test:- Set the time for this entry to a date prior to your next execution time to ensure the alarm will go off.
- Restart the Editor.
- Upon startup, you will see the following dialog:
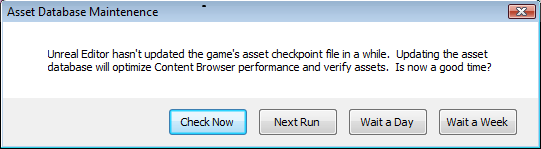
- "Check Now" will run the check point updating process, make a back up of the journal file, delete the original journal file, and set the alarm to 7 days in the future.
- "Next Run" does nothing as the alarm time is properly set to go off for the next run.
- "Wait a Day" and "Wait a Week" set the alarm time forward the expected amount of time from the current time.
Checkpoint commandlet options
The commandlet has some additional options that you really shouldn't need to use except when debugging problems:- -NoDeletes tells the commandlet not to delete any expired journal entries from the SQL server. Any entries that are older than the built-in threshold will be left in the database. Note that if you always use this option your SQL database will grow very large and your editor startup performance will diminish. The next time you run the checkpoint process without this argument it will go and the delete expired assets as per usual.
- -ImportOldTags (Removed in May 2009 QA Build, changelist 33172) Imports legacy Content Tag data from all packages and merges that into the game asset database. See the section below on importing legacy content tags for more information.
- -PurgeGhosts forces the commandlet to immediately expire (delete) any Ghost asset entries from the database. Normally ghost assets are automatically expired after a fixed number of days, unless the asset materializes in a package before then.
- -Repair will attempt to repair any errors in the database. Note that for errors, a repair constitutes eradicating the problematic entry from the database.
- -Reset will build a fresh checkpoint file from scratch. It will ignore all of the existing tags, collections, journal server data and meta data and wipe the slate clean. You probably shouldn't use this unless you know what you're doing.
- -Verify will only check the state of the database and report warnings. It won't actually change anything or save state.
- -DeleteCollections will delete both public and private collections
Importing legacy content tags
The old Content Tag Browser and all related functionality, including the data in package files, was removed from UE3 in the May 2009 QA Build (changelist # 333172.) If you already have a lot of content tags set on your assets and want to convert those to the new system, you'll have to follow the steps below:- Be careful not to resave any content packages using the May 09 QA build (changelist 333172) or later yet! Resaving packages will destroy your content tags.
- Either sync to the April 09 QA build, or sync the May 09 QA build except changelist 333172.
- For each game, run the GAD commandlet to convert old content tags:
- MyGame.exe CheckpointGameAssetDatabase -ImportOldTags
- This will create a file (GameAssetDatabase.checkpoint) with all of your tags
- The Content Browser always loads tag data from this file
- Now you can sync up to a later QA build (all changelists) and you're good to go!
