UDN
Search public documentation:
DevelopmentKitGemsRTSStarterKitKR
English Translation
日本語訳
中国翻译
Interested in the Unreal Engine?
Visit the Unreal Technology site.
Looking for jobs and company info?
Check out the Epic games site.
Questions about support via UDN?
Contact the UDN Staff
日本語訳
中国翻译
Interested in the Unreal Engine?
Visit the Unreal Technology site.
Looking for jobs and company info?
Check out the Epic games site.
Questions about support via UDN?
Contact the UDN Staff
RTS 스타터 키트
문서 변경내역: James Tan 작성. 홍성진 번역.
UDK 2011년 11월 버전으로 최종 테스팅
개요
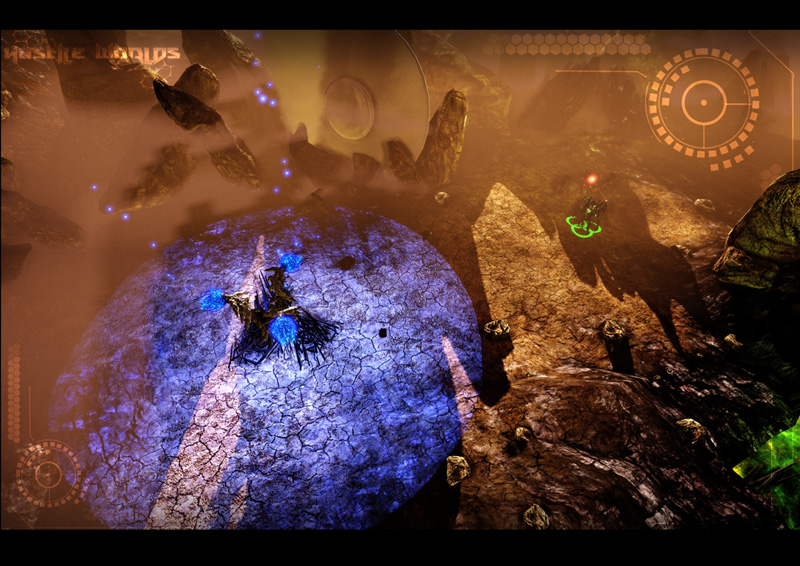
이 스타터 키트에는 현재 UDK 로 개발중인 Hostile Worlds 같은 실시간 전략(RTS) 게임 개발을 위한 시작점으로 삼아볼 수 있는 예제 코드가 들어 있습니다.
포함된 내용
플랫포머 스타터 키트 나 레이서 스타터 키트 와는 달리, 이 스타터 키트에는 코드와 콘텐츠가 많이 포함되어 있습니다. 꼭 실시간 전략 게임에 관계가 있다고는 할 수 없는 고급 기능도 약간 있지만, 다른 개발 영역에도 도움이 될 수 있습니다.
- 플랫폼 추상화 - RTS 스타터 키트는 플레이어가 어느 플랫폼에서 플레이중인지 구별 가능합니다. 플레이어가 사용중인 플랫폼에 따라 각기 다른 플레이어 콘트롤러와 HUD 클래스를 사용합니다. 그러나 PC 와 Console 플랫폼 클래스는 토막(stub)만 떼어 냈습니다. 현재 완벽 지원되는 것은 모바일 플랫폼 뿐입니다.
- 카메라 - RTS 스타터 키트에는 새의 시야처럼 작동하는 카메라를 만드는 법에 대한 예제가 들어 있습니다. 패닝, 터치 패닝, 줌잉을 지원합니다.
- 건물 - RTS 스타터 키트에는 플레이어가 세울 수 있는 건물 처리 예제 코드가 들어 있습니다.
- 유닛 - RTS 스타터 키트에는 플레이어가 명령을 내릴 수 있는 유닛 제어 예제 코드가 들어 있습니다.
- 스킬 - RTS 스타터 키트에는 유닛의 스킬을 처리하는 예제 코드가 들어 있습니다.
- 자원 관리 - RTS 스타터 키트에는 플레이어의 자원을 처리하는 예제 코드가 들어 있습니다.
- AI - RTS 스타터 키트에는 건물, 유닛을 만들고 싸우도록 하는 적 AI 플레이어를 만드는 법을 보여주는 예제 코드가 들어 있습니다.
- 업그레이드 - RTS 스타터 키트에는 유닛 업그레이드 방법을 보여주는 예제 코드가 들어 있습니다.
- 건물 업그레이드 - RTS 스타터 키트에는 건물을 더욱 진화된 형태로 개조하는 법을 보여주는 예제 코드가 들어 있습니다.
- 네트워킹 - RTS 스타터 키트는 네트워킹을 염두에 두고 만들었기에, 리플리케이션(네트워킹을 통한 상태 복제)이 구성되어 있습니다.
- 문서 - RTS 스타터 키트는 Javadocs 과 비슷한 스타일을 사용하여 전체 문서화되어 있습니다.
- UI - RTS 스타터 키트에는 단순한 버튼을 처리하는 작은 커스텀 UI 코드 베이스가 들어 있습니다.
코드 구조
RTS 스타터 키트는 크고 복잡한 프로젝트이므로, 게임을 만들기 위해 스타터 키트를 확장 및/또는 수정하기 전에 모든 부분을 이해하는 것이 중요합니다.
마우스/손가락 "아래" 있는 것을 알아내는 법
마우스 인터페이스 코드는 마우스 인터페이스 UDK 젬 과 비교할 때 작동방식이 다릅니다. RTS 게임의 경우라면 멀리 있는 유닛이 선택되지 않도록 하거나, 일정한 시점에서 선택되는 우선권을 달리 하고 싶을 수가 있습니다. 이를테면 건물이나 자원보다 유닛이 먼저 선택되게 하는거죠. RTS 스타터 키트에서는 화면위 유닛의 차원을 나타내는 화면 공간 박스를 만들어 이 문제를 해결하고 있습니다. 멀리 있는 유닛의 스크린 박스가 너무 작아 발생하는 문제는 박스 치수에 패딩을 약간 대서 해결합니다. (개발 도중에는 카메라 스타일 때문에 이 문제로 고생을 하진 않았습니다.) 우선권 문제 해결을 위해서는 반복처리 순서를 유닛, 건물, 자원 순으로 했습니다. 터치는 이미 화면 공간에서 캡처하므로, 거기서 박스 안 점과 비교를 하여 마우스/손가락이 어느 것 위에 있는지 알아냅니다. 마우스/손가락이 아무것도 터치하지 않았다면, 월드를 터치한 거라 가정합니다.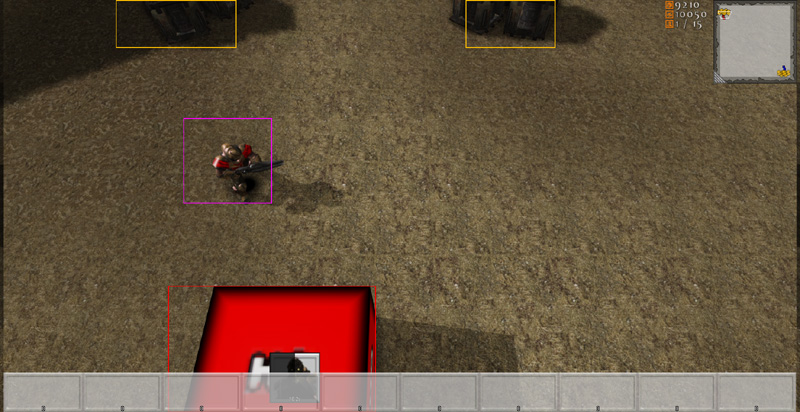 이 코드 스니펫에서, 코드는 월드의 모든 리소스를 대상으로 반복처리한 다음 화면 경계 박스를 계산합니다.
// 모든 리소스에 대한 화면 경계 박스 계산
for (i = 0; i < UDKRTSGameReplicationInfo.Resources.Length; ++i)
{
  if (UDKRTSGameReplicationInfo.Resources[i] != None)
  {
    UDKRTSGameReplicationInfo.Resources[i].ScreenBoundingBox = CalculateScreenBoundingBox(Self, UDKRTSGameReplicationInfo.Resources[i], UDKRTSGameReplicationInfo.Resources[i].CollisionCylinder);

    // 디버그 경계 박스 렌더
    if (ShouldDisplayDebug('BoundingBoxes'))
    {
      Canvas.SetPos(UDKRTSGameReplicationInfo.Resources[i].ScreenBoundingBox.Min.X, UDKRTSGameReplicationInfo.Resources[i].ScreenBoundingBox.Min.Y);
      Canvas.DrawColor = UDKRTSGameReplicationInfo.Resources[i].BoundingBoxColor;
      Canvas.DrawBox(UDKRTSGameReplicationInfo.Resources[i].ScreenBoundingBox.Max.X - UDKRTSGameReplicationInfo.Resources[i].ScreenBoundingBox.Min.X, UDKRTSGameReplicationInfo.Resources[i].ScreenBoundingBox.Max.Y - UDKRTSGameReplicationInfo.Resources[i].ScreenBoundingBox.Min.Y);
    }
  }
}
function Box CalculateScreenBoundingBox(HUD HUD, Actor Actor, PrimitiveComponent PrimitiveComponent)
{
  local Box ComponentsBoundingBox, OutBox;
  local Vector BoundingBoxCoordinates[8];
  local int i;

  if (HUD == None || PrimitiveComponent == None || Actor == None || WorldInfo.TimeSeconds - Actor.LastRenderTime >= 0.1f)
  {
    OutBox.Min.X = -1.f;
    OutBox.Min.Y = -1.f;
    OutBox.Max.X = -1.f;
    OutBox.Max.Y = -1.f;

    return OutBox;
  }

  ComponentsBoundingBox.Min = PrimitiveComponent.Bounds.Origin - PrimitiveComponent.Bounds.BoxExtent;
  ComponentsBoundingBox.Max = PrimitiveComponent.Bounds.Origin + PrimitiveComponent.Bounds.BoxExtent;

  // Z1
  // X1, Y1
  BoundingBoxCoordinates[0].X = ComponentsBoundingBox.Min.X;
  BoundingBoxCoordinates[0].Y = ComponentsBoundingBox.Min.Y;
  BoundingBoxCoordinates[0].Z = ComponentsBoundingBox.Min.Z;
  BoundingBoxCoordinates[0] = HUD.Canvas.Project(BoundingBoxCoordinates[0]);
  // X2, Y1
  BoundingBoxCoordinates[1].X = ComponentsBoundingBox.Max.X;
  BoundingBoxCoordinates[1].Y = ComponentsBoundingBox.Min.Y;
  BoundingBoxCoordinates[1].Z = ComponentsBoundingBox.Min.Z;
  BoundingBoxCoordinates[1] = HUD.Canvas.Project(BoundingBoxCoordinates[1]);
  // X1, Y2
  BoundingBoxCoordinates[2].X = ComponentsBoundingBox.Min.X;
  BoundingBoxCoordinates[2].Y = ComponentsBoundingBox.Max.Y;
  BoundingBoxCoordinates[2].Z = ComponentsBoundingBox.Min.Z;
  BoundingBoxCoordinates[2] = HUD.Canvas.Project(BoundingBoxCoordinates[2]);
  // X2, Y2
  BoundingBoxCoordinates[3].X = ComponentsBoundingBox.Max.X;
  BoundingBoxCoordinates[3].Y = ComponentsBoundingBox.Max.Y;
  BoundingBoxCoordinates[3].Z = ComponentsBoundingBox.Min.Z;
  BoundingBoxCoordinates[3] = HUD.Canvas.Project(BoundingBoxCoordinates[3]);

  // Z2
  // X1, Y1
  BoundingBoxCoordinates[4].X = ComponentsBoundingBox.Min.X;
  BoundingBoxCoordinates[4].Y = ComponentsBoundingBox.Min.Y;
  BoundingBoxCoordinates[4].Z = ComponentsBoundingBox.Max.Z;
  BoundingBoxCoordinates[4] = HUD.Canvas.Project(BoundingBoxCoordinates[4]);
  // X2, Y1
  BoundingBoxCoordinates[5].X = ComponentsBoundingBox.Max.X;
  BoundingBoxCoordinates[5].Y = ComponentsBoundingBox.Min.Y;
  BoundingBoxCoordinates[5].Z = ComponentsBoundingBox.Max.Z;
  BoundingBoxCoordinates[5] = HUD.Canvas.Project(BoundingBoxCoordinates[5]);
  // X1, Y2
  BoundingBoxCoordinates[6].X = ComponentsBoundingBox.Min.X;
  BoundingBoxCoordinates[6].Y = ComponentsBoundingBox.Max.Y;
  BoundingBoxCoordinates[6].Z = ComponentsBoundingBox.Max.Z;
  BoundingBoxCoordinates[6] = HUD.Canvas.Project(BoundingBoxCoordinates[6]);
  // X2, Y2
  BoundingBoxCoordinates[7].X = ComponentsBoundingBox.Max.X;
  BoundingBoxCoordinates[7].Y = ComponentsBoundingBox.Max.Y;
  BoundingBoxCoordinates[7].Z = ComponentsBoundingBox.Max.Z;
  BoundingBoxCoordinates[7] = HUD.Canvas.Project(BoundingBoxCoordinates[7]);

  // 상하좌우 좌표 찾기
  OutBox.Min.X = HUD.Canvas.ClipX;
  OutBox.Min.Y = HUD.Canvas.ClipY;
  OutBox.Max.X = 0;
  OutBox.Max.Y = 0;

  // 경계 박스 좌표를 대상으로 반복처리
  for (i = 0; i < ArrayCount(BoundingBoxCoordinates); ++i)
  {
    // Detect the smallest X coordinate
    if (OutBox.Min.X > BoundingBoxCoordinates[i].X)
    {
      OutBox.Min.X = BoundingBoxCoordinates[i].X;
    }

    // Detect the smallest Y coordinate
    if (OutBox.Min.Y > BoundingBoxCoordinates[i].Y)
    {
      OutBox.Min.Y = BoundingBoxCoordinates[i].Y;
    }

    // Detect the largest X coordinate
    if (OutBox.Max.X < BoundingBoxCoordinates[i].X)
    {
      OutBox.Max.X = BoundingBoxCoordinates[i].X;
    }

    // Detect the largest Y coordinate
    if (OutBox.Max.Y < BoundingBoxCoordinates[i].Y)
    {
      OutBox.Max.Y = BoundingBoxCoordinates[i].Y;
    }
  }

  // 경계 박스가 화면 안에 있는지 검사
  if ((OutBox.Min.X < 0 && OutBox.Max.X < 0) || (OutBox.Min.X > HUD.Canvas.ClipX && OutBox.Max.X > HUD.Canvas.ClipX) || (OutBox.Min.Y < 0 && OutBox.Max.Y < 0) || (OutBox.Min.Y > HUD.Canvas.ClipY && OutBox.Max.Y > HUD.Canvas.ClipY))
  {
    OutBox.Min.X = -1.f;
    OutBox.Min.Y = -1.f;
    OutBox.Max.X = -1.f;
    OutBox.Max.Y = -1.f;
  }
  else
  {
    // 경계 박스 좌표 제한
    OutBox.Min.X = FClamp(OutBox.Min.X, 0.f, HUD.Canvas.ClipX);
    OutBox.Max.X = FClamp(OutBox.Max.X, 0.f, HUD.Canvas.ClipX);
    OutBox.Min.Y = FClamp(OutBox.Min.Y, 0.f, HUD.Canvas.ClipY);
    OutBox.Max.Y = FClamp(OutBox.Max.Y, 0.f, HUD.Canvas.ClipY);
  }

  return OutBox;
}
// 게임 플레이 관련 오브젝트를 터치했는지 검사
if (PlayerReplicationInfo != None)
{
  UDKRTSTeamInfo = UDKRTSTeamInfo(PlayerReplicationInfo.Team);
  if (UDKRTSTeamInfo != None)
  {
    UDKRTSMobileHUD = UDKRTSMobileHUD(MyHUD);
    if (UDKRTSMobileHUD != None)
    {
      // 폰을 터치했는지
      if (TouchEvent.Response == ETR_None && UDKRTSTeamInfo.Pawns.Length > 0)
      {
        for (i = 0; i < UDKRTSTeamInfo.Pawns.Length; ++i)
        {
          if (UDKRTSTeamInfo.Pawns[i] != None && class'UDKRTSMobileHUD'.static.IsPointWithinBox(TouchLocation, UDKRTSTeamInfo.Pawns[i].ScreenBoundingBox) && TouchEvents.Find('AssociatedActor', UDKRTSTeamInfo.Pawns[i]) == INDEX_NONE)
          {
            UDKRTSTeamInfo.Pawns[i].Selected();
            UDKRTSTeamInfo.Pawns[i].RegisterHUDActions(UDKRTSMobileHUD);

            TouchEvent.AssociatedActor = UDKRTSTeamInfo.Pawns[i];
            TouchEvent.Response = ETR_Pawn;
            break;
          }
        }
      }

      // 건물을 터치했는지
      if (TouchEvent.Response == ETR_None && UDKRTSTeamInfo.Structures.Length > 0)
      {
        for (i = 0; i < UDKRTSTeamInfo.Structures.Length; ++i)
        {
          if (class'UDKRTSMobileHUD'.static.IsPointWithinBox(TouchLocation, UDKRTSTeamInfo.Structures[i].ScreenBoundingBox) && TouchEvents.Find('AssociatedActor', UDKRTSTeamInfo.Structures[i]) == INDEX_NONE)
          {
            UDKRTSTeamInfo.Structures[i].Selected();
            UDKRTSTeamInfo.Structures[i].RegisterHUDActions(UDKRTSMobileHUD);

            TouchEvent.AssociatedActor = UDKRTSTeamInfo.Structures[i];
            TouchEvent.Response = ETR_Structure;
            break;
          }
        }
      }
    }
  }
}
유닛/건물 선택시 HUD 에 버튼 표시 방법
RTS 스타터 키트에서 버튼은 HUD 액션이라 합니다. HUD 액션은 UDKRTSHUD.uc 에 정의되어 있는 구조체입니다. 이 코드 스니펫에서 HUD 액션은 단순히 텍스처와 텍스처 UV 좌표 세트를 정의하고 있음을 확인할 수 있습니다. 이 변수는 게임 개발자가 그 값을 설정할 수 있도록 언리얼 에디터에 노출됩니다. 게임에서 다른 기능을 하는 변수가 넷 더 있는데, 잠시 후에 설명하겠습니다.
// HUD 위의 HUD 액션
struct SHUDAction
{
  var() Texture2D Texture;
  var() float U;
  var() float V;
  var() float UL;
  var() float VL;
  var EHUDActionReference Reference;
  var int Index;
  var bool PostRender;
  var delegate<IsHUDActionActive> IsHUDActionActiveDelegate;
};
// HUD 위의 액터에 연관된 HUD 액션
struct SAssociatedHUDAction
{
  var Actor AssociatedActor;
  var array<SHUDAction> HUDActions;
};
simulated function RegisterHUDActions(UDKRTSMobileHUD HUD)
{
  local int i;
  local SHUDAction SendHUDAction;

  if (HUD == None || OwnerReplicationInfo == None || HUD.AssociatedHUDActions.Find('AssociatedActor', Self) != INDEX_NONE || Health <= 0)
  {
    return;
  }

  // 카메라 중앙 HUD 액션 등록
  if (Portrait.Texture != None)
  {
    SendHUDAction = Portrait;
    SendHUDAction.Reference = EHAR_Center;
    SendHUDAction.Index = -1;
    SendHUDAction.PostRender = true;

    HUD.RegisterHUDAction(Self, SendHUDAction);
  }
}
function RegisterHUDAction(Actor AssociatedActor, SHUDAction HUDAction)
{
  local SAssociatedHUDAction AssociatedHUDAction;
  local int IndexA, IndexB;

  // 인덱스 A 구하기
  IndexA = AssociatedHUDActions.Find('AssociatedActor', AssociatedActor);
  if (IndexA != INDEX_NONE)
  {
    // 인덱스 B 구하기
    IndexB = AssociatedHUDActions[IndexA].HUDActions.Find('Reference', HUDAction.Reference);
    if (IndexB != INDEX_NONE && AssociatedHUDActions[IndexA].HUDActions[IndexB].Index == HUDAction.Index)
    {
      return;
    }
  }

  if (IndexA != INDEX_NONE)
  {
    // 관련 HUD 액션 추가
    AssociatedHUDActions[IndexA].HUDActions.AddItem(HUDAction);
  }
  else
  {
    // 관련 HUD 액션 추가
    AssociatedHUDAction.AssociatedActor = AssociatedActor;
    AssociatedHUDAction.HUDActions.AddItem(HUDAction);
    AssociatedHUDActions.AddItem(AssociatedHUDAction);
  }
}
event PostRender()
{
  Super.PostRender();

  if (AssociatedHUDActions.Length > 0)
  {
    Offset.X = PlayableSpaceLeft;
    Offset.Y = 0;
    Size.X = SizeX * 0.0625f;
    Size.Y = Size.X;

    for (i = 0; i < AssociatedHUDActions.Length; ++i)
    {
      if (AssociatedHUDActions[i].AssociatedActor != None && AssociatedHUDActions[i].HUDActions.Length > 0)
      {
        Offset.X = HUDProperties.ScrollWidth;

        for (j = 0; j < AssociatedHUDActions[i].HUDActions.Length; ++j)
        {
          if (AssociatedHUDActions[i].HUDActions[j].IsHUDActionActiveDelegate != None)
          {
            IsHUDActionActive = AssociatedHUDActions[i].HUDActions[j].IsHUDActionActiveDelegate;

            if (!IsHUDActionActive(AssociatedHUDActions[i].HUDActions[j].Reference, AssociatedHUDActions[i].HUDActions[j].Index, false))
            {
              Canvas.SetDrawColor(191, 191, 191, 191);
            }
            else
            {
              Canvas.SetDrawColor(255, 255, 255);
            }

            IsHUDActionActive = None;
          }
          else
          {
            Canvas.SetDrawColor(255, 255, 255);
          }

          Canvas.SetPos(Offset.X, Offset.Y);
          Canvas.DrawTile(AssociatedHUDActions[i].HUDActions[j].Texture, Size.X, Size.Y, AssociatedHUDActions[i].HUDActions[j].U, AssociatedHUDActions[i].HUDActions[j].V, AssociatedHUDActions[i].HUDActions[j].UL, AssociatedHUDActions[i].HUDActions[j].VL);

          if (AssociatedHUDActions[i].HUDActions[j].PostRender)
          {
            UDKRTSHUDActionInterface = UDKRTSHUDActionInterface(AssociatedHUDActions[i].AssociatedActor);
            if (UDKRTSHUDActionInterface != None)
            {
              UDKRTSHUDActionInterface.PostRenderHUDAction(Self, AssociatedHUDActions[i].HUDActions[j].Reference, AssociatedHUDActions[i].HUDActions[j].Index, Offset.X, Offset.Y, Size.X, Size.Y);
            }
          }

          Offset.X += Size.X;
        }
      }

      Offset.Y += Size.Y;
    }
  }
}
simulated function PostRenderHUDAction(HUD HUD, EHUDActionReference Reference, int Index, int PosX, int PosY, int SizeX, int SizeY)
{
  local float HealthPercentage;
  local float HealthBarWidth, HealthBarHeight;

  if (HUD == None || HUD.Canvas == None || Health <= 0)
  {
    return;
  }

  if (Reference == EHAR_Center)
  {
    // 체력 바 백불율 구하기
    HealthPercentage = float(Health) / float(HealthMax);

    // 체력 바 테두리 렌더
    HealthBarWidth = SizeX - 2;
    HealthBarHeight = 8;
    HUD.Canvas.SetPos(PosX + 1, PosY + SizeY - HealthBarHeight - 1);
    HUD.Canvas.SetDrawColor(0, 0, 0, 191);
    HUD.Canvas.DrawBox(HealthBarWidth, HealthBarHeight);

    HealthBarWidth -= 4;
    HealthBarHeight -= 4;

    // 잃은 체력 렌더
    HUD.Canvas.SetPos(PosX + 3, PosY + SizeY - HealthBarHeight - 3);
    HUD.Canvas.SetDrawColor(0, 0, 0, 127);
    HUD.Canvas.DrawRect(HealthBarWidth, HealthBarHeight);

    // 체력 렌더
    HUD.Canvas.SetPos(PosX + 3, PosY + SizeY - HealthBarHeight - 3);
    HUD.Canvas.SetDrawColor(255 * (1.f - HealthPercentage), 255 * HealthPercentage, 0, 191);
    HUD.Canvas.DrawRect(HealthBarWidth * HealthPercentage, HealthBarHeight);
  }
}
HUD 액션이 눌렸을 때의 작동 방법
UDKRTSMobilePlayerController 에 의해 터치 입력을 받으면, 먼저 HUD 로 전달하여 터치된 위치가 HUD 액션의 범위 안에 있는지 검사합니다. 그렇다면 먼저 HUD 액션 활성 델리게이트를 호출합니다. 이 델리게이트는 HUD 액션이 뭔가를 할지 안할지 영향을 끼치기 위해, 어느 액터의 바인딩도 허용합니다. HUD 액션 활성화가 허용된 경우, UDKRTSPlayerController 안의 StartHUDAction 을 호출합니다. 이 작업을 하는 이유는, HUD 액션이 클라이언트에서 서버로의 원격 프로시저 콜에 쌓여 있도록 하기 위해서입니다. 그 후 HUD 액션에 연결되어 있는 액터는 UDKRTSHUDActionInterface 로 형 변환(cast)합니다. 형 변환에 성공하면, 액터한테 뭔가 시키기 위해 HandleHUDAction 이 호출됩니다.
function ETouchResponse InputTouch(Vector2D ScreenTouchLocation)
{
  //HUD 액션 콘트롤 검사
  if (AssociatedHUDActions.Length > 0)
  {
    Offset.X = PlayableSpaceLeft;
    Offset.Y = 0;
    Size.X = SizeX * 0.0625f;
    Size.Y = Size.X;

    for (i = 0; i < AssociatedHUDActions.Length; ++i)
    {
      if (AssociatedHUDActions[i].AssociatedActor != None && AssociatedHUDActions[i].HUDActions.Length > 0)
      {
        Offset.X = HUDProperties.ScrollWidth;

        for (j = 0; j < AssociatedHUDActions[i].HUDActions.Length; ++j)
        {
          if (ScreenTouchLocation.X >= Offset.X && ScreenTouchLocation.Y >= Offset.Y && ScreenTouchLocation.X <= Offset.X + Size.X && ScreenTouchLocation.Y <= Offset.Y + Size.Y)
          {
            if (AssociatedHUDActions[i].HUDActions[j].IsHUDActionActiveDelegate != None)
            {
              IsHUDActionActive = AssociatedHUDActions[i].HUDActions[j].IsHUDActionActiveDelegate;

              if (!IsHUDActionActive(AssociatedHUDActions[i].HUDActions[j].Reference, AssociatedHUDActions[i].HUDActions[j].Index, true))
              {
                IsHUDActionActive = None;
                return ETR_HUDAction;
              }
              else
              {
                IsHUDActionActive = None;
              }
            }

            // HUD 액션 시작
            UDKRTSMobilePlayerController.StartHUDAction(AssociatedHUDActions[i].HUDActions[j].Reference, AssociatedHUDActions[i].HUDActions[j].Index, AssociatedHUDActions[i].AssociatedActor);
            return ETR_HUDAction;
          }

          Offset.X += Size.X;
        }

        Offset.Y += Size.Y;
      }
    }
  }
}
/**
 * 액터에 액션 명령 전송
 *
 * @param    Reference    HUD 액션 리퍼런스
 * @param    Index      HUD 액션 인덱스
 * @param    Actor      연관된 액터
 */
simulated function StartHUDAction(EHUDActionReference Reference, int Index, Actor Actor)
{
  // 서버와 동기화
  if (Role < Role_Authority && class'UDKRTSUtility'.static.HUDActionNeedsToSyncWithServer(Reference) && UDKRTSHUDActionInterface(Actor) != None)
  {
    ServerHUDAction(Reference, Index, Actor);
  }

  BeginHUDAction(Reference, Index, Actor);
}

/**
 * 액터에 대한 액션 명령 동기화
 *
 * @param    Reference    HUD 액션 리퍼런스
 * @param    Index      HUD 액션 인덱스
 * @param    Actor      연관된 액터
 */
reliable server function ServerHUDAction(EHUDActionReference Reference, int Index, Actor Actor)
{
  BeginHUDAction(Reference, Index, Actor);
}

/**
 * 액터에 액션 명령 시작
 */
simulated function BeginHUDAction(EHUDActionReference Reference, int Index, Actor Actor)
{
  local UDKRTSHUDActionInterface UDKRTSHUDActionInterface;

  UDKRTSHUDActionInterface = UDKRTSHUDActionInterface(Actor);
  if (UDKRTSHUDActionInterface != None)
  {
    UDKRTSHUDActionInterface.HandleHUDAction(Reference, Index);
  }
}
리소스 처리 방식
기본으로 스타터 키트에는 리소스가 셋 있습니다. 이들 모두 UDKRTSPlayerReplicationInfo 에 리플리케이션 통지 정수 변수로 정의되어 있습니다. 리플리케이션 블록은 변수가 "dirty"(클라이언트와 서버가 다른) 상태일 때만 이 세 변수를 클라이언트에 리플리케이트시켜야 하며, 그 리플리케이션은 일방(이 변수는 서버에서 클라이언트로만 리플리케이트되고, 클라이언트에서 서버로는 불가능)이다 정의하고 있습니다.
// 플레이어가 가진 자원
var RepNotify int Resources;
// 플레이어가 가진 파워
var RepNotify int Power;
// 플레이어의 현재 인구 제한
var RepNotify int PopulationCap;

// 리플리케이션 블록
replication
{
  if (bNetDirty && Role == Role_Authority)
    Resources, Power, PopulationCap;
}
/**
 * "RepNotify" 프로퍼티 플랙과 함께 변수가 리플리케이트될 때 호출
 *
 * @param  VarName  리플리케이트된 변수명
 */
simulated event ReplicatedEvent(name VarName)
{
  if (VarName == 'Resources')
  {
    // Resources 변수가 변경됨
  }
  else if (VarName == 'Power')
  {
    // Power 변수가 변경됨
  }
  else if (VarName == 'PopulationCap')
  {
    // PopulationCap 변수가 변경됨
  }
  else
  {
    Super.ReplicatedEvent(VarName);
  }
}
게임에서의 유닛 생성 처리
플레이어의 경우 이 작업은 플레이어 콘트롤러를 통한 리모트 프로시져 콜을 통해 이루어 집니다. 플레이어에서 서버로 통신할 수 있는 경로중 가장 직접적인 것입니다. 아래 예제 코드는 건물이 유닛 생산 대기열이 어떤 식으로 이뤄지는지 보여줍니다. 대기열이 만료되면 서버가 플레이어에게 새 유닛을 스폰시켜 줍니다. 이 코드 스니펫은 HandleHUDAction 안에 있습니다. 이 함수는 서버와 클라이언트 둘 다에서 동시 실행되는데, 플레이어 콘트롤러가 클라이언트와 서버 콜을 HandleHUDAction 에 동기화시키기 때문입니다 (UDKRTSPlayerController.StartHUDAction(), UDKRTSPlayerController.ServerHUDAction(), UDKRTSPlayerController.BeginHUDAction() 참고). 먼저 검사하는 것은, 요청된 유닛 인덱스가 배열 범위 내에 있는지, 그리고 플레이어가 유닛을 생산할 능력이 되는지 (, 즉 플레이어의 자원과 인구 등이 충분한지) 입니다. 통과되면 소리를 재생시켜 플레이어에게 이 유닛 생산이 시작되었음을 알립니다. 그런 다음 이 유닛 생산 비용만큼 자원을 뺍니다. 이 작업은 네트워크 대기시간을 줄이기 위해 클라이언트에서 시뮬레이션으로 이루어지는데, 서버 역시도 이 코드를 실행하기에 서버와 클라이언트의 자원 값이 다르면 올바른 값을 리플리케이트 시킵니다. 여기에서 새로운 HUD 액션이 만들어져 플레이어의 HUD 에 추가됩니다. 그 이유는 이 시점에서는 아직 플레이어의 손가락이 건물 위에 있을 것이고 건물의 HUD 액션이 아직 보이는 상태이기 때문입니다. 그 다음 구매한 유닛 아키타입을 유닛 생산 대기열에 추가합니다. 유닛 생산 타이머가 시작되지 않았다면, 지금 시작시킵니다.
if (Index >= 0 && Index < BuildablePawnArchetypes.Length && class'UDKRTSPawn'.static.CanBuildPawn(BuildablePawnArchetypes[Index], OwnerReplicationInfo, false))
{
  // 생산 소리 재생
  class'UDKRTSCommanderVoiceOver'.static.PlayBuildingSoundCue(OwnerReplicationInfo);

  // 자원 차감
  OwnerReplicationInfo.Resources -= BuildablePawnArchetypes[Index].ResourcesCost;
  OwnerReplicationInfo.Power -= BuildablePawnArchetypes[Index].PowerCost;

  // 플레이어 콘트롤러의 HUD 액션 업데이트
  PlayerController = PlayerController(OwnerReplicationInfo.Owner);
  if (PlayerController != None)
  {
    UDKRTSMobileHUD = UDKRTSMobileHUD(PlayerController.MyHUD);
    if (UDKRTSMobileHUD != None)
    {
      SendHUDAction = BuildablePawnArchetypes[Index].BuildHUDAction;
      SendHUDAction.Reference = EHAR_Building;
      SendHUDAction.Index = QueuedUnitArchetypes.Length;
      SendHUDAction.PostRender = true;

      UDKRTSMobileHUD.RegisterHUDAction(Self, SendHUDAction);
    }
  }

  // 유닛을 대기열에 추가
  QueuedUnitArchetypes.AddItem(BuildablePawnArchetypes[Index]);

  // 유닛 생산 타이머가 움직이지 않으면 시작
  if (!IsTimerActive(NameOf(BuildingUnit)))
  {
    SetTimer(BuildablePawnArchetypes[Index].BuildTime, false, NameOf(BuildingUnit));
  }
}
simulated function BuildingUnit()
{
  local Vector SpawnLocation;
  local Rotator R;
  local UDKRTSMobileHUD UDKRTSMobileHUD;
  local PlayerController PlayerController;
  local int i;
  local SHUDAction SendHUDAction;

  // 건물이 유닛을 빌드할 수 있는지 검사
  if (!IsConstructed || QueuedUnitArchetypes.Length <= 0)
  {
    return;
  }

  // HUD 액션 목록 업데이트
  PlayerController = PlayerController(OwnerReplicationInfo.Owner);
  if (PlayerController != None)
  {
    UDKRTSMobileHUD = UDKRTSMobileHUD(PlayerController.MyHUD);
    if (UDKRTSMobileHUD != None && UDKRTSMobileHUD.AssociatedHUDActions.Find('AssociatedActor', Self) != INDEX_NONE)
    {
      UDKRTSMobileHUD.UnregisterHUDActionByReference(Self, EHAR_Building);

      if (QueuedUnitArchetypes.Length > 0)
      {
        for (i = 0; i < QueuedUnitArchetypes.Length; ++i)
   {
     if (QueuedUnitArchetypes[i] != None)
     {
       SendHUDAction = QueuedUnitArchetypes[i].BuildHUDAction;
       SendHUDAction.Reference = EHAR_Building;
       SendHUDAction.Index = i;
       SendHUDAction.PostRender = true;

       UDKRTSMobileHUD.RegisterHUDAction(Self, SendHUDAction);
     }
   }
      }
    }
  }

  // 적합한 스폰 위치 구하기
  if (Role == Role_Authority)
  {
    if (RallyPointLocation == Location)
    {
      R.Yaw = Rand(65536);
      SpawnLocation = Location + Vector(R) * (QueuedUnitArchetypes[0].CylinderComponent.CollisionRadius + UnitSpawnRadius);
    }
    else
    {
      SpawnLocation = Location + Normal(RallyPointLocation - Location) * (QueuedUnitArchetypes[0].CylinderComponent.CollisionRadius + UnitSpawnRadius);
    }

    SpawnLocation.Z -= CollisionCylinder.CollisionHeight;
    // 폰 요청
    RequestPawn(QueuedUnitArchetypes[0], SpawnLocation);
  }

  // 대기열에서 유닛 제거
  QueuedUnitArchetypes.Remove(0, 1);

  // 대기열에 유닛이 남아있으면 유닛 생산 타이머 재시작
  if (QueuedUnitArchetypes.Length > 0)
  {
    SetTimer(QueuedUnitArchetypes[0].BuildTime, false, NameOf(BuildingUnit));
  }
}
function RequestPawn(UDKRTSPawn RequestedPawnArchetype, UDKRTSPlayerReplicationInfo RequestingReplicationInfo, Vector SpawnLocation, bool InRallyPointValid, Vector RallyPoint, Actor RallyPointActorReference)
{
  local UDKRTSPawn UDKRTSPawn;
  local UDKRTSAIController UDKRTSAIController;
  local UDKRTSResource UDKRTSResource;

  if (RequestedPawnArchetype == None || RequestingReplicationInfo == None)
  {
    return;
  }

  UDKRTSPawn = Spawn(RequestedPawnArchetype.Class,,, SpawnLocation + Vect(0.f, 0.f, 1.f) * RequestedPawnArchetype.CylinderComponent.CollisionHeight,, RequestedPawnArchetype);
  if (UDKRTSPawn != None)
  {
    if (UDKRTSPawn.bDeleteMe)
    {
      `Warn(Self$":: RequestPawn:: Deleted newly spawned pawn, refund player his money?");
    }
    else
    {
      UDKRTSPawn.SetOwnerReplicationInfo(RequestingReplicationInfo);
      UDKRTSPawn.SpawnDefaultController();

      UDKRTSAIController = UDKRTSAIController(UDKRTSPawn.Controller);
      if (UDKRTSAIController != None)
      {
        if (RallyPointActorReference != None)
        {
          UDKRTSResource = UDKRTSResource(RallyPointActorReference);
          if (UDKRTSResource != None && UDKRTSPawn.HarvestResourceInterval > 0)
          {
            UDKRTSAIController.HarvestResource(UDKRTSResource);
          }
        }
        else if (InRallyPointValid)
        {
          UDKRTSAIController.MoveToPoint(RallyPoint);
        }
      }
    }
  }
}
simulated function SetOwnerReplicationInfo(UDKRTSPlayerReplicationInfo NewOwnerReplicationInfo)
{
  local UDKRTSTeamInfo UDKRTSTeamInfo;

  if (NewOwnerReplicationInfo == None)
  {
    return;
  }

  // 유닛이 다른 팀으로 변환중일 수 있음
  if (OwnerReplicationInfo != None && OwnerReplicationInfo != NewOwnerReplicationInfo)
  {
    UDKRTSTeamInfo = UDKRTSTeamInfo(OwnerReplicationInfo.Team);
    if (UDKRTSTeamInfo != None)
    {
      UDKRTSTeamInfo.RemovePawn(Self);
    }
  }

  // 팀 할당
  OwnerReplicationInfo = NewOwnerReplicationInfo;
  if (!UpdateTeamMaterials())
  {
    SetTimer(0.1f, true, NameOf(CheckTeamInfoForOwnerReplicationInfo));
  }

  // 폰에 무기가 없을 경우 기본 무기를 줌
  if (Role == Role_Authority && WeaponArchetype != None && UDKRTSWeapon == None)
  {
    UDKRTSWeapon = Spawn(WeaponArchetype.Class, Self,, Location, Rotation, WeaponArchetype);
    if (UDKRTSWeapon != None)
    {
      UDKRTSWeapon.SetOwner(Self);
      UDKRTSWeapon.UDKRTSWeaponOwnerInterface = UDKRTSWeaponOwnerInterface(Self);
      UDKRTSWeapon.Initialize();
      UDKRTSWeapon.AttachToSkeletalMeshComponent(Mesh, LightEnvironment, WeaponSocketName);
    }
  }

  // 클라이언트에 폰의 훈련을 마쳤다는 월드 메시지 전송
  OwnerReplicationInfo.ReceiveWorldMessage(FriendlyName@"trained.", class'HUD'.default.WhiteColor, Location, Portrait.Texture, Portrait.U, Portrait.V, Portrait.UL, Portrait.VL);
  class'UDKRTSCommanderVoiceOver'.static.PlayUnitReadySoundCue(OwnerReplicationInfo);
}
게임에서의 건물 생성 처리
이 스타터 키트에서는 폰만이 선물을 만들 수 있습니다. 보통 플레이어가 폰에게 뭔가를 시킬 때는 "명령(command)" 메시가 보여집니다. 이동에 대해서는 속이 빈 하양 원으로 보입니다. 고로 플레이어가 건물 아이콘 중 하나를 누르면, 그저 이 명령 메시를 플레이어가 만들고자 하는 건물의 반투명 버전으로 바꾸는 것입니다.
simulated function HandleHUDAction(EHUDActionReference Reference, int Index)
{
  // Snip
  // Build commands
  case EHAR_Build:
    if (Index >= 0 && Index < BuildableStructureArchetypes.Length)
    {
      CommandMesh.SetSkeletalMesh(BuildableStructureArchetypes[Index].PreviewSkeletalMesh);
      CommandMode = ECM_BuildStructure;
    }
    break;

  // Snip
}
simulated function SetCommandMeshTranslation(Vector NewTranslation, bool NewHide)
{
  // Snip
  case ECM_BuildStructure:
    // 반경 안에 건물이 있는지, 그렇다면 여기 세울 수 없음을 나타내기 위해 빨갛게 변환
    if (CommandIndex >= 0 && CommandIndex < BuildableStructureArchetypes.Length)
    {
      CanBuildStructure = true;

      ForEach VisibleCollidingActors(class'Actor', Actor, BuildableStructureArchetypes[CommandIndex].PlacementClearanceRadius, NewTranslation, true,, true)
      {
        CanBuildStructure = false;
        break;
      }

      Material = (CanBuildStructure) ? BuildableStructureArchetypes[CommandIndex].CanBuildMaterial : BuildableStructureArchetypes[CommandIndex].CantBuildMaterial;
    }
    break;
  // Snip
}
event PostRender()
{
  // Snip
          case ECM_BuildStructure:
            if (PlayerUDKRTSTeamInfo.Pawns[i] != None)
            {
              PlayerUDKRTSTeamInfo.Pawns[i].HasPendingCommand = false;
              // 폰 확인 이펙트와 사운드 재생
              PlayerUDKRTSTeamInfo.Pawns[i].ConfirmCommand();
              // 보류중인 화면 명령 위치 Deproject
              Canvas.Deproject(PlayerUDKRTSTeamInfo.Pawns[i].PendingScreenCommandLocation, CurrentWorldLocation, CurrentWorldDirection);
              // 보류중인 이동 위치에 대한 월드 위치 찾기
              ForEach TraceActors(class'UDKRTSCameraBlockingVolume', UDKRTSCameraBlockingVolume, HitCurrentWorldLocation, HitNormal, CurrentWorldLocation + CurrentWorldDirection * 65536.f, CurrentWorldLocation)
              {
                // 건물 요청
                UDKRTSMobilePlayerController.RequestStructure(PlayerUDKRTSTeamInfo.Pawns[i].BuildableStructureArchetypes[PlayerUDKRTSTeamInfo.Pawns[i].CommandIndex], HitCurrentWorldLocation);
                // 폰을 그리로 이동
                UDKRTSMobilePlayerController.GiveMoveOrder(HitCurrentWorldLocation + Normal(PlayerUDKRTSTeamInfo.Pawns[i].Location - HitCurrentWorldLocation) * PlayerUDKRTSTeamInfo.Pawns[i].BuildableStructureArchetypes[PlayerUDKRTSTeamInfo.Pawns[i].CommandIndex].CollisionCylinder.CollisionRadius * 1.5f, PlayerUDKRTSTeamInfo.Pawns[i]);
                break;
              }
            }
            break;
  // Snip
}
function UDKRTSStructure RequestStructure(UDKRTSStructure RequstedStructureArchetype, UDKRTSPlayerReplicationInfo RequestingReplicationInfo, Vector SpawnLocation)
{
  local UDKRTSStructure UDKRTSStructure;
  local Actor Actor;
  local UDKRTSMobilePlayerController UDKRTSMobilePlayerController;

  // 오브젝트 변수 검사
  if (RequstedStructureArchetype == None || RequestingReplicationInfo == None)
  {
    return None;
  }

  // 건물을 막는 액터가 없는지 검사
  ForEach VisibleCollidingActors(class'Actor', Actor, RequstedStructureArchetype.PlacementClearanceRadius, SpawnLocation, true,, true)
  {
    class'UDKRTSCommanderVoiceOver'.static.PlayCannotDeployHereSoundCue(RequestingReplicationInfo);

    UDKRTSMobilePlayerController = UDKRTSMobilePlayerController(RequestingReplicationInfo.Owner);
    if (UDKRTSMobilePlayerController != None)
    {
      UDKRTSMobilePlayerController.ReceiveMessage("Cannot deploy here.");
    }
    return None;
  }

  // 플레이어가 이 건물을 세울 수 있는지 검사
  if (!class'UDKRTSStructure'.static.CanBuildStructure(RequstedStructureArchetype, RequestingReplicationInfo, true))
  {
    return None;
  }

  // 건물 스폰
  UDKRTSStructure = Spawn(RequstedStructureArchetype.Class,,, SpawnLocation + Vect(0.f, 0.f, 1.f) * RequstedStructureArchetype.CollisionCylinder.CollisionHeight,, RequstedStructureArchetype, true);
  if (UDKRTSStructure != None)
  {
    RequestingReplicationInfo.Resources -= RequstedStructureArchetype.ResourcesCost;
    RequestingReplicationInfo.Power -= RequstedStructureArchetype.PowerCost;

    UDKRTSStructure.SetOwnerReplicationInfo(RequestingReplicationInfo);
  }

  return UDKRTSStructure;
}
simulated function Tick(float DeltaTime)
{
  // Snip
    // 건물이 폰 건축 시작 대기중인지 검사
    else if (WaitingForPawnToStartConstruction)
    {
      // 근접 폰 탐색
      ForEach VisibleCollidingActors(class'UDKRTSPawn', UDKRTSPawn, CollisionCylinder.CollisionRadius * 1.5f, Location, true,, true)
      {
        // 폰이 우리 팀인지 검사
        if (UDKRTSPawn != None && OwnerReplicationInfo != None && UDKRTSPawn.OwnerReplicationInfo != None && UDKRTSPawn.OwnerReplicationInfo.Team == OwnerReplicationInfo.Team)
        {
          // 건물 건축 시작
          CreateNavMeshObstacle();
          SetHidden(false);
          WaitingForPawnToStartConstruction = false;
          SetDrawScale3D(Vect(1.f, 1.f, 0.01f));
          SetTimer(ConstructionTime, false, NameOf(CompleteConstruction));
          break;
        }
      }
    }
  // Snip
}
AI 작동 방식
AI 는 루핑 타이머가 설정된 AIController 입니다. 다른 일이 벌어졌을 때 AI 에게 뭔가를 시키기 위해 폰과 건물이 호출할 수 있는 알림 함수도 갖고 있습니다. 예를 들어 건물이 피해를 입으면 건물은 AI 에게 피해 상황을 알리고, 그 덕에 AI 는 그 상황에 최적인 조치를 취할 수 있습니다.
event TakeDamage(int DamageAmount, Controller EventInstigator, vector HitLocation, vector Momentum, class<DamageType> DamageType, optional TraceHitInfo HitInfo, optional Actor DamageCauser)
{
  // Snip
      // 오너가 AI 인 경우, AI 더러 기지가 공격받는 중이라고 알림
      UDKRTSTeamAIController = UDKRTSTeamAIController(OwnerReplicationInfo.Owner);
      if (UDKRTSTeamAIController != None)
      {
        UDKRTSTeamAIController.NotifyStructureDamage(EventInstigator, Self);
      }
 // Snip
}
function NotifyStructureDamage(Controller EventInstigator, UDKRTSStructure Structure)
{
  local int i;
  local float Distance;
  local UDKRTSAIController UDKRTSAIController;
  local UDKRTSTargetInterface PotentialTarget;

  // 파라미터 검사
  if (CachedUDKRTSTeamInfo == None || EventInstigator == None || EventInstigator.Pawn == None)
  {
    return;
  }

  if (CachedUDKRTSTeamInfo.Pawns.Length > 0)
  {
    // 잠재적 대상 찾기
    PotentialTarget = UDKRTSTargetInterface(EventInstigator.Pawn);
    if (PotentialTarget != None)
    {
      for (i = 0; i < CachedUDKRTSTeamInfo.Pawns.Length; ++i)
      {
        // 1024 uu 범위에 내 말을 듣는 팔팔한 폰들아, 침입자를 공격하라!
        if (CachedUDKRTSTeamInfo.Pawns[i] != None && CachedUDKRTSTeamInfo.Pawns[i].Health > 0)
        {
          Distance = VSize(CachedUDKRTSTeamInfo.Pawns[i].Location - Structure.Location);
          if (Distance <= 1024.f)
          {
            UDKRTSAIController = UDKRTSAIController(CachedUDKRTSTeamInfo.Pawns[i].Controller);
            if (UDKRTSAIController != None && UDKRTSAIController.EnemyTargetInterface == None)
            {
              UDKRTSAIController.EngageTarget(EventInstigator.Pawn);
            }
          }
        }
      }
    }
  }
}
업그레이드 시스템 작동 방식
업그레이드 시스템은 그저 서버와 클라이언트에 존재하는 리플리케티으 액터를 두는 식으로 돌아갑니다. 베이스 업그레이드 클래스인 UDKRTSUpgrade 는 다른 어떤 것 보다도 그저 업그레이드를 통해 증가되는 것만 저장합니다. 무기 발사, 이동 속력 계산, 폰이나 건물이 피해를 입는 등의 상황이 발생할 때, 서버는 기존 업그레이드 액터를 검사하여 그 효과를 적용합니다. 예를 들어 플레이어가 갑옷 업그레이드 연구를 마치고 폰 중 하나가 맞았을 때 어떤 일이 벌어지나 살펴 보겠습니다.
function AdjustDamage(out int InDamage, out vector Momentum, Controller InstigatedBy, vector HitLocation, class<DamageType> DamageType, TraceHitInfo HitInfo, Actor DamageCauser)
{
  local UDKRTSTeamInfo UDKRTSTeamInfo;
  local int i;

  Super.AdjustDamage(InDamage, Momentum, InstigatedBy, HitLocation, DamageType, HitInfo, DamageCauser);

  // 유닛에 방어 보너스가 있는지 검사
  if (DefensiveBonus > 0.f)
  {
    InDamage = FClamp(1.f - DefensiveBonus, 0.f, 1.f) * InDamage;
  }

  // 아군에 유닛 방어 보너스가 있는지 검사
  if (OwnerReplicationInfo != None)
  {
    UDKRTSTeamInfo = UDKRTSTeamInfo(OwnerReplicationInfo.Team);
    if (UDKRTSTeamInfo != None)
    {
      for (i = 0; i < UDKRTSTeamInfo.Upgrades.Length; ++i)
      {
        if (UDKRTSTeamInfo.Upgrades[i] != None && UDKRTSTeamInfo.Upgrades[i].UnitArmourBoost > 0.f)
        {
          InDamage = InDamage * (1.f - UDKRTSTeamInfo.Upgrades[i].UnitArmourBoost);
        }
      }
    }
  }
}
웨폰 시스템 작동 방식
웨폰은 발사 모드가 들어있는 단순화된 액터입니다. 여기서는 Weapon 내 대부분의 함수성이 전혀 쓰이지 않아 베이스 클래스로 사용하지 않았습니다. 웨폰 자체가 그 발사 방식을 제어하기 보다는 그저 언제 발사할지, 발사할 수는 있는지 같은 것을 제어하는 관문 역할을 합니다. 언리얼 에디터에는 WeaponFireMode 오브젝트가 만들어져 그 자체로 발사 방식을 제어합니다. 이로써 WeaponFireMode 내 파라미터와 기존 아키타입을 수정하는 것만으로 디자이너가 새로운 무기를 맞춰낼 수 있을 뿐만 아니라, 프로그래머는 WeaponFireMode 를 상속하기만 해도 되니 시스템 확장 유연성도 확보됩니다. 이 스타터 키트의 WeaponFireMode 는 두 가지입니다. 트레이스를 사용하여 액터에 대미지를 입히는 UDKRTSInstantHitWeaponFire 와, 프로젝타일을 스폰시킨 후 그에 충돌하는 액터에 대미지를 입히는 UDKRTSProjectileWeaponFire 입니다.커맨더 보이스 오버 시스템 작동 방식
커맨드 보이스 오버 시스템은 UDKRTSCommanderVoiceOver 라는 스태틱 오브젝트입니다. 콘텐츠 패키지에 저장된 아키타입으로 링크하는데, 게임 디자이너가 아키타입을 동적으로 변경하고 그 내용을 실행 시간에 적용시키도록 하기 위해서입니다. 스타터 키트가 커맨더 음성을 재생하려는 경우, Play*SoundSlot*SoundCue 함수 중 하나를 호출합니다. 그 다음엔 UDKRTSCommanderVoiceOver 안의 PlaySoundCue 를 호출합니다. PlaySoundCue 함수는 사운드를 재생해야 하는지를 검사한 다음, PlayerReplicationInfo 를 소유하는 콘트롤러에서 최종적으로 PlaySound 를 호출합니다. 불리언 변수들이 사운드가 다른 클라이언트로 리플리케이트되지 않도록 합니다.
/**
 * 빌딩 소리 재생
 *
 * @param      PlayerReplicationInfo      사운드 재생 대상
 */
final static function PlayBuildingSoundCue(PlayerReplicationInfo PlayerReplicationInfo)
{
  PlaySoundCue(PlayerReplicationInfo, default.CommanderVoiceOverArchetype.Building);
}

/**
 * 사운드 큐 재생
 *
 * @param      PlayerReplicationInfo      사운드 재생 대상
 * @param      SoundCue               재생할 사운드 큐
 */
final static function PlaySoundCue(PlayerReplicationInfo PlayerReplicationInfo, SoundCue SoundCue)
{
  local AIController AIController;
  local WorldInfo WorldInfo;

  // 전용 서버에 있는지 확인
  WorldInfo = class'WorldInfo'.static.GetWorldInfo();
  if (WorldInfo != None && WorldInfo.NetMode == NM_DedicatedServer)
  {
    return;
  }

  // 오브젝트 리퍼런스 확인
  if (PlayerReplicationInfo == None || SoundCue == None || PlayerReplicationInfo.Owner == None)
  {
    return;
  }

  // 플레이어 리플리케이션 인포가 AI 콘트롤러에 속하면 중단
  AIController = AIController(PlayerReplicationInfo.Owner);
  if (AIController != None)
  {
    return;
  }

  PlayerReplicationInfo.Owner.PlaySound(SoundCue, true, true, true,, true);
}
// 빌딩 소리 재생
class'UDKRTSCommanderVoiceOver'.static.PlayBuildingSoundCue(OwnerReplicationInfo);
음악 재생 방식
이 스타터 키트는 iPad2 같은 iOS 디바이스에 초점을 맞추고 있기에, 음악은 MP3 를 사용해서 재생합니다. 스타터 키트 예제 맵에서는 PlayMusicTrack 키즈멧 노드를 사용해서 음악을 재생합니다. 음악은 SoundCue 로도 저장되므로 PC 플랫폼에서도 들을 수 있습니다.이 스타터 키트를 사용해서 게임을 만드는 방법
이 스타터 키트에는 이미 완성된 게임이 들어있어, 바로 건물, 유닛, 무기를 만들 수 있습니다. 게임플레이 로직을 새로 만들려면 스타터 키트를 수정해야 하기는 합니다. 건물, 유닛, 무기는 대부분 데이터 주도형이기에 아키타입 을 사용하여 그 프로퍼티 다수를 정의합니다.
새 건물 추가법
우선 콘텐츠 브라우저의 액터 클래스 탭으로 갑니다. 액터 클래스 트리 안에서 UDKRTSStructure 를 검색합니다. 우클릭 후 새 아키타입 생성(Create New Archetype) 을 선택합니다.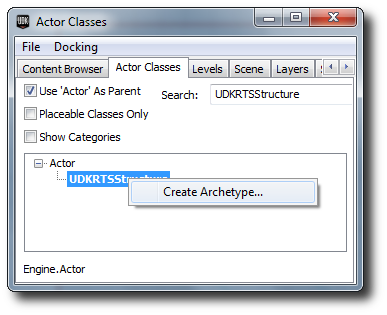 콘텐츠 브라우저에서 새 건물 아키타입을 찾아 더블클릭하여 그 프로퍼티를 엽니다.
 여기에 열린 변수를 게임 디자이너의 관점으로 살펴봅니다. 변수 대부분에 코멘트 처리가 되어 있으니, 자세한 설명이 필요하면 마우스 커서를 올려 보십시오. 예로 UDKRTSGameContent.Archetypes 패키지의 다른 건물을 살펴 보십시오.
 다양한 건물 프로퍼티 실험을 마치고나면, 맵에 건물 인스턴스를 만들고, (유닛이 건물을 지을 수 있도록) 유닛 아키타입 내 건설가능 건물 배열 안에 방금 만든 건물 아키타입을 추가한 후, AI 의 빌드 오더에도 추가해 줍니다.
맵 안에 인스턴스 만드는 것은, 그저 콘텐츠 브라우저에서 건물 아키타입을 선택한 다음, 월드 뷰포트에 우클릭한 후 '아키타입 추가: _<아키타입 이름>_' 을 선택하면 됩니다. 맵 시작시 이 건물이 누구껀지 설정하려면 건물 인스턴스의 Starting Team Index 변수를 수정해야 한다는 점, 기억해 주시고요.
다양한 건물 프로퍼티 실험을 마치고나면, 맵에 건물 인스턴스를 만들고, (유닛이 건물을 지을 수 있도록) 유닛 아키타입 내 건설가능 건물 배열 안에 방금 만든 건물 아키타입을 추가한 후, AI 의 빌드 오더에도 추가해 줍니다.
맵 안에 인스턴스 만드는 것은, 그저 콘텐츠 브라우저에서 건물 아키타입을 선택한 다음, 월드 뷰포트에 우클릭한 후 '아키타입 추가: _<아키타입 이름>_' 을 선택하면 됩니다. 맵 시작시 이 건물이 누구껀지 설정하려면 건물 인스턴스의 Starting Team Index 변수를 수정해야 한다는 점, 기억해 주시고요.
 유닛 아키타입 내 건설가능 건물 배열에 추가하려면, 콘텐츠 브라우저에서 유닛 아키타입을 찾아 더블클릭하여 아키타입 프로퍼티 창을 엽니다. Ability 범주를 펼치고 Buildable Structure Archetypes 배열 옆 녹색 더하기 아이콘을 클릭하여 새 항목을 추가합니다. 콘텐츠 브라우저에서 건물 아키타입을 선택한 다음, Buildable Structure Archetypes 배열 내 녹색 화살표 아이콘을 클릭하여 할당해 줍니다. 이제 유닛을 선택하면 새로 만든 건물이 유닛의 HUD 액션에 나타날 것입니다.
 AI 가 새로 만든 건물을 세울 수 있도록 하려면, UDKRTSGameContent.Archetypes 패키지에 저장된 AIProperties 아키타입 내 Structure Build Order 배열에 추가해 줘야 합니다.

새 유닛 (Pawn) 추가법
우선 콘텐츠 브라우저의 액터 클래스 탭으로 갑니다. 액터 클래스 트리에서 UDKRTSPawn 를 검색합니다. 그 위에 우클릭 후 새 아키타입 생성(Create New Archetype) 을 선택합니다. 콘텐츠 브라우저에서 새로 만든 폰 아키타입을 찾아 더블클릭하여 그 프로퍼티를 엽니다.
 여기에 열린 변수를 게임 디자이너의 관점으로 살펴봅니다. 변수 대부분에 코멘트 처리가 되어 있으니, 자세한 설명이 필요하면 마우스 커서를 올려 보십시오. 예로 UDKRTSGameContent.Archetypes 패키지의 다른 폰을 살펴 보십시오.
 유닛에 무기를 추가하려면, 기존의 웨폰 아키타입을 찾거나 새로 만듭니다. 콘텐츠 브라우저에 선택한 후, Weapon Archetype 필드에 할당해 줍니다.
 AI 가 뭘 만들어야 할지 참고삼을 수 있는 것은 없지만, AI 는 현재 세운 건물 모두를 검색하여 가장 필요한 유닛 종류를 찾아냅니다. 일꾼과 병력 중 어떤 것을 더 많이 뽑게 만들지, 다양한 프로퍼티 구성을 통해 조절할 수 있습니다. 유닛 아키타입을 건물의 Buildable Pawns 배열에 추가하지 않으면 플레이어든 AI 든 그 유닛을 뽑을 수가 없으니 주의하십시오!
이 작업을 위해 우선 적합한 건물 아키타입을 찾습니다. Structure 범주를 펼치고, Buildable Pawn Archetypes 배열 옆 녹색 더하기 아이콘을 클릭하여 항목을 새로 추가합니다. 콘텐츠 브라우저에서 새로 만든 폰 아키타입을 선택한 다음, Buildable Pawn Archetypes 배열 옆 녹색 화살표 아이콘을 클릭하여 할당해 줍니다. 이제 건물을 선택하면 HUD 액션에 새로 만든 유닛이 나타날 것입니다.
AI 가 뭘 만들어야 할지 참고삼을 수 있는 것은 없지만, AI 는 현재 세운 건물 모두를 검색하여 가장 필요한 유닛 종류를 찾아냅니다. 일꾼과 병력 중 어떤 것을 더 많이 뽑게 만들지, 다양한 프로퍼티 구성을 통해 조절할 수 있습니다. 유닛 아키타입을 건물의 Buildable Pawns 배열에 추가하지 않으면 플레이어든 AI 든 그 유닛을 뽑을 수가 없으니 주의하십시오!
이 작업을 위해 우선 적합한 건물 아키타입을 찾습니다. Structure 범주를 펼치고, Buildable Pawn Archetypes 배열 옆 녹색 더하기 아이콘을 클릭하여 항목을 새로 추가합니다. 콘텐츠 브라우저에서 새로 만든 폰 아키타입을 선택한 다음, Buildable Pawn Archetypes 배열 옆 녹색 화살표 아이콘을 클릭하여 할당해 줍니다. 이제 건물을 선택하면 HUD 액션에 새로 만든 유닛이 나타날 것입니다.
새 무기 추가법
우선 콘텐츠 브라우저의 액터 클래스 탭으로 갑니다. 액터 클래스 트리에서 UDKRTSWeapon 을 검색합니다. 그 위에 우클릭 후 새 아키타입 생성(Create New Archetype) 을 선택합니다. 콘텐츠 브라우저에서 새로 만든 웨폰 아키타입을 찾아 더블클릭하여 그 프로퍼티를 엽니다.
 새로운 모드를 만들기 위해 Weapon 범주를 확장하고 파랑 화살표를 클릭하여 맥락 메뉴를 엽니다. 즉시 적중형 무기를 만들려면 UDKRTSInstantHitWeaponFire 를, 탄도 발사형 무기를 만들려면 UDKRTSProjectileWeaponFire 를 만듭니다 (이 발사 모드를 사용하려면 UDKRTSProjectile 아키타입을 만들거나 UDKRTSProjectile 을 찾아야 합니다).
 여기에 열린 변수를 게임 디자이너의 관점으로 살펴봅니다. 변수 대부분에 코멘트 처리가 되어 있으니, 자세한 설명이 필요하면 마우스 커서를 올려 보십시오. 예로 UDKRTSGameContent.Archetypes 패키지의 다른 폰을 살펴 보십시오.
유닛에 웨폰이 설정되면 그 유닛에는 무기가 자동으로 붙은 상태로 스폰됩니다.
여기에 열린 변수를 게임 디자이너의 관점으로 살펴봅니다. 변수 대부분에 코멘트 처리가 되어 있으니, 자세한 설명이 필요하면 마우스 커서를 올려 보십시오. 예로 UDKRTSGameContent.Archetypes 패키지의 다른 폰을 살펴 보십시오.
유닛에 웨폰이 설정되면 그 유닛에는 무기가 자동으로 붙은 상태로 스폰됩니다.
이 스타터 키트 사용법
- UDK 를 다운로드 합니다.
- UDK 를 설치합니다.
- 첨부된 zip 파일을 받습니다.
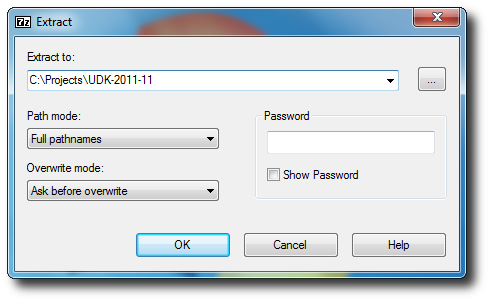
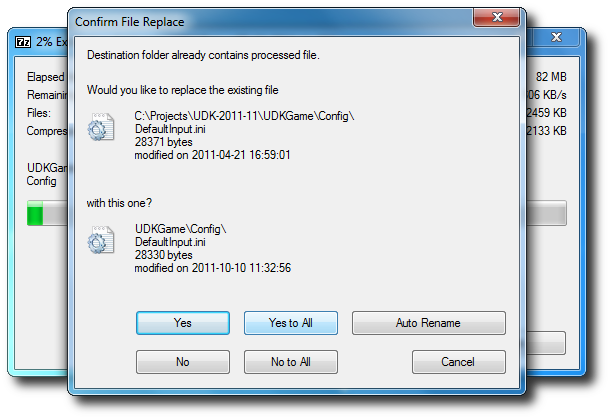
- 압축 파일을 UDK 기본 디렉토리에 풉니다. (예: C:\Projects\UDK-2011-11\) 기존 파일이나 폴더를 덮어쓰겠냐는 창이 뜰 수가 있습니다. 모두 예를 선택하세요.
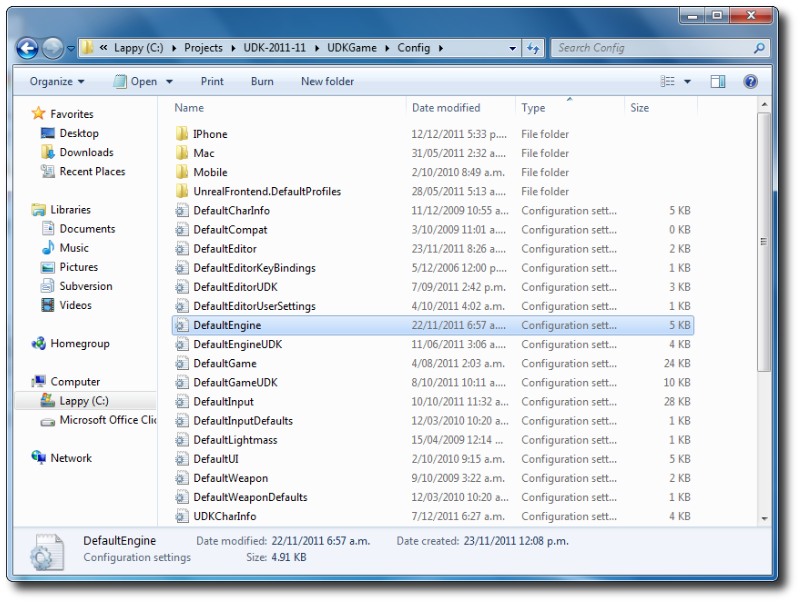
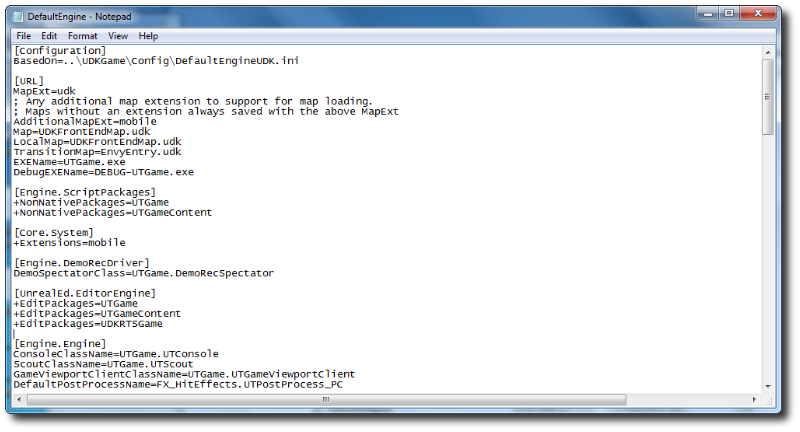
- UDKGame\Config 디렉토리에 있는 DefaultEngine.ini 파일을 메모장(Notepad)으로 엽니다. (예: C:\Projects\UDK-2011-10\UDKGame\Config\DefaultEngine.ini)
- EditPackages 를 찾습니다.
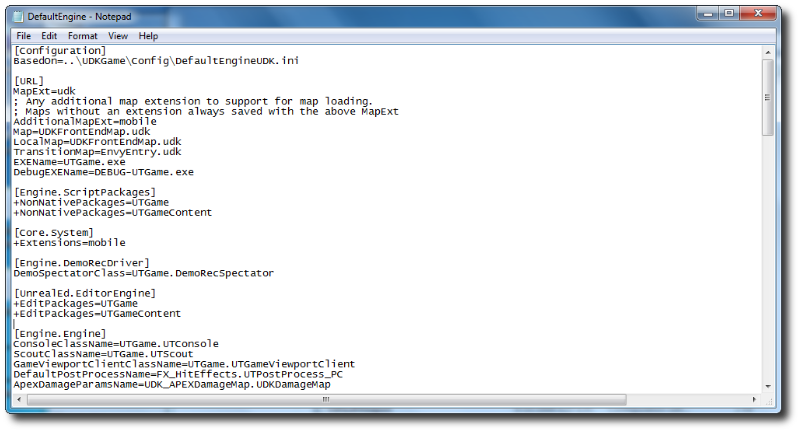
- +EditPackages=UDKRTSGame 를 추가합니다.
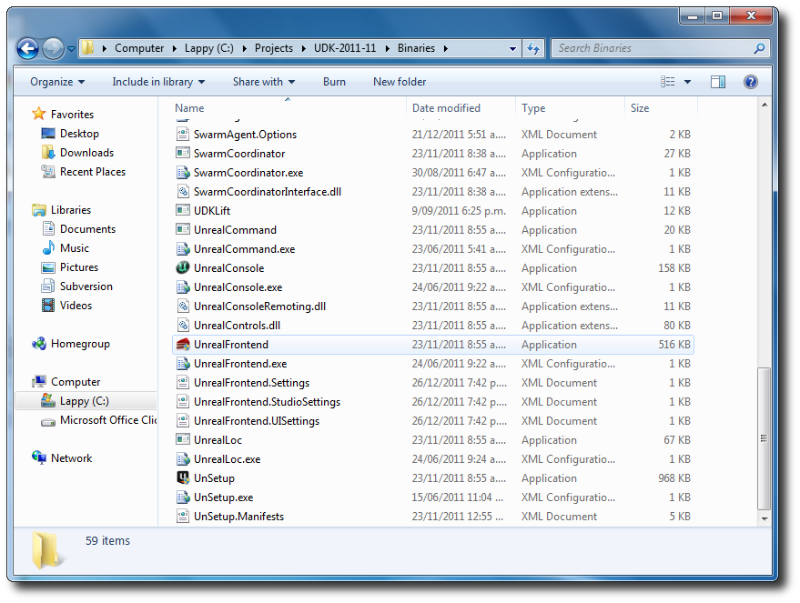
- Binaries 디렉토리에 있는 Unreal Frontend 어플리케이션을 실행시킵니다. (예: C:\Projects\UDK-2011-11\Binaries\UnrealFrontend.exe)
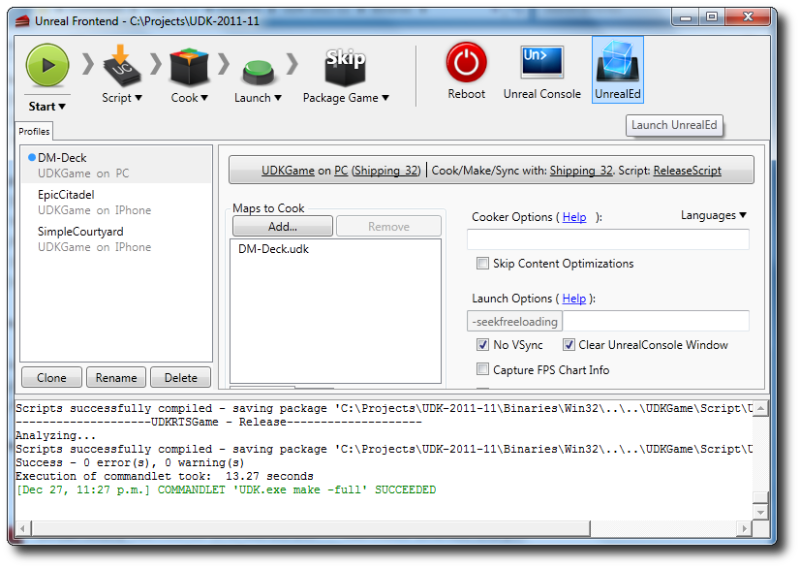
- Script 를 클릭, Full Recompile 을 선택합니다.

- 마지막에 UDKRTSGame 패키지가 컴파일되는 것이 보일 것입니다.

- UnrealEd 를 클릭하여 언리얼 에디터를 엽니다.
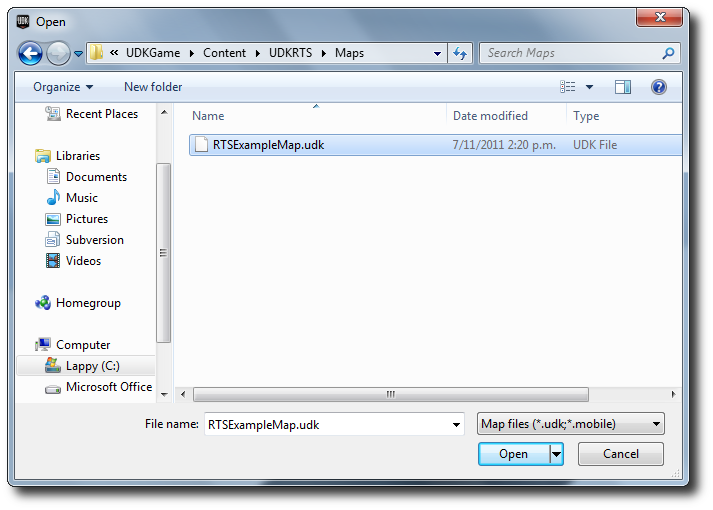
- Open 버튼을 클릭하고 RTSExampleMap.udk 를 엽니다.
- 내려보기 카메라 모드에 있는지 확인한 다음 Play In Editor 버튼을 눌러 RTS 스타터 키트를 플레이합니다. (모바일 에뮬레이션 기능 켜는 것 잊지 마시고, HUD 액션 수행은 숫자키로 합니다.)
- iDevice 에 익스포트한 후 거기서 플레이할 수도 있습니다. (개발 provision 셋업이 필요합니다.)
내려받기
- 이 스타터 키트에 사용된 코드와 콘텐츠.
- UDK-2012-01 에 대한 UnrealScript 패치.
- UDKRTSMobilePlayerController.uc 를 대체하는 패치로, enum EZoneTouchEvent 를 ETouchType 으로 고칩니다.
- UDK-2012-05 에 대한 UnrealScript 패치.
- UDKRTSMobilePlayerController.uc 를 대체하는 패치로, 초기 시뮬레이션만 처리되는 버그 픽스입니다.
