UDN
Search public documentation:
DistributionAppleiOS
日本語訳
中国翻译
한국어
Interested in the Unreal Engine?
Visit the Unreal Technology site.
Looking for jobs and company info?
Check out the Epic games site.
Questions about support via UDN?
Contact the UDN Staff
中国翻译
한국어
Interested in the Unreal Engine?
Visit the Unreal Technology site.
Looking for jobs and company info?
Check out the Epic games site.
Questions about support via UDN?
Contact the UDN Staff
UE3 Home > Mobile Home > Distributing iOS Applications
Distributing iOS Applications
Overview
Distribution Provisioning
Generating Distribution Provisioning
The steps for getting these are nearly identical to the steps for getting a development mobile provision and signing certificate through the iOS Provisioning Portal, except that the Distribution tab is used instead on the iOS Provisioning portal web site. See the following sections of the iOS Provisioning Portal Overview page for complete details:- Requesting a Distribution Certififcate - Instructions for generating a distribution certificate through the iOS Provisioning Portal.
- Creating Distribution Profiles - Instructions for creating distribution provisioning profiles through the iOS Provisioning Portal.
Installing Distribution Provisioning
-
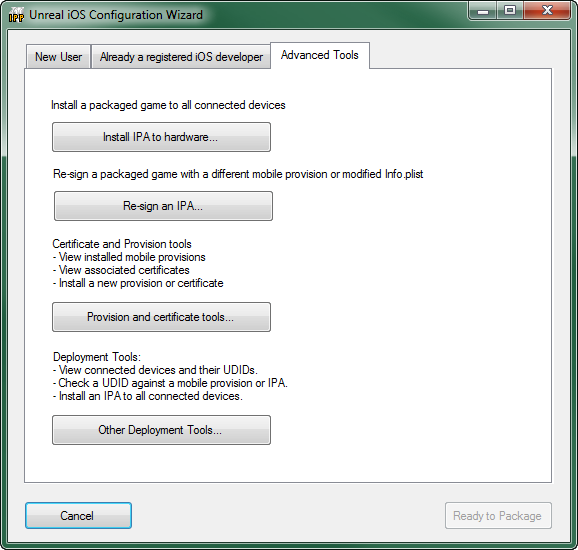
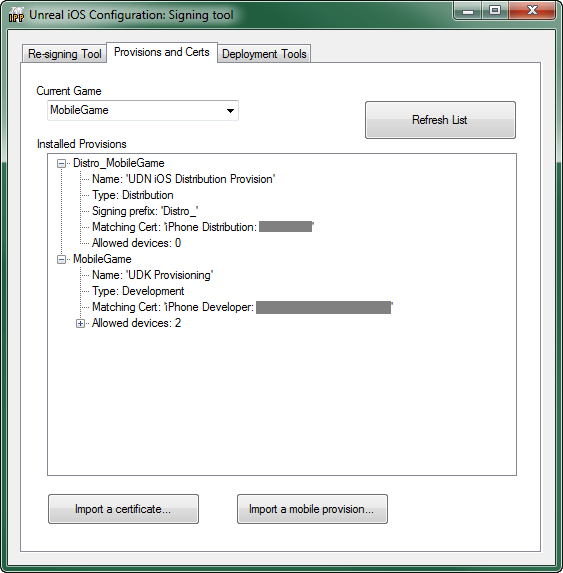
Launch the GUI of the iPhonePackager tool (Accessing Unreal iOS Configuration Wizard). The Unreal iOS Configuration Wizard should appear.
-
Click the
 button to open the Provisions and Certs tab of the Unreal iOS Configuration: Signing Tool.
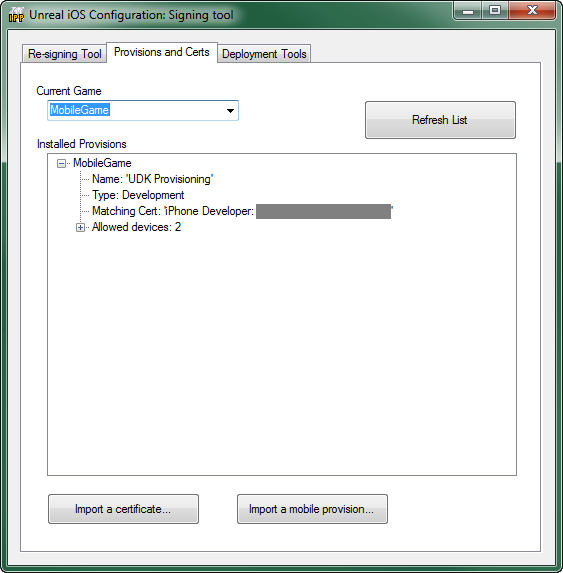
-
Click the
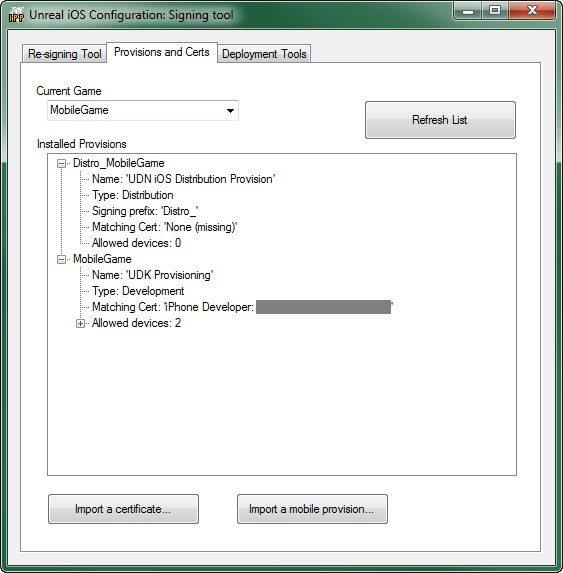
 button to import the distribution profile. Use the file dialog that opens to select your distribution mobile provisioning profile. Whether the import process was successful will not be immediately apparent. However, if you click the
  button, the new provisioning profile will be displayed.
-
Click the
 button to import the distribution certificate. Use the file dialog that opens to select your Distribution certificate. A message box prompting you to import your key pair file will appear.
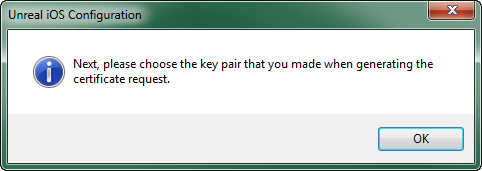 Click OK and use the file dialog that opens to find the key pair file. Again, you will have to click the button for the new certificate to be displayed.
Required Assets and information
/UDKGame/Build/IPhone/Resources/Graphics/Icon%402x.png
/UDKGame/Build/IPhone/Resources/Graphics/Icon.png
/UDKGame/Build/IPhone/Resources/Graphics/Icon-72.png
/UDKGame/Build/IPhone/Resources/Graphics/Icon-Small%402x.png
/UDKGame/Build/IPhone/Resources/Graphics/Icon-Small.png
/UDKGame/Build/IPhone/Resources/Graphics/Icon-Small-50.png
More information about iOS application icons can be found on the App Icons on iPad and iPhone page of the iOS Reference Library. Application Info While in iPhonePackager, you should also review your display name and bundle identifier by using the "Edit Info.plist overrides..." button on the "Already a registered iOS developer tab", to make sure they are correct. If you want to override some Info.plist settings, but only for distribution builds, then you can edit the Distro_UDKGameOverrides.plist file instead of the UDKGameOverrides.plist file. iTunes Artwork You will need a 512x512 image which will be the artwork displayed for your application in iTunes. This is usually a larger version of the application icon. This image must be one of the following formats and dimensions:
| Formats | Dimensions | DPI | Color Space |
|---|---|---|---|
| .jpg, .jpeg, .png, .tif .tiff | 512x512 | 72+ dpi | RGB |
| Device | Formats | Dimensions | DPI | Color Space |
|---|---|---|---|---|
| iPhone/iPod Touch | .jpg, .jpeg, .png, .tif .tiff | 320x480, 480x320, 320x460, 640x960, 960x640 | 72+ dpi | RGB |
| iPad | .jpg, .jpeg, .png, .tif .tiff | 768x1024, 1024x768, 748x1024, 1004x768 | 72+ dpi | RGB |
Creating the distribution IPA
-
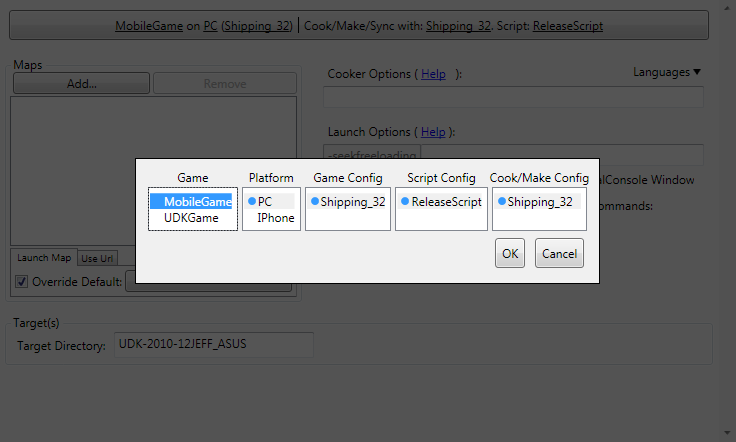
Click the
 button to open the configuration settings:
-
Make sure the settings are as follows:
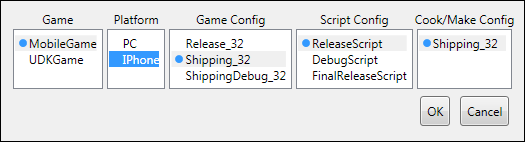
Click theGame Platform Game Config Script Config Cook/Make Config UDKGameIPhoneShipping_32ReleaseScriptShipping_32 button to save the settings.
-
The Mobile section should now be visible if it was not previously.
 Change the Packaging Mode to Distribution.

-
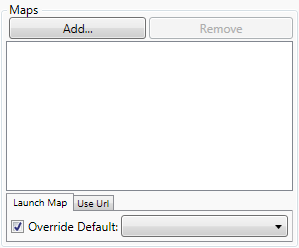
Next, you need to add all the maps that need to be packaged into the application. This can be done in the maps section:
 Click the
  button. A window will open listing all existing maps in the current game project.
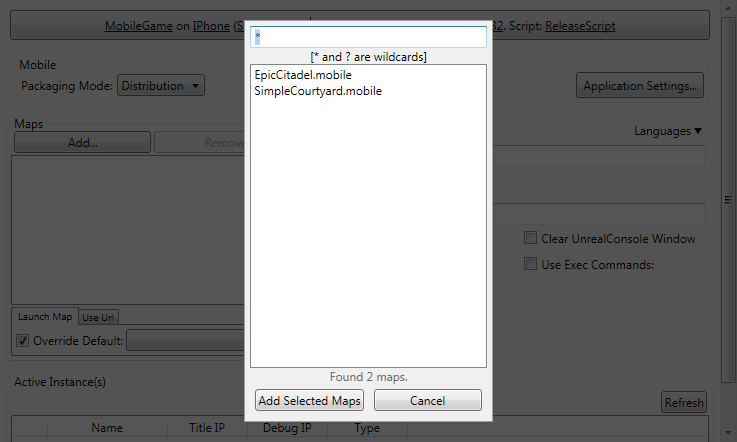 Select all the maps in the list you want to add:
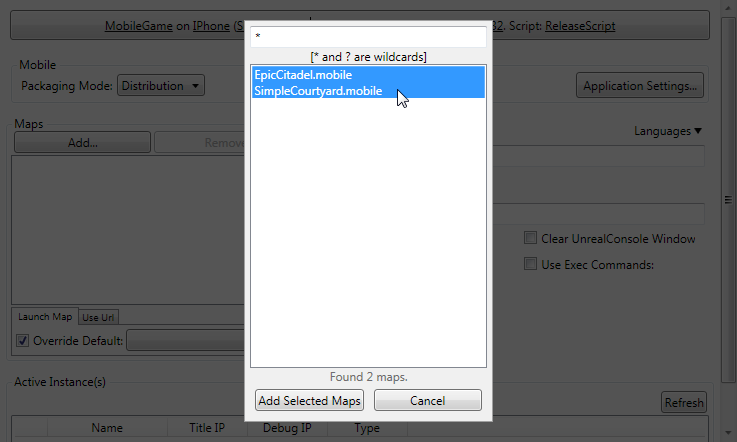 Click the
  button to add the maps and close the window. The maps should now be listed in the maps list:
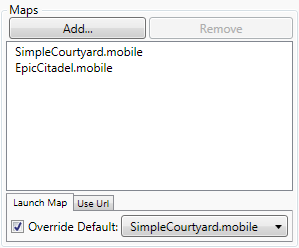
-
Make sure to set the map to be loaded by default:

-
Click the
 button, which will bring down a drop-down, and select Clean and Full Recook.
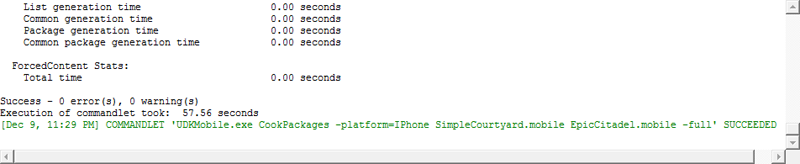
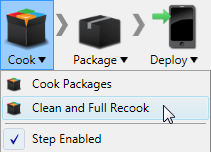 The
The  graphic will display while the cooking process is in progress. Once complete, the output window will show the results.
-
Click the
 button, which will bring down a drop-down, and select Package iOS App.
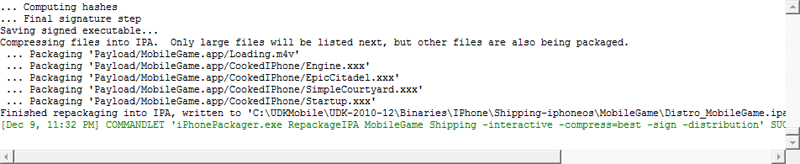
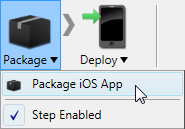 The graphic will display while the packaging process is in progress. Once complete, the output window will show the results.
 Note: When Packaging Mode is set to
 Distribution, it will generate IPAs that can only be uploaded to the app store. They cannot be installed on your iOS device. Therefore, if you click on Start, everything will go smoothly until the final Deploy step, which will fail. If you want to test that you have all of the correct maps, etc..., then you can switch Package Mode back toDefaultand hit Start again. When the package step is done successfully, you should have a file namedDistro_UDKGame.ipain the following directory:[UDK install path]\Binaries\IPhone\Shipping-iphoneos\UDKGame
This is the file to be uploaded to the application store throught he Application Loader program.
Submission and uploading
iTunes Connect
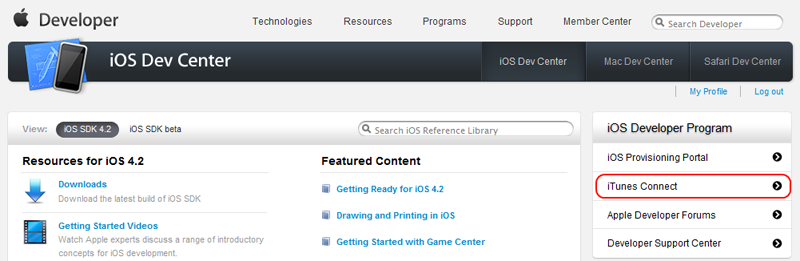
The next part of the submission process requires using iTunes Connect. iTunes Connect is an area of the iOS Dev Center on Apple's Developer website that has tools for managing applications for submission and tracking stats about those applications already in the App Store. NOTE: You can click the-
iTunes Connect is accessed by logging into the Apple iOS Dev Center and clicking the "iTunes Connect" link on the right hand side.
 If this is your first time using iTunes Connect, you will be greeted with a Terms of Service page.
 You must agree in order to continue. Check the box to agree and then click the
  button to continue to the iTunes Connect home page.

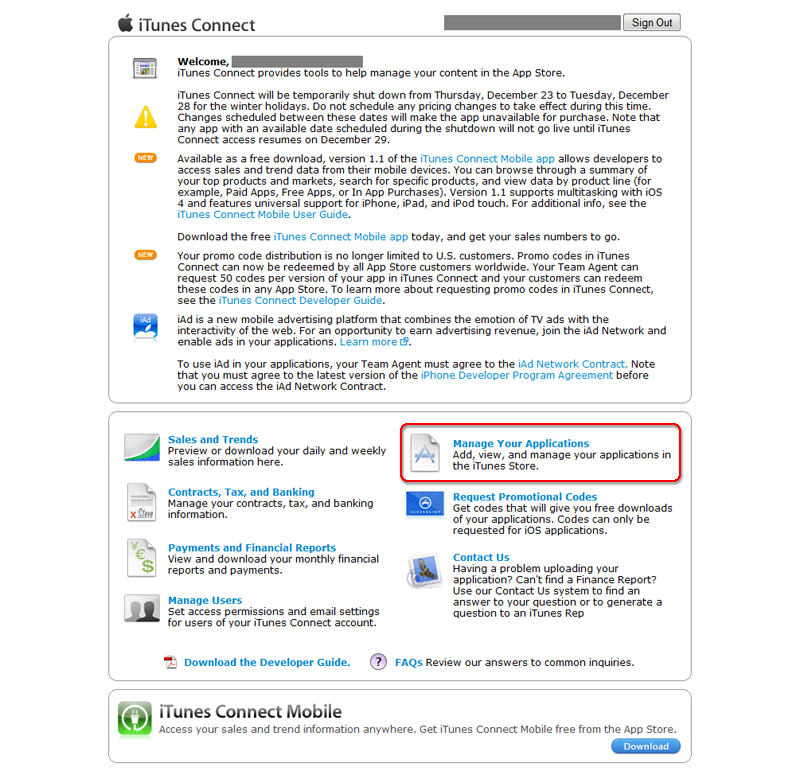
-
Click Manage Your Applications, shown highlighted below:
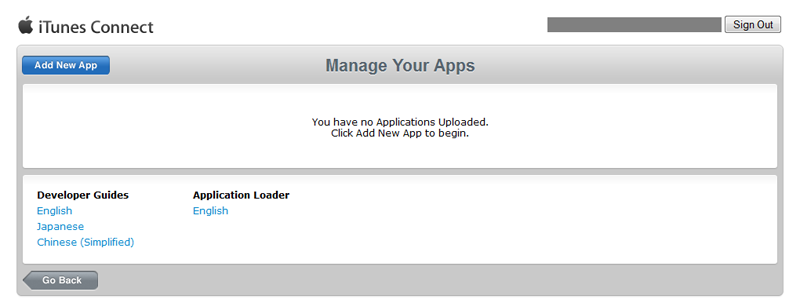
 This should take you to the Manage Your Apps page. If this is your first app submission, the list of apps will be empty.
-
Click the
 button to begin the process of adding a new app. If this is your first app submission, this will take you to the New Application page.
Enter the following information:
button to begin the process of adding a new app. If this is your first app submission, this will take you to the New Application page.
Enter the following information:
- Primary Language - Choose the language you wish to use when entering the information for your app submissions with this developer account.
- Company Name - Enter the name of the company you want associated with all apps you submit using this developer account.
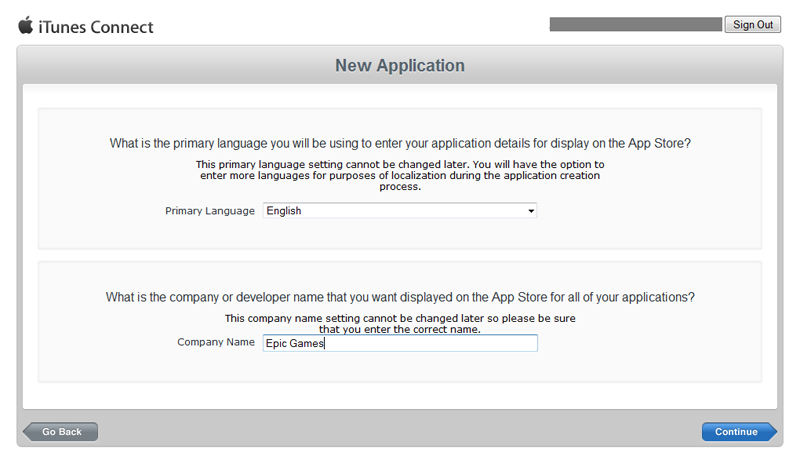 Click the
  button to submit the information. A message box will appear confirming this information is correct as it cannot be changed after it is submitted.
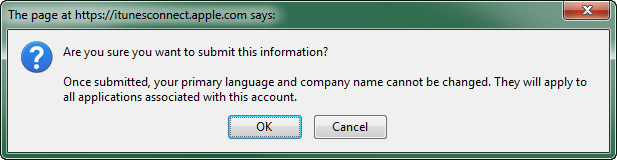 Click OK if the information is correct to continue to the App Information screen.
-
Enter the following information about the app you are submitting:
- App Name - Enter the name of the app as you want it known in the App Store.
- SKU Number - Enter a unique (within your submitted apps) number used to identify the app being submitted.
- Bundle ID - Choose the Bundle ID you want associated with this app.
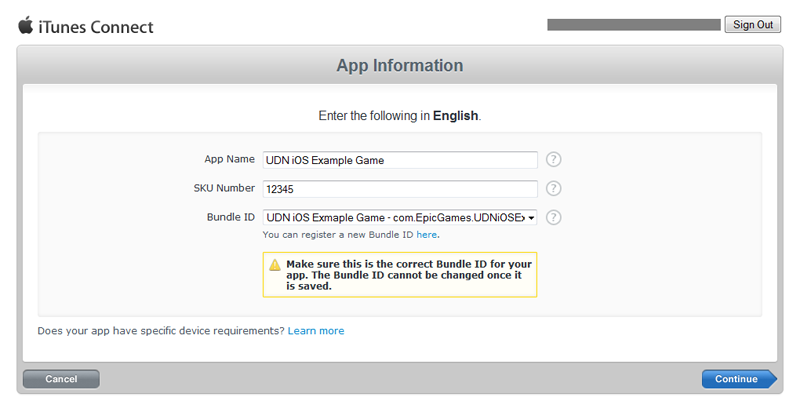 Click the button to move on to the Rights and Pricing screen.
-
Enter the following information:
- Availability Date - Set the date at which the app will first appear in the App Store.
- Price Tier - Choose a price for the app.
- Discount for Educational Instituations - Check whether educational instituations should get discounts on the app.
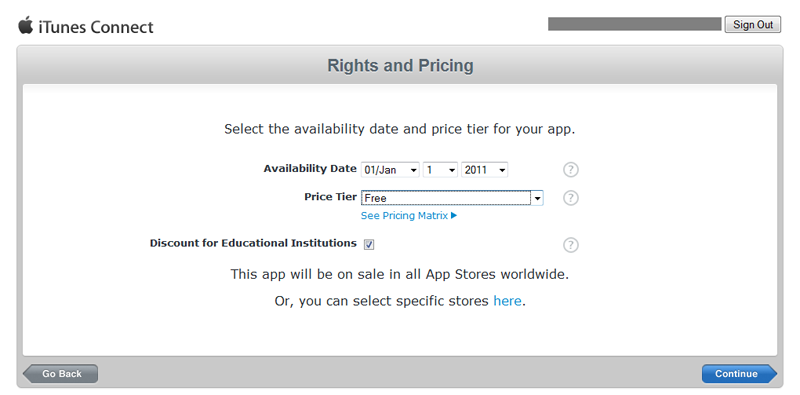 Click the button to move on to the Version Information screen.
-
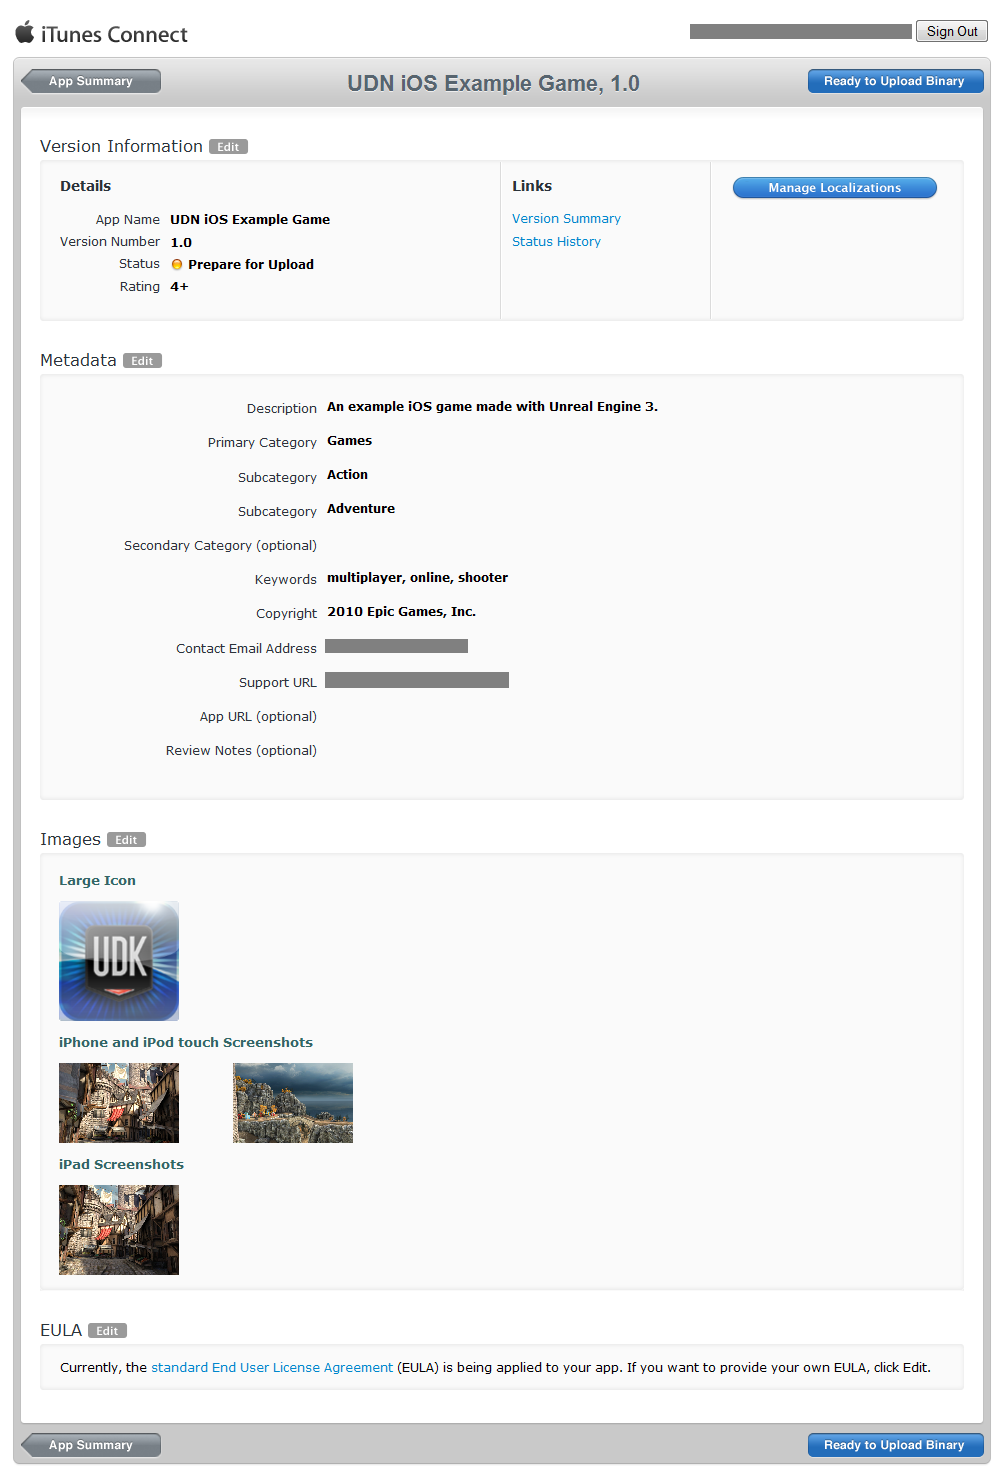
Enter the following information:
Metadata
- Version number - Enter the version number for the app (e.g., 1.0, 1.01, etc.)
- Description - Enter a descript of the app being submitted. include features and functionality. Must be less than 4000 bytes.
- Primary Category - Choose a category that best describes the app being submitted.
- Subcategory - Choose two subcategories within the category above.
- Keywords - Enter some keywords that describe the app being submitted. These are used when users search the App Store. Must be less than 100 bytes.
- Copyright - Enter the name of the person or entity that owns the exclusive rights to the app, preceded by the year the rights were obtained. (e.g., 2010 Epic Games, Inc.
- Contact Email Address - Enter an email address users can contact for support. (e.g., support@example.com)
- Support URL - Enter a URL where users can go to get support for the app. (e.g., http://support.example.com)
- Large 512x512 Icon - Upload your itunes artwork image.
- iPhone and iPod Touch Screenshots - Upload your iPhone/iPod Tuch screenshots.
- iPad Screenshots - Upload your iPad screenshots.
(Click for full size)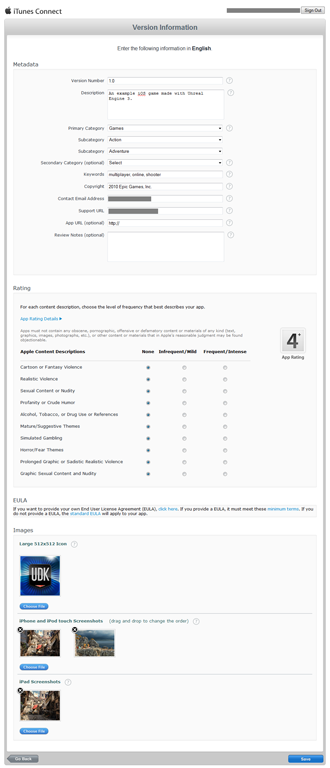 Click the
  button to save the app's information. This will take you to the App Summary page for the app.
-
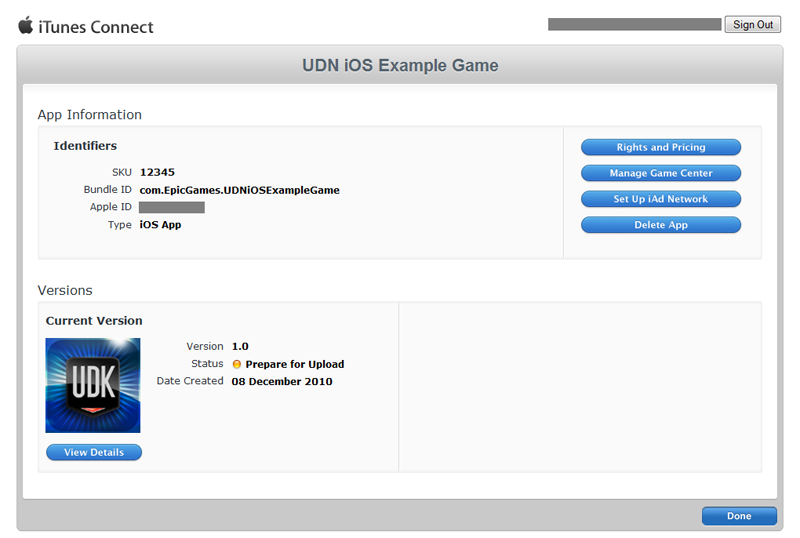
Click the
 button to view the App Details page for the app.
(Click for full size)
button to view the App Details page for the app.
(Click for full size)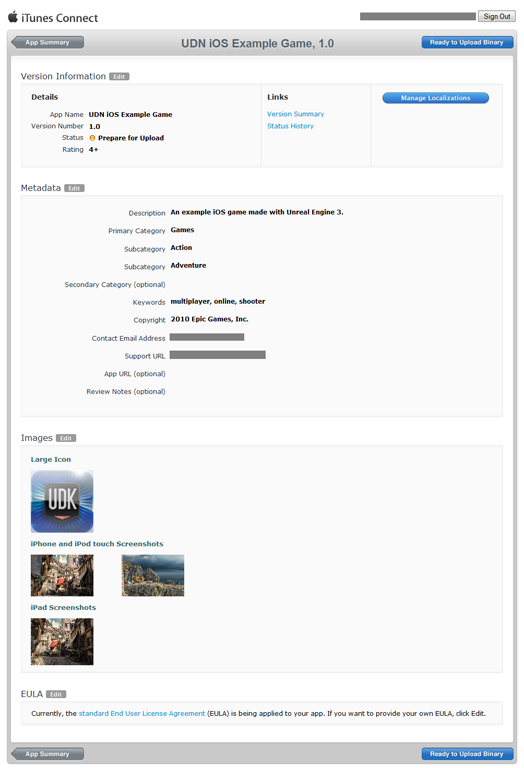 You can click the
  button to edit any of the information displayed on this page.
-
Click the
 button to proceed. An Export Compliance screen will be displayed.
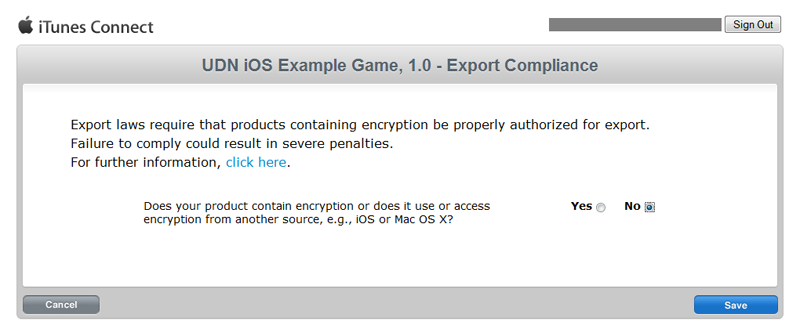 Specify whether encryption is used in your app and then click the button to continue. A new screen explaining that you are now ready to upload your app through the Application Loader will appear.
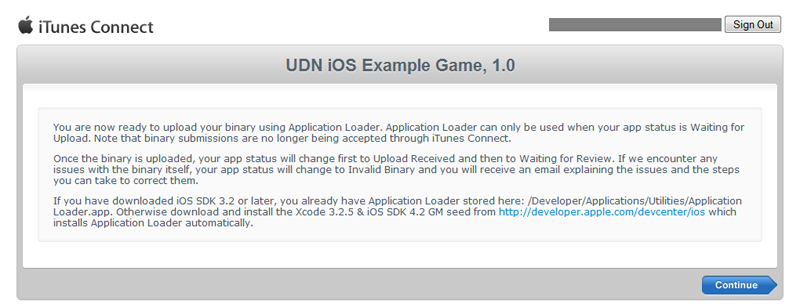 Click the button to continue.
-
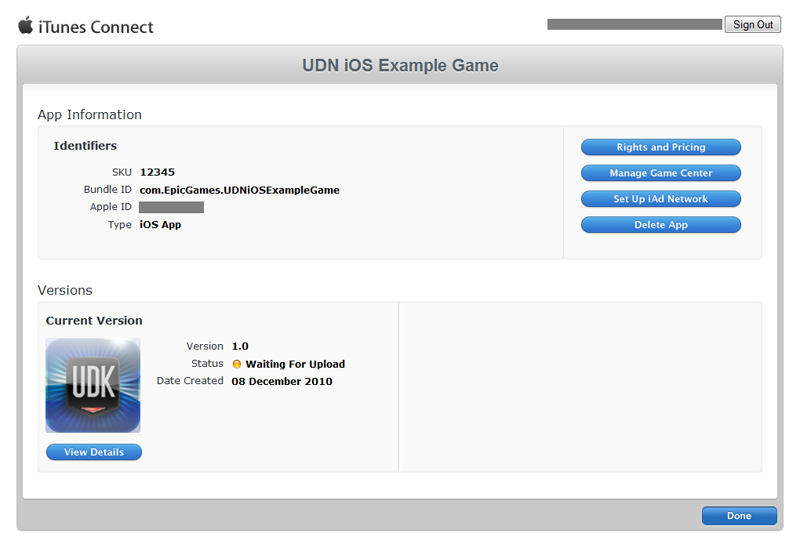
You should be taken back to the App Details screen, only now the button no longer appears and the app's status has now changed to Waiting For Upload.
(Click for full size)
 Click the
  button to return to the App Summary screen. It should also show the app's status as Waiting For Upload.
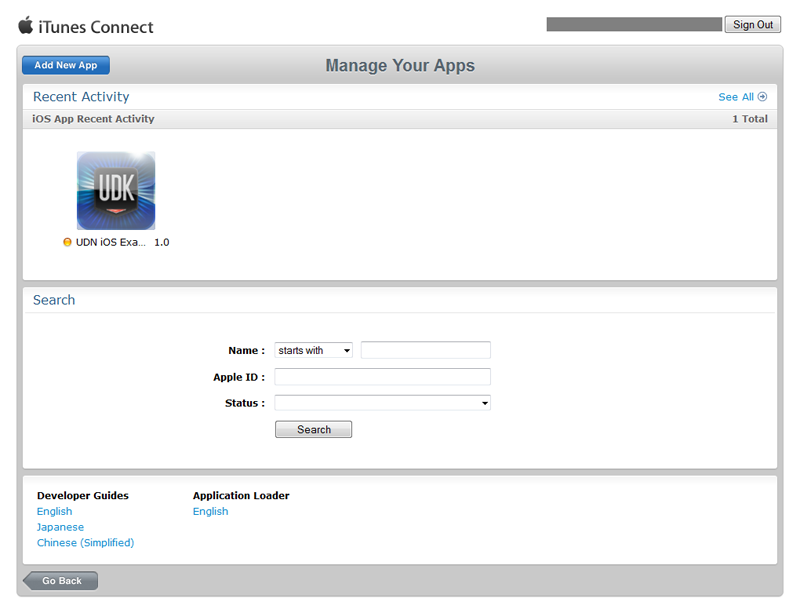
 Click the
  button to complete the process. You should be taken back to the Manage Your Apps screen, where the new app is now displayed.


Application Loader
Uploading your distribution IPA requires a computer running OSX with the Application Loader installed. Application Loader should be installed as part of the iOS development SDK; however, it can be installed and accessed in other ways as well. To install the latest version of Application Loader, you can:- Download Application Loader from iTunes Connect within the Manage Your Applications module.
- Access Application Loader from your Utilities folder (/Developer/Applications/Utilities/ApplicationLoader.app) if you have installed iOS SDK 3.2 or later.
- Access Application Loader from Xcode, delivering your binary directly from Xcode. For more information on this delivery mechanism, review the iOS Development Guide.
- Transfer the distribution IPA file you created (e.g., Distro_UDKGame.ipa) to the Mac with Application Loader installed.
- Launch the Application Loader program.
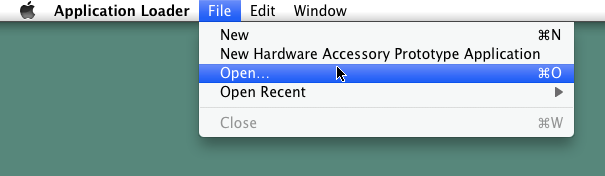
-
Inside the Application Loader program, select Open... from the File menu.
-
Choose the application which is currently Waiting For Upload for which this IPA should be uploaded.
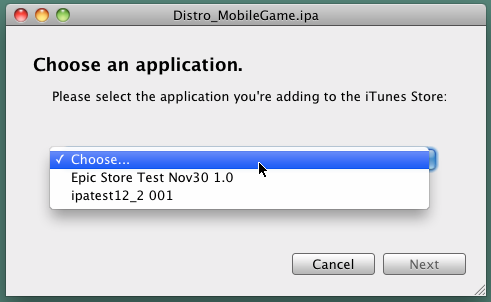 NOTE: If you get the 'no valid apps' message, make sure your app's status is Waiting For Upload on the iTunes Connect site. if it is not, go through the steps of preparing your app for upload.
Click Next to continue.
NOTE: If you get the 'no valid apps' message, make sure your app's status is Waiting For Upload on the iTunes Connect site. if it is not, go through the steps of preparing your app for upload.
Click Next to continue.
-
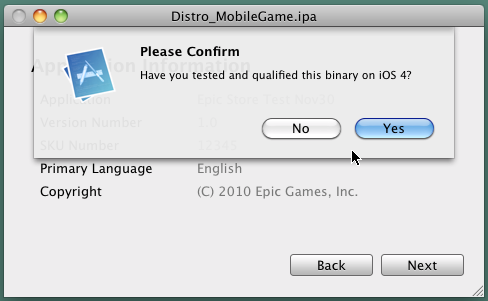
Confirm that you have tested the IPA on a device running iOS 4 by clicking Yes.
-
Select the distribution IPA and click Send to begin the upload.
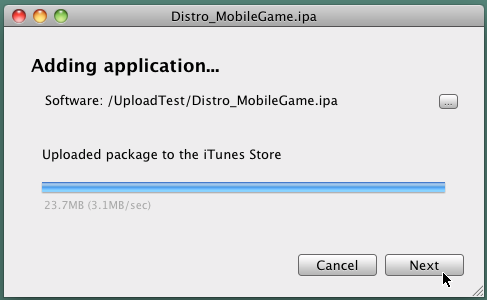
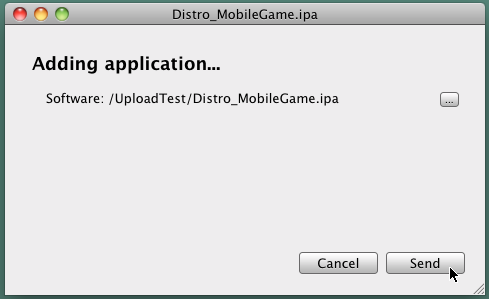 When the upload is complete, click Next to proceed.
-
The upload process is now complete.
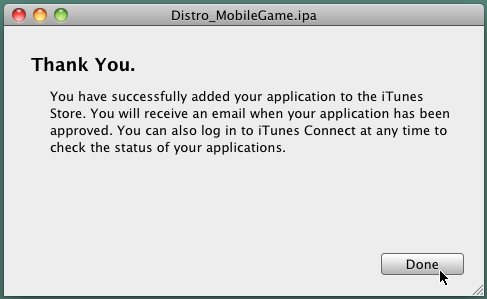 Feel free to log back in to iTunes Connect and got the Manage Your Applications page to check that the status of your app has changed accordingly.
