UDN
Search public documentation:
MeshPaintReference
日本語訳
中国翻译
한국어
Interested in the Unreal Engine?
Visit the Unreal Technology site.
Looking for jobs and company info?
Check out the Epic games site.
Questions about support via UDN?
Contact the UDN Staff
中国翻译
한국어
Interested in the Unreal Engine?
Visit the Unreal Technology site.
Looking for jobs and company info?
Check out the Epic games site.
Questions about support via UDN?
Contact the UDN Staff
UE3 Home > Unreal Editor & Tools > Mesh Paint Reference
UE3 Home > Level Designer > Mesh Paint Reference
UE3 Home > Level Designer > Mesh Paint Reference
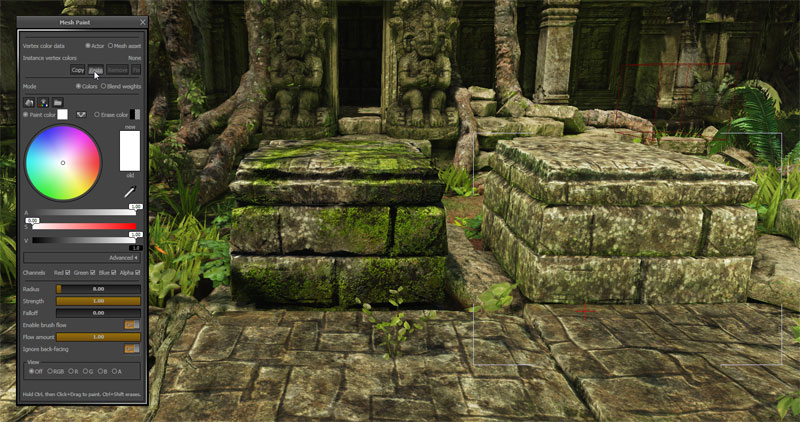
Mesh Paint Reference
Overview
Quick guide
- Activate the Mesh Paint Mode and select your mesh actor
- Make sure the material assigned to your mesh makes use of vertex color or alpha
- Set your paint color and adjust other brush properties appropriately
- While holding down the Ctrl key, click and drag on your mesh to apply paint!
Mesh Paint Mode
 While in this mode, you can still perform most common editor actions like camera movement and selection, but certain features are disabled. Also, you'll notice that your perspective viewport will be forced to real-time mode which is a requirement of this system.
Painting on Meshes
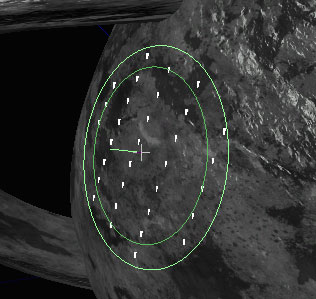 You can think of the paint brush as a cylinder projected along the surface normal of the mesh geometry, centered at the point on the mesh under your cursor. The circular brush outline shows you the radius of the brush. The inner circle shows the brush's falloff (or inner radius.) You probably figured this out already, but the small line sticking out from center of the brush is the mesh surface normal.
To paint, hold down the Control key, then click and drag over the mesh's surface. You can also hold down the Shift key to erase instead.
Paint will be applied to the surface each time you click, and also each time the mouse position changes (dragging). Also, if brush flow is enabled, paint will be applied every time the scene is rendered.
You can think of the paint brush as a cylinder projected along the surface normal of the mesh geometry, centered at the point on the mesh under your cursor. The circular brush outline shows you the radius of the brush. The inner circle shows the brush's falloff (or inner radius.) You probably figured this out already, but the small line sticking out from center of the brush is the mesh surface normal.
To paint, hold down the Control key, then click and drag over the mesh's surface. You can also hold down the Shift key to erase instead.
Paint will be applied to the surface each time you click, and also each time the mouse position changes (dragging). Also, if brush flow is enabled, paint will be applied every time the scene is rendered.
 Note that you can only paint in perspective viewport windows.
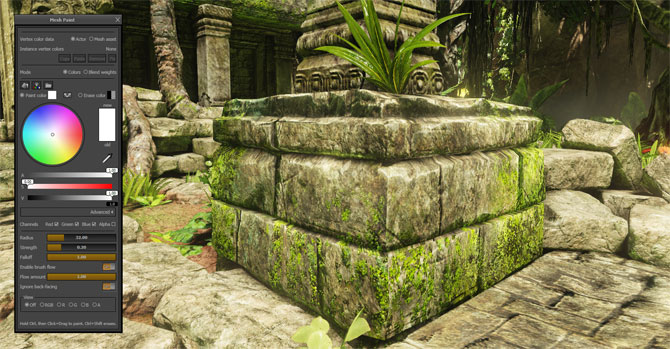
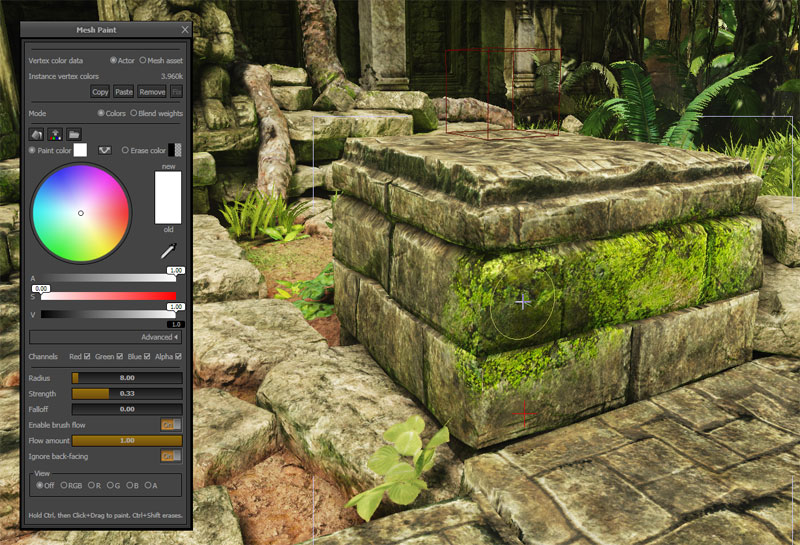
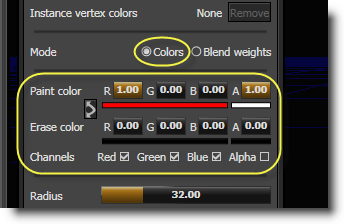
Painting Colors
The default Mesh Paint mode is to paint color data (Red, Green, Blue, Alpha) directly. You can select a paint and erase color and then apply those colors to the mesh using the brush. This mode is useful when your material is configured to combine the vertex color with your pixel shader in some interesting way. When the painting mode is set to colors you have these options available: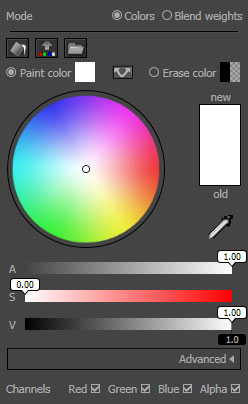
 | "Fills" the mesh or instance being painted using the Paint color, respecting the Channels settings. |
 | Copies the vertex colors from the selected instance(s) to the source mesh asset. |
 | Imports a .TGA image file to use to populate the vertex colors of the selected instance(s). |
 | The color that will be applied while painting (Ctrl + LMB + Drag). A swatch displays a preview of the current color. The color can be set using the Color Picker built-in to the tool. |
 | The color to use as your "eraser" color while erasing (Ctrl + Shift + LMB + Drag). A swatch displays a preview of the current color. The color can be set using the Color Picker built-in to the tool. |
 | Swaps the Paint color and Erase color. |
 | These check boxes set which color/alpha channels should be affected by the paint brush. |
Brush Settings
This section describes the brush settings common between all of the tool's modes. Note that for the options controlled by sliders, you can click and drag to change the value quickly, or you can click and type in a number if needed.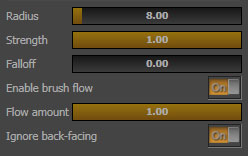
| Setting | Description |
|---|---|
| Radius | The radius of the brush in Unreal units. In addition, the brush has a depth-based falloff that's equal to half of this radius. |
| Strength | Sets the amount of paint to apply each time you click or move the mouse cursor while painting is enabled. Also if brush flow is enabled, a percentage (flow amount) of the brush's strength will be applied to the surface. |
| Falloff | Sets how the brush's strength falls off with distance. A falloff value of 1.0 means that the center of the brush is 100% strong and fades linearly towards the radius of the brush. A falloff value of 0.5 means that the brush is 100% strong half way towards the radius, then falls off linearly. A falloff value of 0.0 means the brush is 100% strong over the entire radius. Note that depth-based falloff is always active, regardless of this setting. |
| Enable brush flow | This option configures the brush to apply paint every single render frame, even when you're not moving the cursor. It yields results similar to an airbrush. |
| Flow amount | When Enable brush flow is turned on, this sets the strength of the brush when paint is applied every render frame, as a percentage of the brush's strength. |
| Ignore back-facing | When enabled, triangles facing away from the camera are ignored and won't be affected by the paint brush. |
Asset vs Instance
While the mesh paint tool allows you to paint on the actual mesh source asset, most of the time you'll probably want to paint on an instance of that mesh placed into a level. For example, if you had a pillar mesh that was placed in four locations in your map you could paint each instance uniquely. Use the Vertex color data option to set whether the Mesh Paint tool edits either the instance of the actor in the map, or the actual mesh source asset.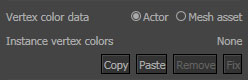
| Option | Description |
|---|---|
| Actor | Paints color data stored in the instance of the static mesh component in the level |
| Mesh asset | Edits the color data stored in the original mesh asset, potentially shared in many levels |
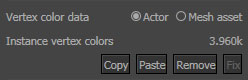 This displays the number of bytes of memory used by the vertex color data (stored in the map package.) This value reflects the total for all assets that are currently selected.
| Command | Description |
|---|---|
| Copy | Copies the instance vertex color data for the selected mesh. See Sharing Instance Color Data for more information. |
| Paste | Pastes instance vertex color data that was previously copied. See Sharing Instance Color Data for more information. |
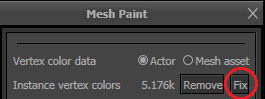
| Remove | Discard the data for all selected meshes and restores the default vertex colors. |
| Fix | Attempts to match stored instance data on re-imported meshes with different vertex counts. See Vertex Color Matching for more information. |
Sharing Instance Color Data
There may be cases where you want to paint a mesh and then share those vertex colors with other instances of the mesh in the same level. For example, if you had a pillar mesh you were using in an outdoor map and you wanted to paint the base of the pillar green, and have all instances in that map only appear that way. Instanced vertex color data can be copied and pasted between instances in the level very easily using the Copy and Paste buttons in the Mesh Paint Dialog. To Copy Instanced Color Data:- Select the instance that contains the color data to be copied and press the Copy button.

- Select the instance(s) to copy the color data to and press the Paste button.
- The color data should now be applied to all of the instances.

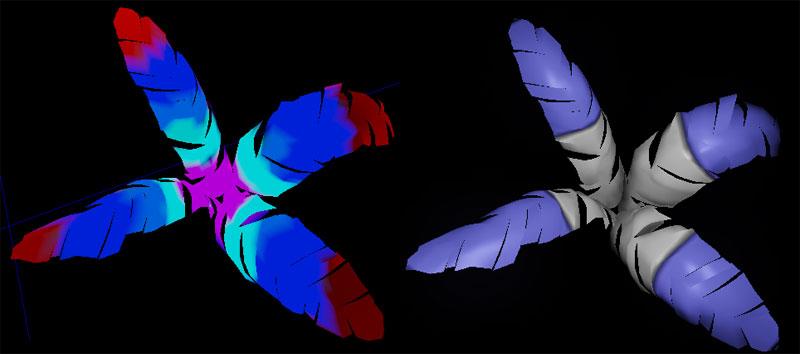
Vertex Color Matching
When a static mesh is reimported with a different vertex count than the number of vertex colors on the instance you got errors like this in map checks and during cooking:StaticMeshActor_73 (LOD 0) has hand-painted vertex colors that no longer match the original StaticMesh
 This feature will only be available if a mesh needs fixup; otherwise, it will be disabled. The tool works well in most cases especially when you are only making small tweaks. The more drastic the change to the mesh, the more unlikely the colors will match. The feature is designed to always match some color even if the changes are drastic. We elected not to make this tool automatic because that would prevent people from easily opting out of the fixup if they didn't like the results. Additionally, adding the feature to mesh paint means you can easily touchup after the fix is applied.
Original mesh:
This feature will only be available if a mesh needs fixup; otherwise, it will be disabled. The tool works well in most cases especially when you are only making small tweaks. The more drastic the change to the mesh, the more unlikely the colors will match. The feature is designed to always match some color even if the changes are drastic. We elected not to make this tool automatic because that would prevent people from easily opting out of the fixup if they didn't like the results. Additionally, adding the feature to mesh paint means you can easily touchup after the fix is applied.
Original mesh:
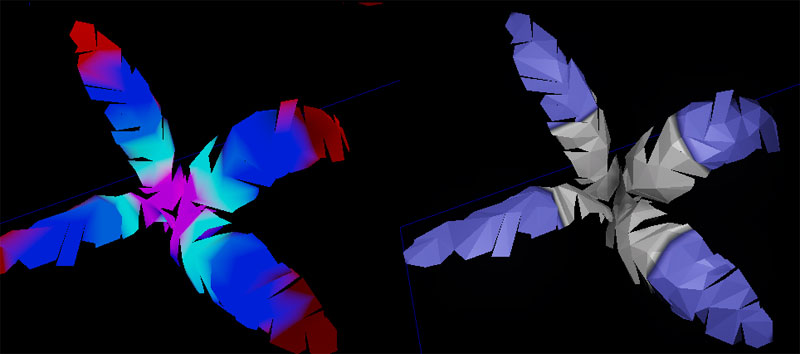
 Lower poly mesh with Fixup applied:
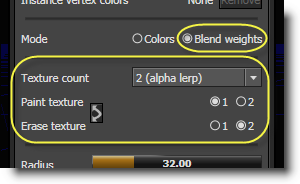
Colors vs Blend Weights
Instead of painting colors directly, you can switch the tool to paint texture blend weights. This is useful as often you'll configure your material to use the vertex color channels as blend factors between two or more textures. The Mesh Paint tool will help you out here by automatically normalizing your blend weights as you paint. You simply select a texture index and start painting, and the tool will make sure the color/alpha values are set correctly. When the paint mode is set to blend weights you have these options available.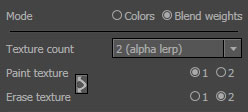
| Texture count | Configures the blend weight "strategy" by setting the number of textures you're blending between in the material associated with the mesh. When you change this option, the choices available for Paint texture and Erase texture will update. See the section about Blend weight material setup for more information. |
|---|---|
| Paint texture | Selects the texture index to apply each time you click or move the mouse cursor while painting is enabled. (Ctrl+LMB+drag) |
| Erase texture | The texture index to use as your "eraser" texture while erasing. (Ctrl+Shift+LMB+drag) |
View Modes
You can use the view mode controls to visualize vertex color and alpha values in the perspective viewport.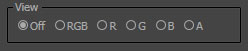
| Off | Restores default editor view mode |
|---|---|
| RGB | Displays static meshes unlit with only RGB vertex colors |
| R | Displays static meshes unlit with only red vertex color |
| G | Displays static meshes unlit with only green vertex color |
| B | Displays static meshes unlit with only blue vertex color |
| A | Displays static meshes unlit with only vertex alpha |
Setting up Materials
EngineMaterials.upk that demonstrate possible uses for the Mesh Paint tool. Use the Content Browser to search for TexturePaint or VertexPaint to see these.
Here's an example of how you might use the vertex alpha value to blend between two diffuse textures in the material editor.
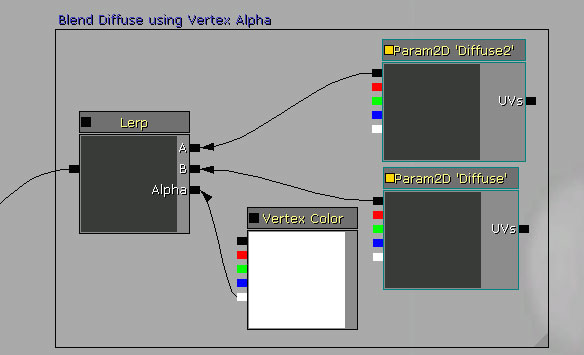
Material Example
This example uses theVertexPaint_2Tex_Color material which can be found in EngineMaterials.upk. It's an example material that does three special things:
- Modulates diffuse color by the painted vertex color (RGB)
- Blends between two separate diffuse textures (Diffuse, Diffuse2) using the blend weight stored in the vertex alpha channel (A)
- Blends between two separate normal textures (Normal, Normal2) using the blend weight stored in the vertex alpha channel (A)
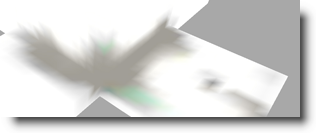
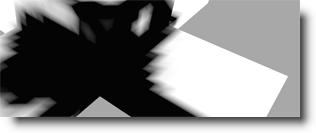
 Next the vertex alpha (A) is painted using the "Blend Weight" paint mode. This value will be used to interpolate between a pair of diffuse/normal textures. This screenshot shows the mesh in the "alpha only" (A) view mode.
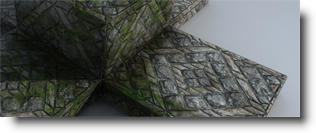
 Finally, here is the end result, fully lit and shaded.