UDN
Search public documentation:
GettingStartedContent
日本語訳
中国翻译
한국어
Interested in the Unreal Engine?
Visit the Unreal Technology site.
Looking for jobs and company info?
Check out the Epic games site.
Questions about support via UDN?
Contact the UDN Staff
中国翻译
한국어
Interested in the Unreal Engine?
Visit the Unreal Technology site.
Looking for jobs and company info?
Check out the Epic games site.
Questions about support via UDN?
Contact the UDN Staff
UE3 Home > Getting Started Overview > Getting Started: Content Creation
Getting Started: Content Creation
Overview
Content Import Pipeline
- Click the
 button in the Content Browser.
- Navigate to and select the FBX file containing the content to import.
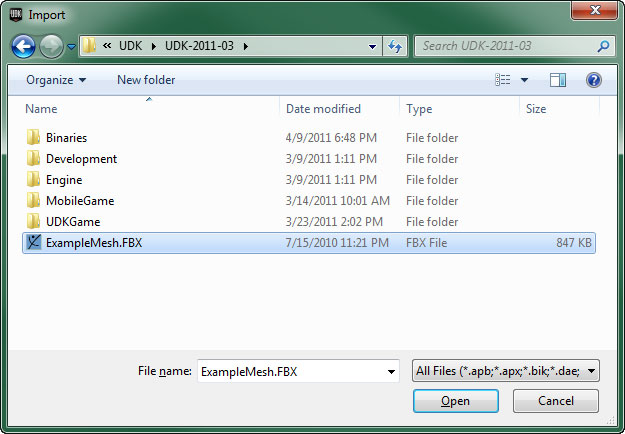
- In the Import dialog that appears, choose the appropriate settings and click the
 button. (See FBX Import Properties for complete details on the available options)

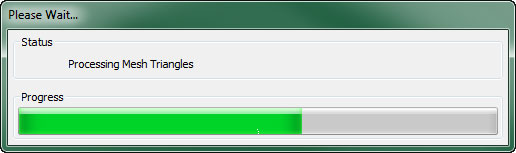
- The import process will begin, displaying the progress:
Static Meshes
 These meshes can be used for several different types of Actors being placed in a level. Most commonly, a static mesh will be the visual representation of a StaticMeshActor to create world geometry and decorations, an InterpActor to create moving objects, or a KActor to create rigid body physics objects. In reality, any Actor that has a StaticMeshComponent can use a static mesh.
For a guide on creating and importing static meshes, see the FBX Static Mesh Pipeline page.
Static Mesh Editor
Once imported, Static Meshes can be viewed and certain aspects can be modified in the Static Mesh Editor.
These meshes can be used for several different types of Actors being placed in a level. Most commonly, a static mesh will be the visual representation of a StaticMeshActor to create world geometry and decorations, an InterpActor to create moving objects, or a KActor to create rigid body physics objects. In reality, any Actor that has a StaticMeshComponent can use a static mesh.
For a guide on creating and importing static meshes, see the FBX Static Mesh Pipeline page.
Static Mesh Editor
Once imported, Static Meshes can be viewed and certain aspects can be modified in the Static Mesh Editor.
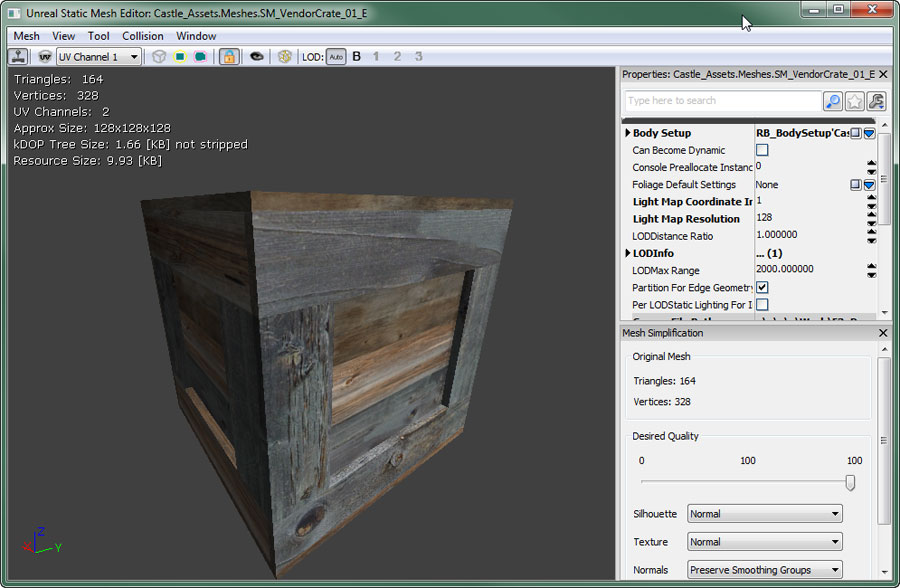 This is where global properties of the mesh can be modified, LOD meshes can be imported, UV sets can be managed, and simplified collision geometry can be added or removed.
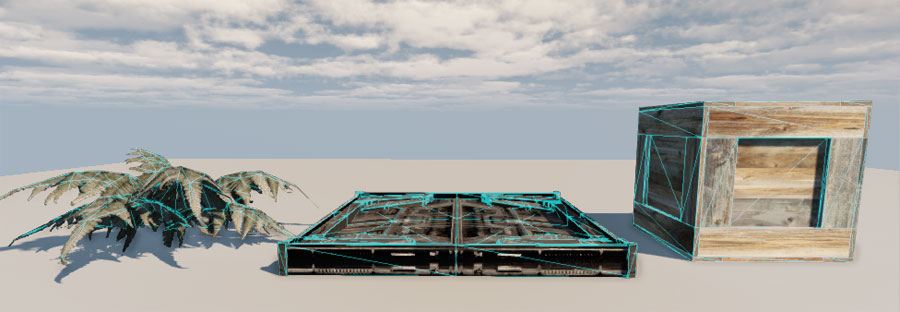
Collision
Static meshes can have collision calculated against the actual triangles of the render mesh if desired, but generally they use separate simplified collision geometry to reduce the complexity of the collision calculation and improve perofrmance. In the image below, the red and green wireframes show the geometry used for collisions. You can see it is much simpler than the shaded render mesh, but defines the general shape which is usually good enough for collision calculations in most situations.
This is where global properties of the mesh can be modified, LOD meshes can be imported, UV sets can be managed, and simplified collision geometry can be added or removed.
Collision
Static meshes can have collision calculated against the actual triangles of the render mesh if desired, but generally they use separate simplified collision geometry to reduce the complexity of the collision calculation and improve perofrmance. In the image below, the red and green wireframes show the geometry used for collisions. You can see it is much simpler than the shaded render mesh, but defines the general shape which is usually good enough for collision calculations in most situations.
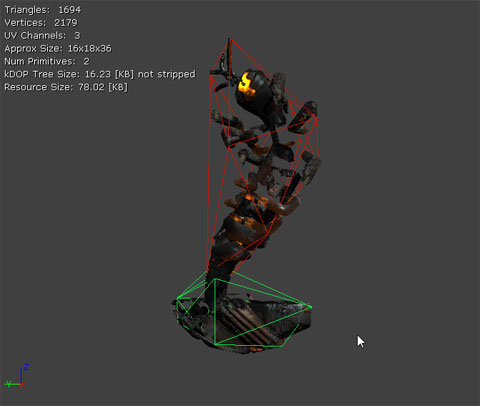 Simplified collision geometry can be created in an external modeling application and imported along with the render mesh. This allows for completely customized collision geometry. The Static Mesh Editor also contains tools for adding simplified collision geometry to imported meshes. These tools are less flexible, but can work well in certain circumstances.
An overview of collision for static meshes can be found in the Collision Reference.
Level of Detail (LOD)
A level of detail system is built in to allow each StaticMesh asset to render different meshes depending on the size of the mesh on the screen. This can be a great optimization as you can have meshes of varying complexity, each with their own material(s); rendering a detailed mesh up close and switching to meshes with lower detail as the cammera gets farther away and intricate details become unnecessary.
Simplified collision geometry can be created in an external modeling application and imported along with the render mesh. This allows for completely customized collision geometry. The Static Mesh Editor also contains tools for adding simplified collision geometry to imported meshes. These tools are less flexible, but can work well in certain circumstances.
An overview of collision for static meshes can be found in the Collision Reference.
Level of Detail (LOD)
A level of detail system is built in to allow each StaticMesh asset to render different meshes depending on the size of the mesh on the screen. This can be a great optimization as you can have meshes of varying complexity, each with their own material(s); rendering a detailed mesh up close and switching to meshes with lower detail as the cammera gets farther away and intricate details become unnecessary.
 LOD meshes for a StaticMesh asset can be imported and set up within the Static Mesh Editor.
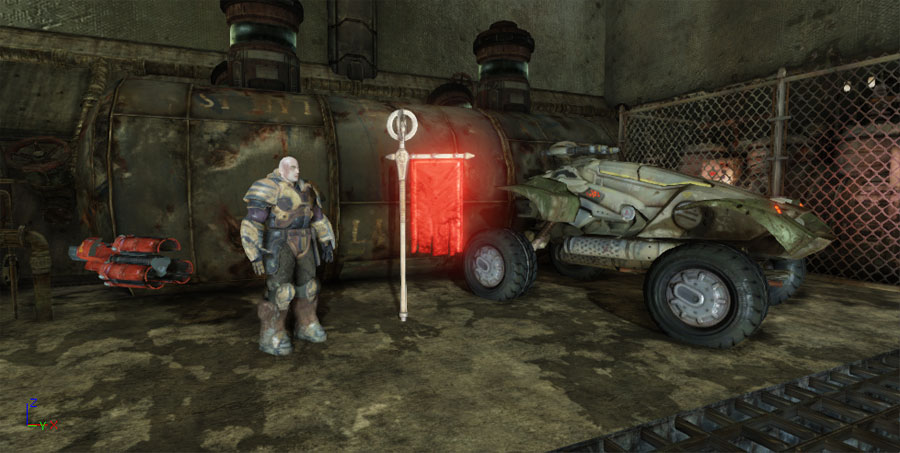
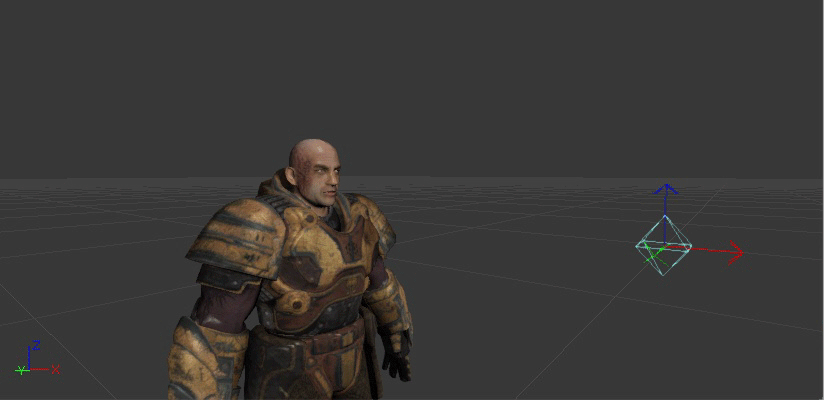
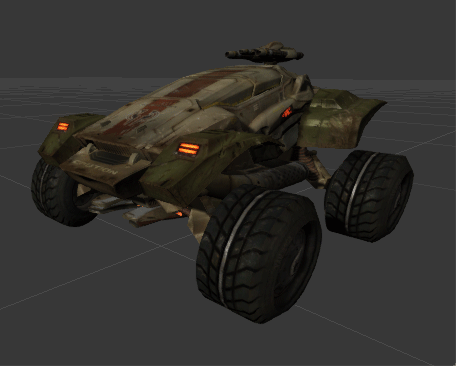
Skeletal Meshes
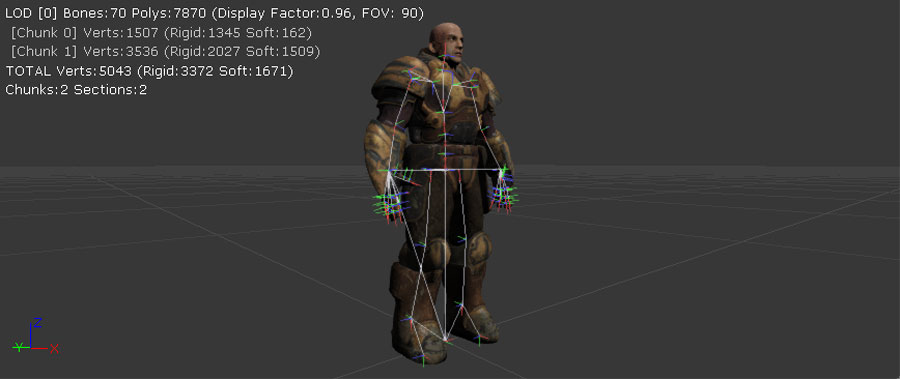 These meshes can be animated; or rather animation can be applied to the skeletons of the meshes to animate them. They can also have morph targets applied and their bones can be controlled individually by Skeletal Controllers. These meshes can also have special locators created called Sockets that are attached and/or offset from bones in the skeleton to which items can be attached.
Skeletal Meshes are typically used for characters, weapons, vehicles, and any other items that require complex animations beyond simple translation and rotation.
These meshes can be animated; or rather animation can be applied to the skeletons of the meshes to animate them. They can also have morph targets applied and their bones can be controlled individually by Skeletal Controllers. These meshes can also have special locators created called Sockets that are attached and/or offset from bones in the skeleton to which items can be attached.
Skeletal Meshes are typically used for characters, weapons, vehicles, and any other items that require complex animations beyond simple translation and rotation.
 For a guide on creating and importing skeletal meshes, see the FBX Skeletal Mesh Pipeline page.
Physics Assets
Physics Assets are objects which contain the physical setup for a Skeletal mesh which is used for calculating their physics simulation and collision. They are essentially a collection of rigid bodies joined together by constraints to mimic the shape and desired movement abilities of the Skeletal mesh.
For a guide on creating and importing skeletal meshes, see the FBX Skeletal Mesh Pipeline page.
Physics Assets
Physics Assets are objects which contain the physical setup for a Skeletal mesh which is used for calculating their physics simulation and collision. They are essentially a collection of rigid bodies joined together by constraints to mimic the shape and desired movement abilities of the Skeletal mesh.
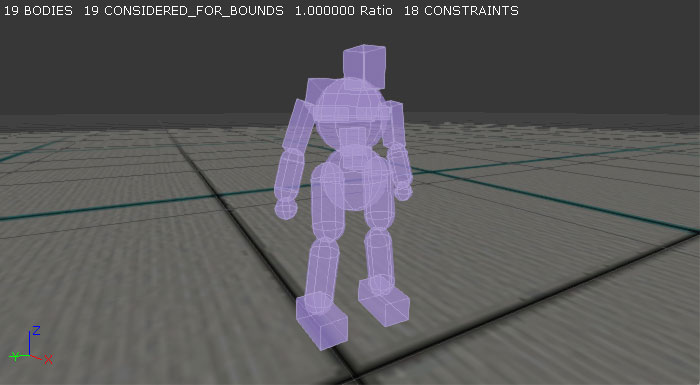 Physics Assets are created and modified in the PhAT physics editor. This is a tool for graphically editing the bodies and constraints that constitute the Physics Asset.
 For a guide to using the PhAT editor, see the PhAT User Guide.
Animations
Animations, or animation sequences, are collections of keyframe data that specify the translation and rotation of a single bone at a specific time. Each animation sequence contains all the necessary keyframes for all of the bones in the skeleton for the particular animation. Unreal Engine 3 uses these animation sequences to control the animation of Skeletal Meshes in the game.
For a guide to using the PhAT editor, see the PhAT User Guide.
Animations
Animations, or animation sequences, are collections of keyframe data that specify the translation and rotation of a single bone at a specific time. Each animation sequence contains all the necessary keyframes for all of the bones in the skeleton for the particular animation. Unreal Engine 3 uses these animation sequences to control the animation of Skeletal Meshes in the game.
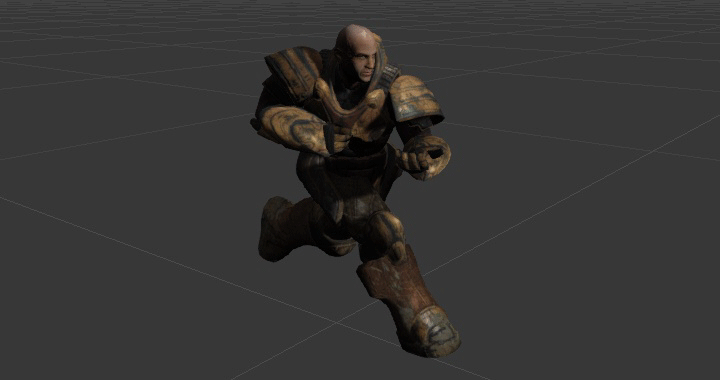 A collection of related animation sequences can be grouped into a container called an AnimSet. Usually, all of the animations for a particular Skeletal Mesh or group of Skeletal Meshes sharing a common skeletal setup will be in a single AnimSet.
Animations can be previewed and modified in certain ways within the AnimSet Editor in UnrealEd. For a complete overview of viewing and modifying animations, see the AnimSet Editor User Guide.
For a more detailed overview of the animation system within Unreal Engine 3, visit the Animation Overview page. For a guide to importing animations into Unreal Engine 3, see the FBX Animation Pipeline.
Animation Trees
Unreal Engine 3 uses the idea of 'blend trees', called AnimTrees, to blend together multiple sources of animation data. This method allows you to cleanly organize the way in which a number of animations are blended together, and lets you easily add more animations in predictable ways as you progress. These are typically used for players and other characters to control and blend between the different movement animations.
A collection of related animation sequences can be grouped into a container called an AnimSet. Usually, all of the animations for a particular Skeletal Mesh or group of Skeletal Meshes sharing a common skeletal setup will be in a single AnimSet.
Animations can be previewed and modified in certain ways within the AnimSet Editor in UnrealEd. For a complete overview of viewing and modifying animations, see the AnimSet Editor User Guide.
For a more detailed overview of the animation system within Unreal Engine 3, visit the Animation Overview page. For a guide to importing animations into Unreal Engine 3, see the FBX Animation Pipeline.
Animation Trees
Unreal Engine 3 uses the idea of 'blend trees', called AnimTrees, to blend together multiple sources of animation data. This method allows you to cleanly organize the way in which a number of animations are blended together, and lets you easily add more animations in predictable ways as you progress. These are typically used for players and other characters to control and blend between the different movement animations.
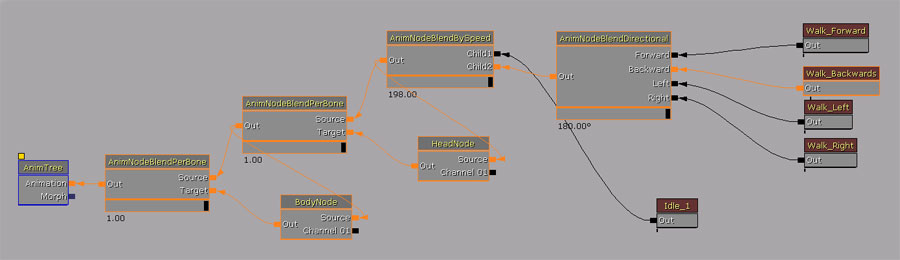 AnimTrees also provide the ability to use Skeletal Controllers and Morph Targets, which are detailed below. Vehicles also make use of AnimTrees for any animations that may be needed and for visible localized damage through the use of morph targets and direct control of bones through skeletal controllers.
For information on creating and editing AnimTrees, see the AnimTree Editor User Guide.
Skeletal Controllers
Skeletal Controllers, or SkelControls, allow you to modify a bone or set of bones in a skeletal mesh programmatically. For instance, there are skeletal controllers for transforming a single bone arbitrarily, forcing one bone to look at another bone or other location, setting up an IK limb solver, and so on.
AnimTrees also provide the ability to use Skeletal Controllers and Morph Targets, which are detailed below. Vehicles also make use of AnimTrees for any animations that may be needed and for visible localized damage through the use of morph targets and direct control of bones through skeletal controllers.
For information on creating and editing AnimTrees, see the AnimTree Editor User Guide.
Skeletal Controllers
Skeletal Controllers, or SkelControls, allow you to modify a bone or set of bones in a skeletal mesh programmatically. For instance, there are skeletal controllers for transforming a single bone arbitrarily, forcing one bone to look at another bone or other location, setting up an IK limb solver, and so on.
 SkelControls are set up in the AnimTree Editor and can be connected together to form chains, each affecting a single bone, where each SkelControl is applied to the result of the previous.
For an overview of Skeletal Controllers and using them to manipulate Skeletal Meshes, see the Using Skeletal Controllers page.
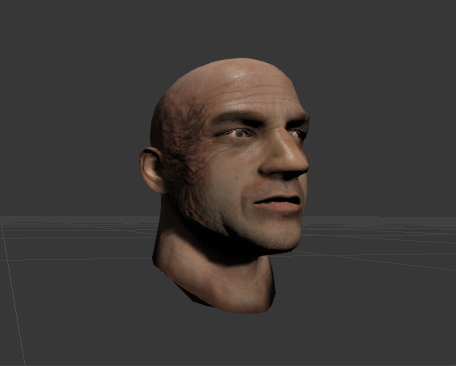
Morph Targets
Morph Targets are a way to modify a Skeletal Mesh in real-time, but with more control than bone-based skeletal animation. A static Morph Target is a version of an existing skeletal mesh that has the same underlying geometry in terms of vertices and faces, but the vertices have been positioned differently.
For example, you might create a 'smiling' version for a character in your 3D modeling program, and import that as a 'smile' morph target. Then in the game you can apply this morph target to modify the vertices on the face and make your character smile, but with a great deal of control over how each vertex moves.
SkelControls are set up in the AnimTree Editor and can be connected together to form chains, each affecting a single bone, where each SkelControl is applied to the result of the previous.
For an overview of Skeletal Controllers and using them to manipulate Skeletal Meshes, see the Using Skeletal Controllers page.
Morph Targets
Morph Targets are a way to modify a Skeletal Mesh in real-time, but with more control than bone-based skeletal animation. A static Morph Target is a version of an existing skeletal mesh that has the same underlying geometry in terms of vertices and faces, but the vertices have been positioned differently.
For example, you might create a 'smiling' version for a character in your 3D modeling program, and import that as a 'smile' morph target. Then in the game you can apply this morph target to modify the vertices on the face and make your character smile, but with a great deal of control over how each vertex moves.
 Morph targets are also commonly used for creating the appearance of damage on vehicles or other objects.
 For more information on Morph Targets and their use, visit the Morph Targets page.
Sockets
Sockets are essentially named locators that can be attached to, and offset from, a bone of a Skeletal Mesh. These provide a simple means of attaching other objects, such as particle effects or other meshes, to Skeletal Meshes in specific locations that can be set up by artists in the AnimSet Editor and referenced by programmers in code.
For more information on Morph Targets and their use, visit the Morph Targets page.
Sockets
Sockets are essentially named locators that can be attached to, and offset from, a bone of a Skeletal Mesh. These provide a simple means of attaching other objects, such as particle effects or other meshes, to Skeletal Meshes in specific locations that can be set up by artists in the AnimSet Editor and referenced by programmers in code.
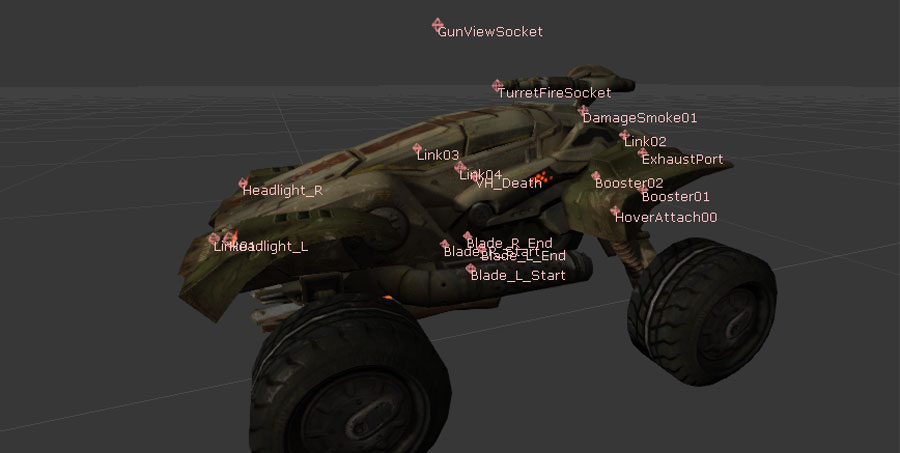 A detailed overview of sockets can be found on the SkeletalMesh Sockets page.
Materials and Textures
- Diffuse
- DiffusePower
- Emissive
- Specular
- SpecularPower
- Opacity
- OpacityMask
- Distortion
- TransmissionMask
- TransmissionColor
- Normal
- CustomLighting
- CustomLightingDiffuse
- AnisotropicDirection
- WorldPositionOffset
- Displacement
- TessellationFactors
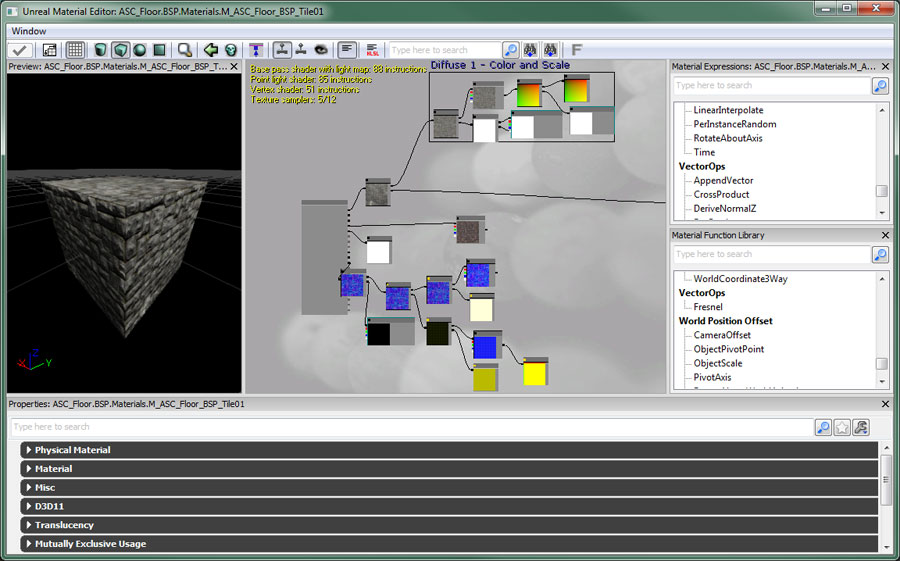 A complete reference of every material expression can be found in the Materials Compendium. Various examples of common and useful material creation techniques and effects can be found on the Material Examples page.
Instanced Materials
In Unreal Engine 3, material instancing may be used to change the appearance of a material without incurring an expensive recompilation of the material. General modification of the material cannot be supported without recompilation, so the instances are limited to changing the values of predefined material parameters. The parameters are statically defined in the compiled material by a unique name, type and default value. An instance of a material can dynamically provide new values for these parameters with very little expense.
For details on instanced materials in Unreal Engine 3, visit the Instanced Materials page. For an overview of the Material Instance Editor, see the MaterialInstanceEditorUserGuide.
Material Instance Constant
The MaterialInstanceConstant object allows for users to override the defined parameters set on a material, creating customized instances of a given material. The parameters of the instanced material can be setup by artists to create variations on a theme, modified by level designers using Matinee, or modified by programmers through code during play.
A simple example of using MaterialInstanceConstants to create variation is shown below:
A complete reference of every material expression can be found in the Materials Compendium. Various examples of common and useful material creation techniques and effects can be found on the Material Examples page.
Instanced Materials
In Unreal Engine 3, material instancing may be used to change the appearance of a material without incurring an expensive recompilation of the material. General modification of the material cannot be supported without recompilation, so the instances are limited to changing the values of predefined material parameters. The parameters are statically defined in the compiled material by a unique name, type and default value. An instance of a material can dynamically provide new values for these parameters with very little expense.
For details on instanced materials in Unreal Engine 3, visit the Instanced Materials page. For an overview of the Material Instance Editor, see the MaterialInstanceEditorUserGuide.
Material Instance Constant
The MaterialInstanceConstant object allows for users to override the defined parameters set on a material, creating customized instances of a given material. The parameters of the instanced material can be setup by artists to create variations on a theme, modified by level designers using Matinee, or modified by programmers through code during play.
A simple example of using MaterialInstanceConstants to create variation is shown below:
 Details on Material Instance Constant assets can be found on the MaterialInstanceConstant page.
Material Instance Time Varying
A Material Instance Time Varying is another type of InstancedMaterial in UE3. Its primary purpose is to put more of the control over how materials change over time into the content team's hands. Usually to have time varying materials you have to have code driving the parameters which we want to avoid.
More information over using time varying material instances can be found on the Material Instance Time Varying page.
Textures
Materials make use of texture images for many different purposes. They can be used simply for their color information to be applied directly to the surface, but they can also be used as masks or for any other purpose where values must vary over the surface of an object. Textures are imported through the Content Browser.
For a guide to creating and importing textures, see the Importing Texture Tutorial. For complete details on the properties of textures in Unreal Engine 3, see the Texture Properties page.
Flipbook Textures
Flipbook textures are special textures which provide the ability to cycle through a series of sub-images, similar to the way particle SubUV animations work in ParticleSystems. However, flipbook textures can be used in materials and applied to any surface in the world. These are a simple way to create limited animations inside of materials without the need for using movie textures (Bink movies).
For information on using flipbook textures, see the Flipbook Textures page.
Render To Texture
The render-to-texture features of the engine allow you to dynamically capture the scene from different viewpoints to a texture resource. This allows for certain special effects such as remote cameras and surfaces that appear to be dynamically reflecting the scene.
For more information on using render textures, see the Render To Texture page.
Details on Material Instance Constant assets can be found on the MaterialInstanceConstant page.
Material Instance Time Varying
A Material Instance Time Varying is another type of InstancedMaterial in UE3. Its primary purpose is to put more of the control over how materials change over time into the content team's hands. Usually to have time varying materials you have to have code driving the parameters which we want to avoid.
More information over using time varying material instances can be found on the Material Instance Time Varying page.
Textures
Materials make use of texture images for many different purposes. They can be used simply for their color information to be applied directly to the surface, but they can also be used as masks or for any other purpose where values must vary over the surface of an object. Textures are imported through the Content Browser.
For a guide to creating and importing textures, see the Importing Texture Tutorial. For complete details on the properties of textures in Unreal Engine 3, see the Texture Properties page.
Flipbook Textures
Flipbook textures are special textures which provide the ability to cycle through a series of sub-images, similar to the way particle SubUV animations work in ParticleSystems. However, flipbook textures can be used in materials and applied to any surface in the world. These are a simple way to create limited animations inside of materials without the need for using movie textures (Bink movies).
For information on using flipbook textures, see the Flipbook Textures page.
Render To Texture
The render-to-texture features of the engine allow you to dynamically capture the scene from different viewpoints to a texture resource. This allows for certain special effects such as remote cameras and surfaces that appear to be dynamically reflecting the scene.
For more information on using render textures, see the Render To Texture page.
Particle Systems
 Particle systems are created through the Content Browser and constructed using Cascade, the particle editor.
Emitter Types
Unreal Engine 3 provides several different types of emitters which can be mixed and matched within the same ParticleSystem to create any desired effect. Sprite A sprite is a single camera-facing quad. When using the sprite data type, each particle emitted by the emitter will be a sprite with the emitter's material applied. This is the default type of all emitters, so there is no need (nor is it possible) to manually apply this type to an emitter in Cascade. AnimTrail
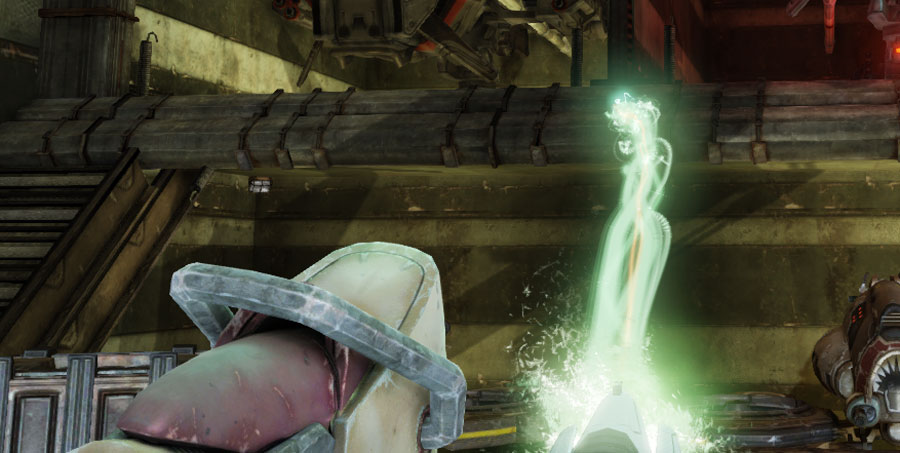
The AnimTrail data type causes multiple particles, with quads extending between them connected end-to-end, to be emitted to form a trail in response to the animation of a SkeletalMesh. These can be used to enhance the appearance of motion due to animations, such as a streak from a slashing sword.
See the AnimTrails page for more information on creating and using AnimTrail emitters.
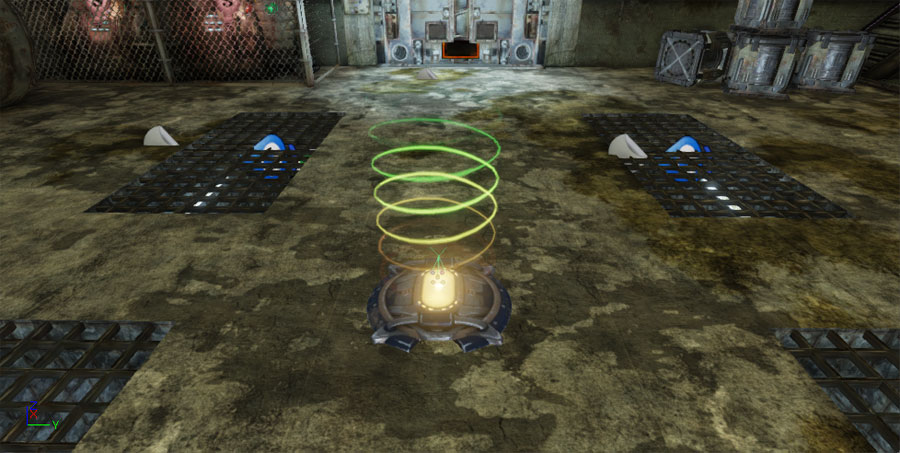
Beam
Beam emitters emit multiple particles, with quads extending between them connected end-to-end, between a source and target location to form a beam. These emitters can be used to create lasers or other beam-type effects.
AnimTrail
The AnimTrail data type causes multiple particles, with quads extending between them connected end-to-end, to be emitted to form a trail in response to the animation of a SkeletalMesh. These can be used to enhance the appearance of motion due to animations, such as a streak from a slashing sword.
See the AnimTrails page for more information on creating and using AnimTrail emitters.
Beam
Beam emitters emit multiple particles, with quads extending between them connected end-to-end, between a source and target location to form a beam. These emitters can be used to create lasers or other beam-type effects.
 Ribbon
The ribbon data type emits particles where each particle is connected to the previous one, with quads extending between them connected end-to-end, to form a ribbon-type effect. Ribbon emitters can be used to create more generic or arbitrary trails (as opposed to the animation driven AnimTrails mentioned previously).
Ribbon
The ribbon data type emits particles where each particle is connected to the previous one, with quads extending between them connected end-to-end, to form a ribbon-type effect. Ribbon emitters can be used to create more generic or arbitrary trails (as opposed to the animation driven AnimTrails mentioned previously).
 PhysX
The PhysX data types emit either sprites or meshes in a similar manner to the standard Sprite or Mesh data types, but the particles are controlled by a fluid physics simulation.
PhysX
The PhysX data types emit either sprites or meshes in a similar manner to the standard Sprite or Mesh data types, but the particles are controlled by a fluid physics simulation.
Modules
The appearance and behavior of the particles are controlled by a collection of modules. Each module controls a specific aspect determining how a particle looks or behaves. Examples of what can be controlled through modules include:- How long each particle lives
- Where particles are spawned from
- Direction and speed particles move
- How large are the particles
- The Color of the particles
- Direction and speed particles rotate
- Whether particles collide with geometry
Post Process Effects
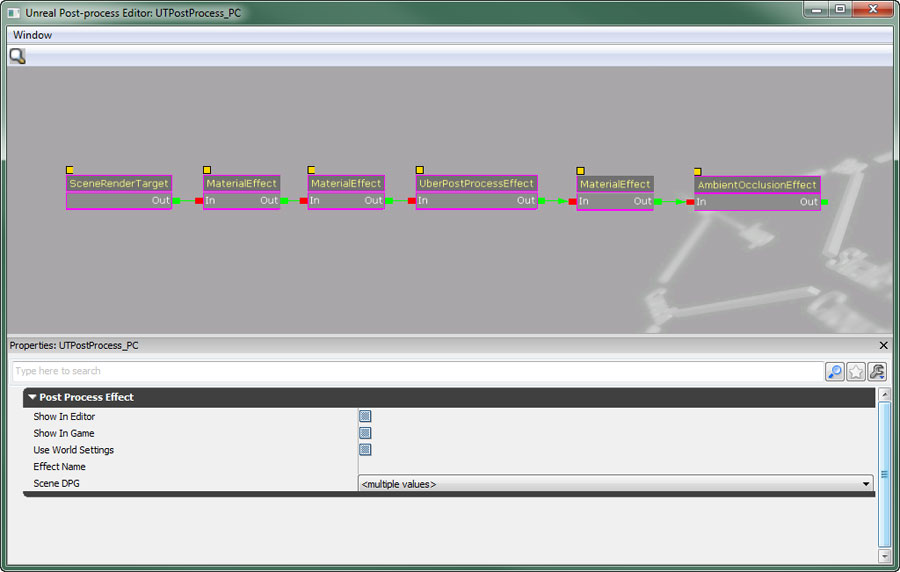 This node-based editor allows the various available effect modules to be added and arranged
For additional information over specific types of effects available in Unreal Engine 3, see the following pages:
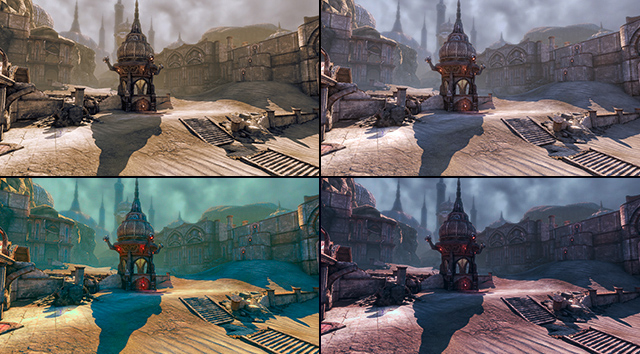
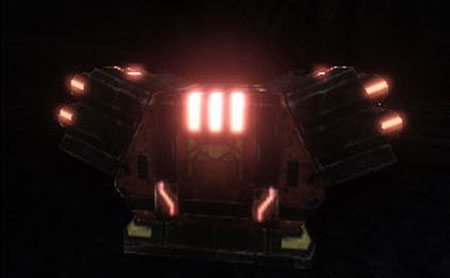
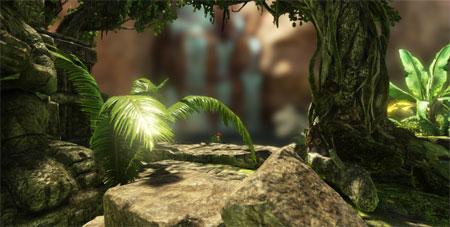
Bloom
Bloom is a type of glow effect that occurs when looking at very bright objects that are on a much darker background.
This node-based editor allows the various available effect modules to be added and arranged
For additional information over specific types of effects available in Unreal Engine 3, see the following pages:
Bloom
Bloom is a type of glow effect that occurs when looking at very bright objects that are on a much darker background.
 |  |
| Without Bloom | With Bloom |
 |  |
| Without Blur Effect | With Blur Effect (BlurKernel = 2) |
 |  |
| Without DoF Effect | With Dof Effect |
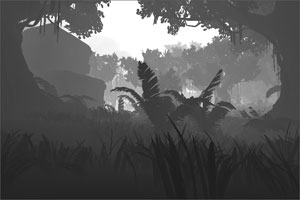 |  | 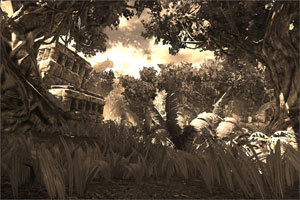 |
| Scene Depth Visualized | Distance-Based Desaturation | Sepia Tone Scene Tinting |
 |  |
| Without Motion Blur | With Motion Blur (and quick camera movement) |
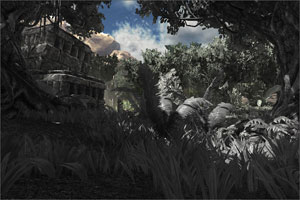
 |  |  |
| Without Ambient Occlusion | With Ambient Occlusion | Ambient Occlusion Only |